Automation requires proxy servers, but managing proxies while keeping your tasks running smoothly can be challenging. This is when browser extensions like FoxyProxy can help. They allow you to connect to a proxy, disconnect, and switch between multiple proxies with a single click.
In this guide, we’ll show you how to set up FoxyProxy on both Chrome and Firefox. We’ll also walk you through configuring and managing MarsProxies proxies in FoxyProxy for smooth, efficient workflows.
What is FoxyProxy?
FoxyProxy is a browser extension designed to make proxy management easier. Whether you’re using Chrome or Firefox, it lets you manage your proxy servers without having to adjust your browser’s proxy settings manually.
That means simplified and more efficient operations such as SEO monitoring, web scraping, multi-accounting, and accessing geo-restricted content.
FoxyProxy supports various proxy types, including residential and datacenter. It also works with HTTP, HTTPS, SOCKS5, and FTP protocols, so you can use it with almost any proxy service.
Some of its key features include:
- Rule lists - automate which sites to block to save time
- Multiple proxy profiles - switch between them without interrupting your workflow
- Import and export of proxies - use your proxies across different apps and devices
- Auto switch - set up automatic redirection for a smoother browsing experience
How to install FoxyProxy on Chrome
Follow the steps below to install FoxyProxy on Google Chrome.
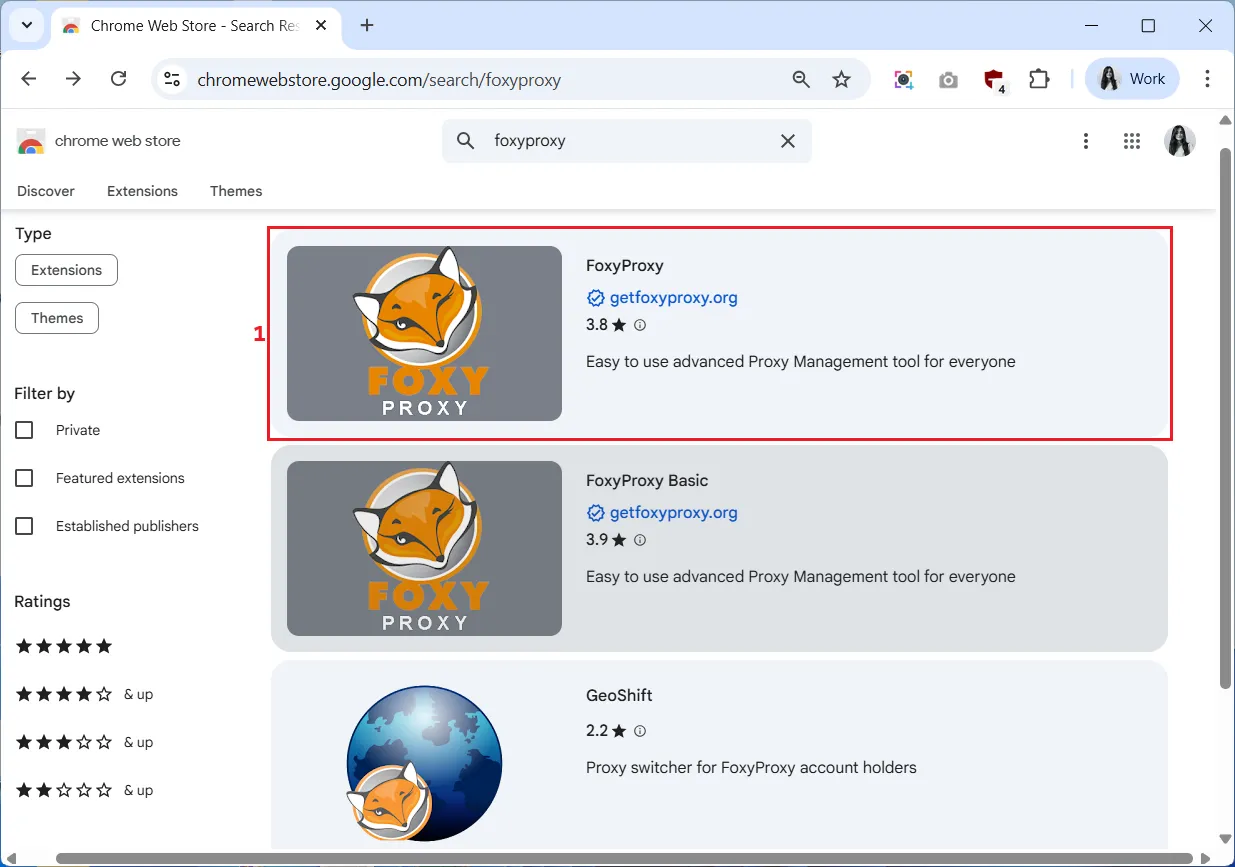
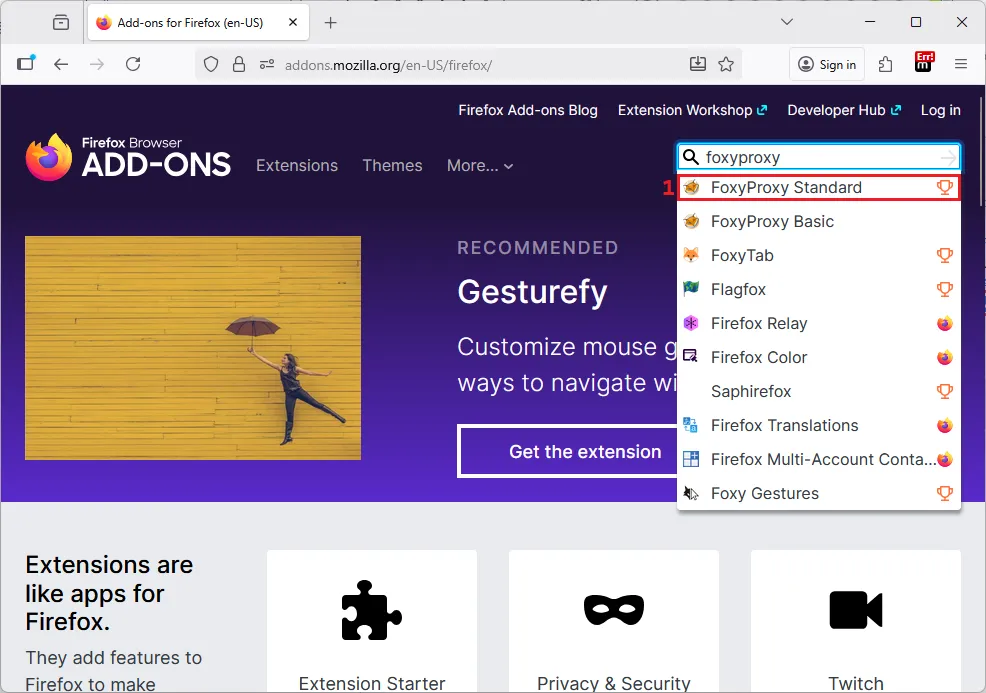
1. Open the Chrome Web Store and search for “FoxyProxy”. You can see two FoxyProxy extensions. Both are free and work the same, so we’ll go with the first or the standard version (1).
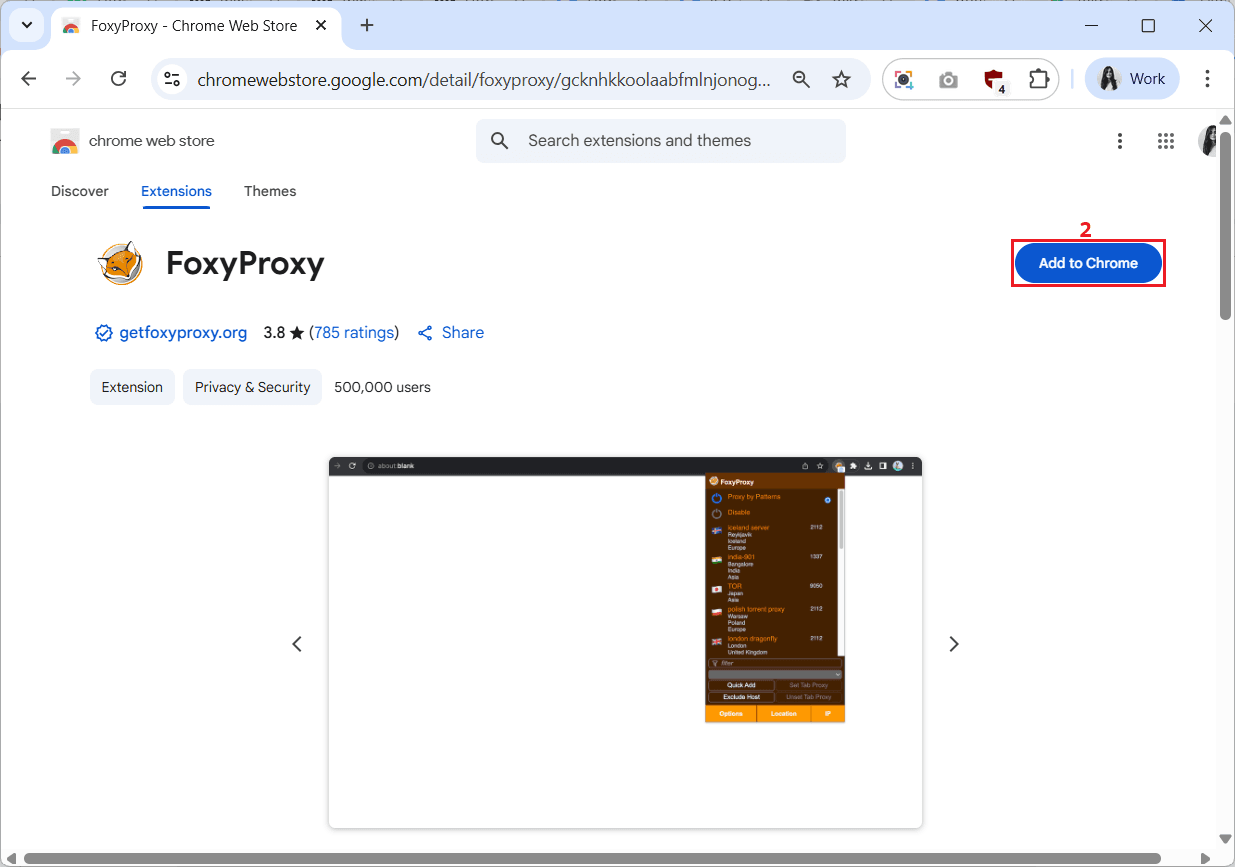
2. Click the ‘Add to Chrome’ (2) button on the right side of the screen.
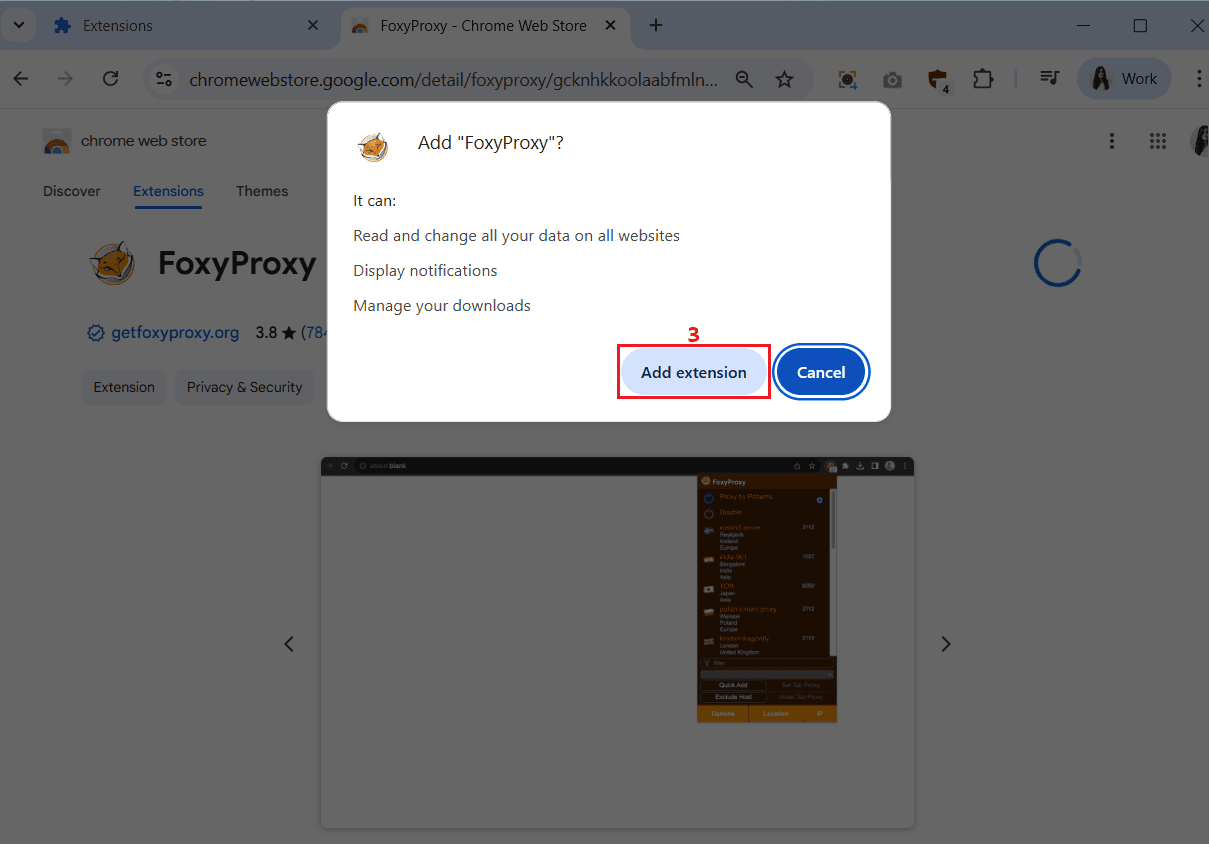
3. Select ‘Add extension’ (3) in the pop-up window.
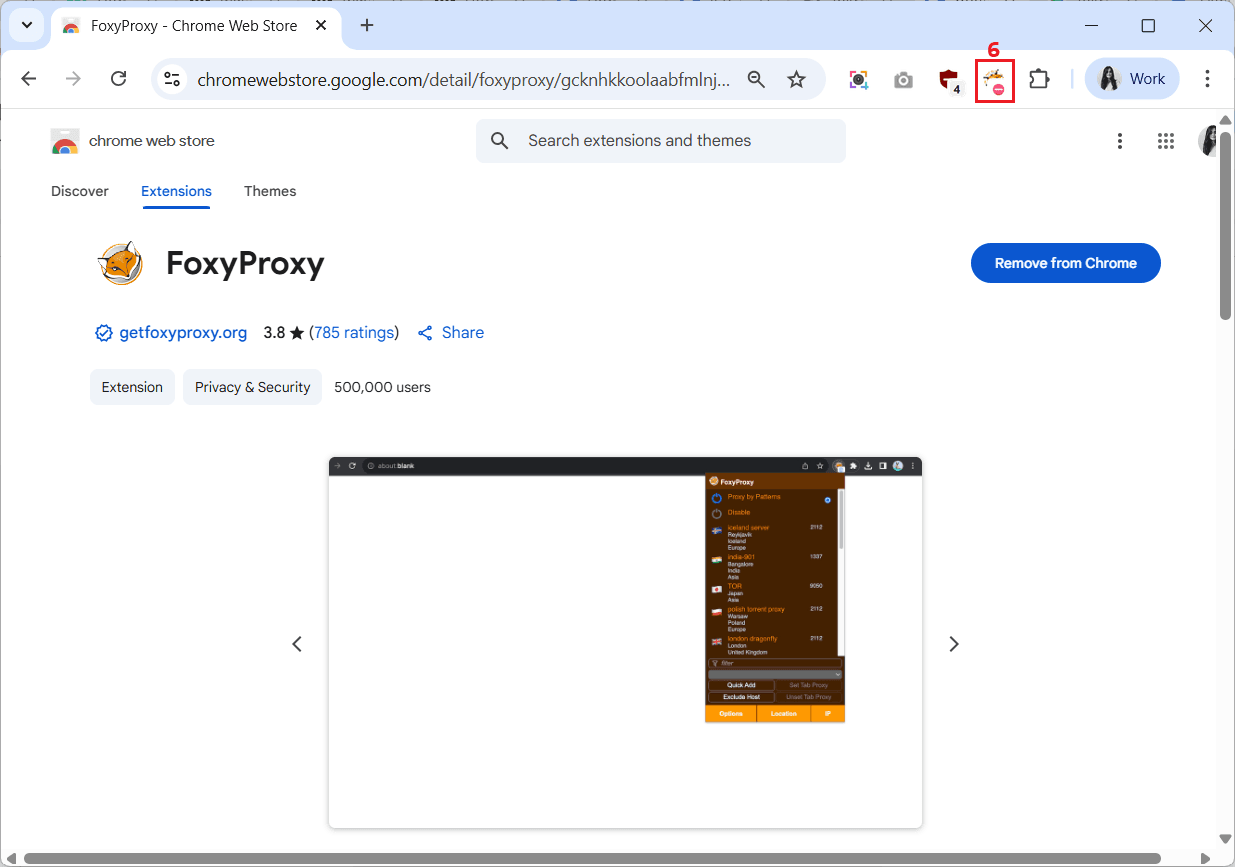
4. A notification will appear confirming that FoxyProxy has been added to Chrome.

5. Click on the ‘Extensions’ (4) icon and pin FoxyProxy (5) to your extensions display for easy access.
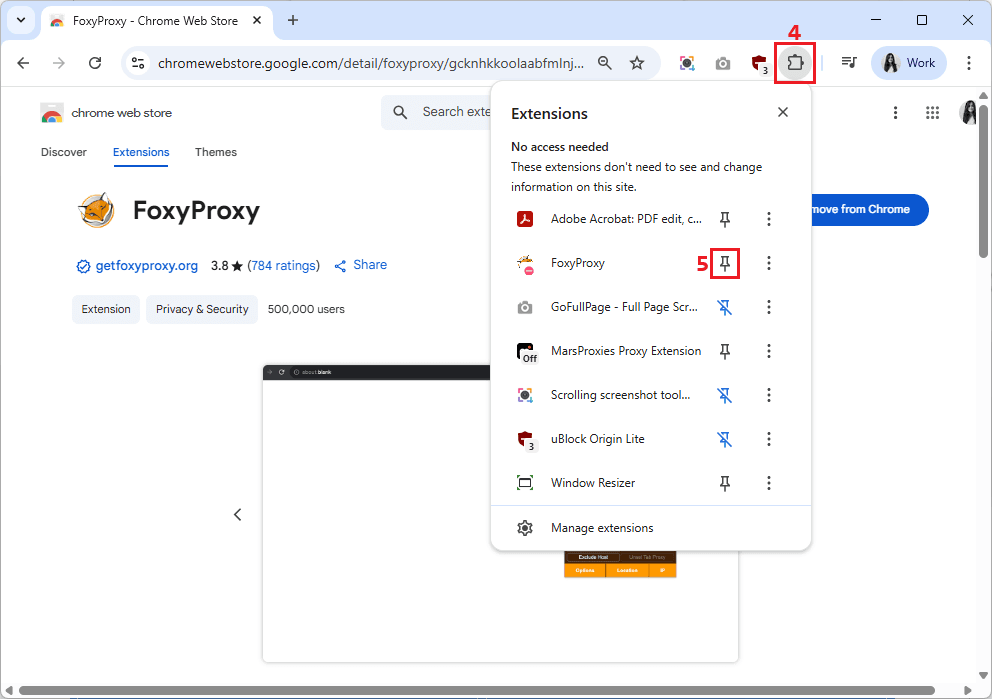
6. You should now see the FoxyProxy icon (6) in the Chrome toolbar.
How to install FoxyProxy on Firefox
Here are the steps to install FoxyProxy on Mozilla Firefox.
1. Go to Firefox Add-ons and type “FoxyProxy” in the search bar. Once again, we’ll choose the standard version (1).
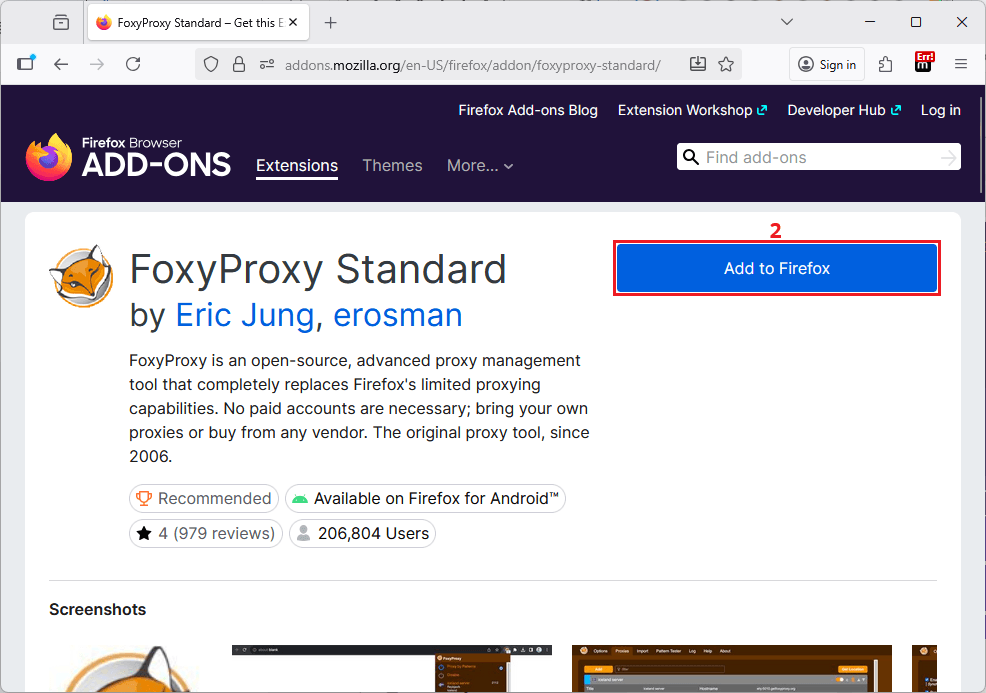
2. Click the ‘Add to Firefox’ (2) button on the right.
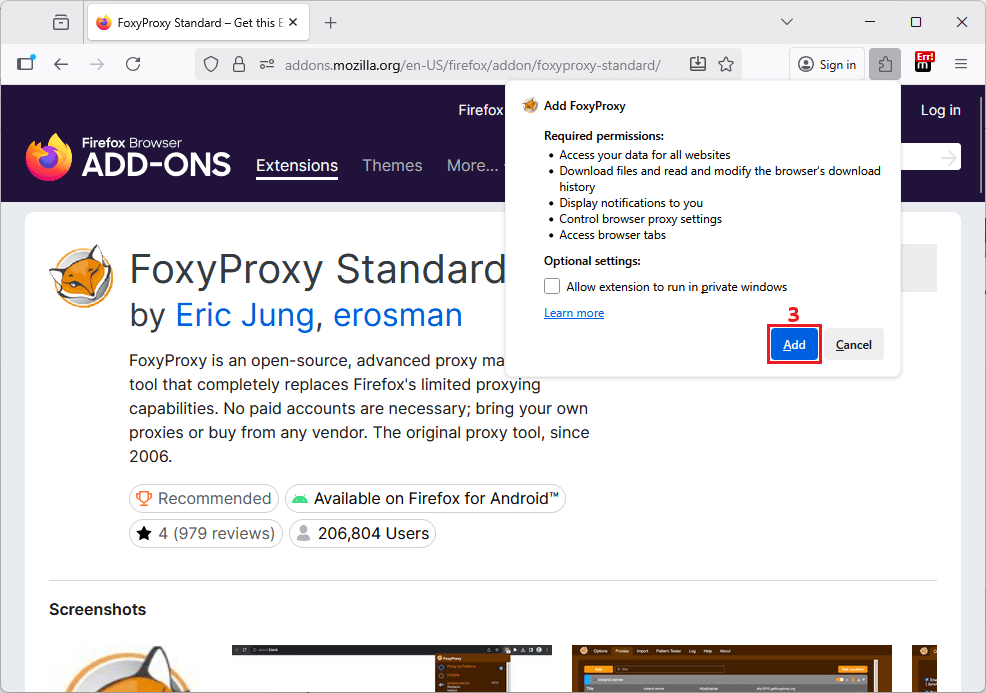
3. A pop-up window will appear asking if you want the Firefox extension to run in private windows. Make your choice and click the ‘Add’ (3) button.
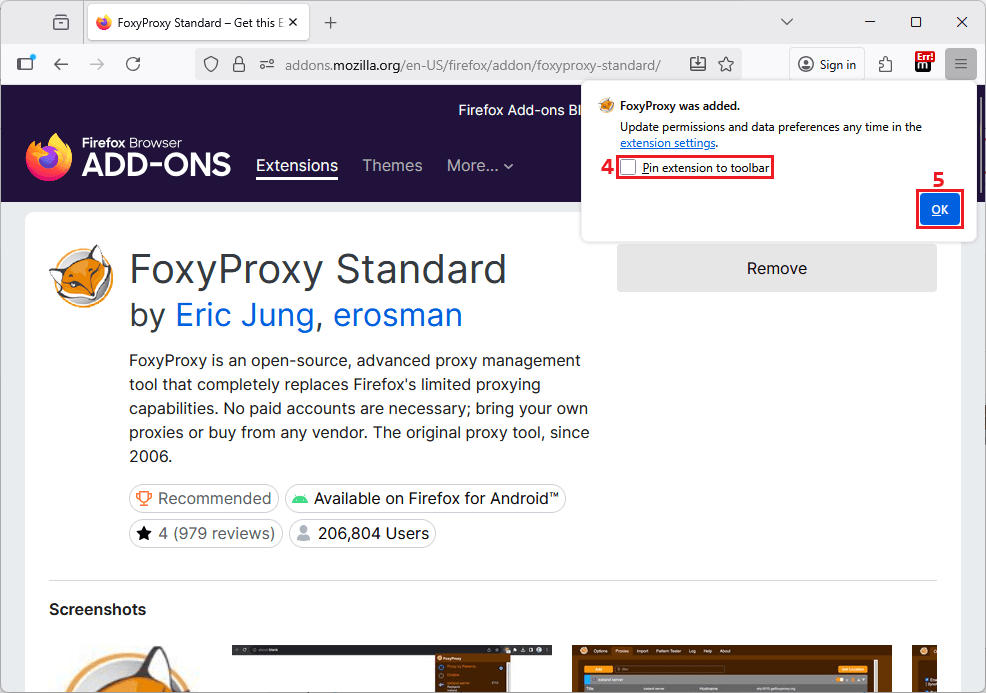
4. Select ‘Pin extension to toolbar’ (4) for easier access and click the ‘OK’ (5) button.
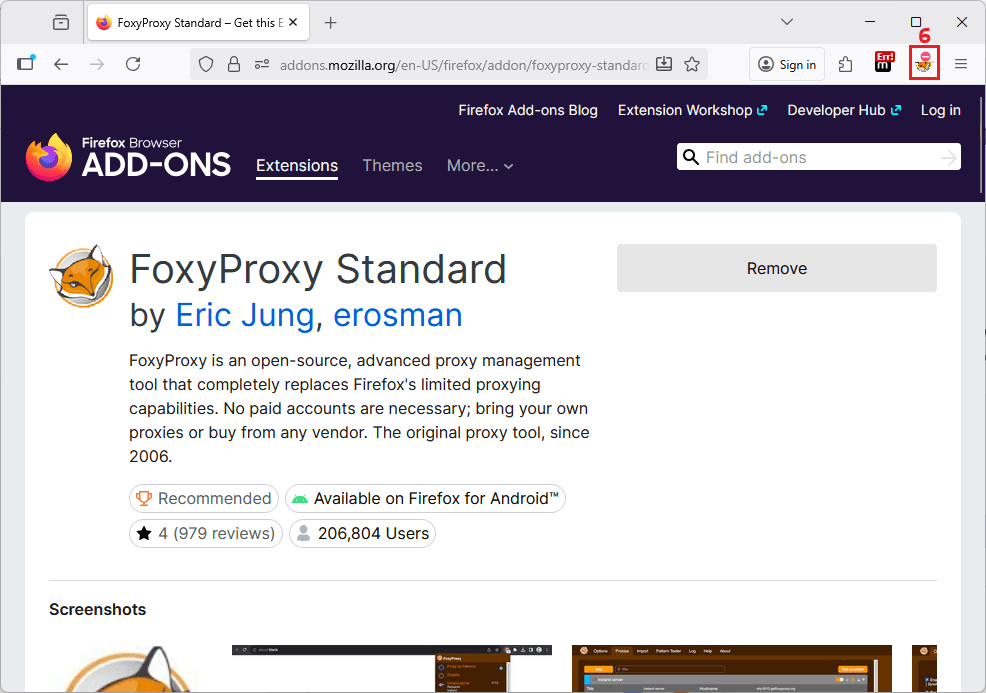
5. You should now see the FoxyProxy icon (6) in the toolbar.
How to configure a proxy in FoxyProxy
Once you’ve installed the Foxy Proxy extension, it’s time to set up your proxy connection. Whether you’re using FoxyProxy’s Chrome or Firefox version, the process is the same. We’ll use MarsProxies residential proxies for this example.
Follow these steps to add a proxy in FoxyProxy in minutes.
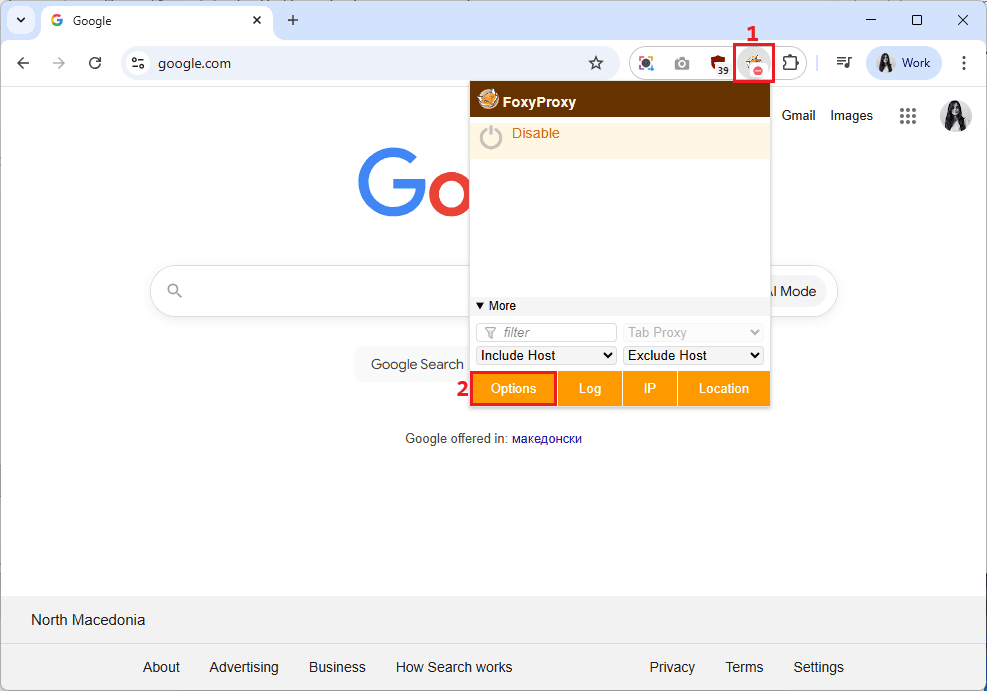
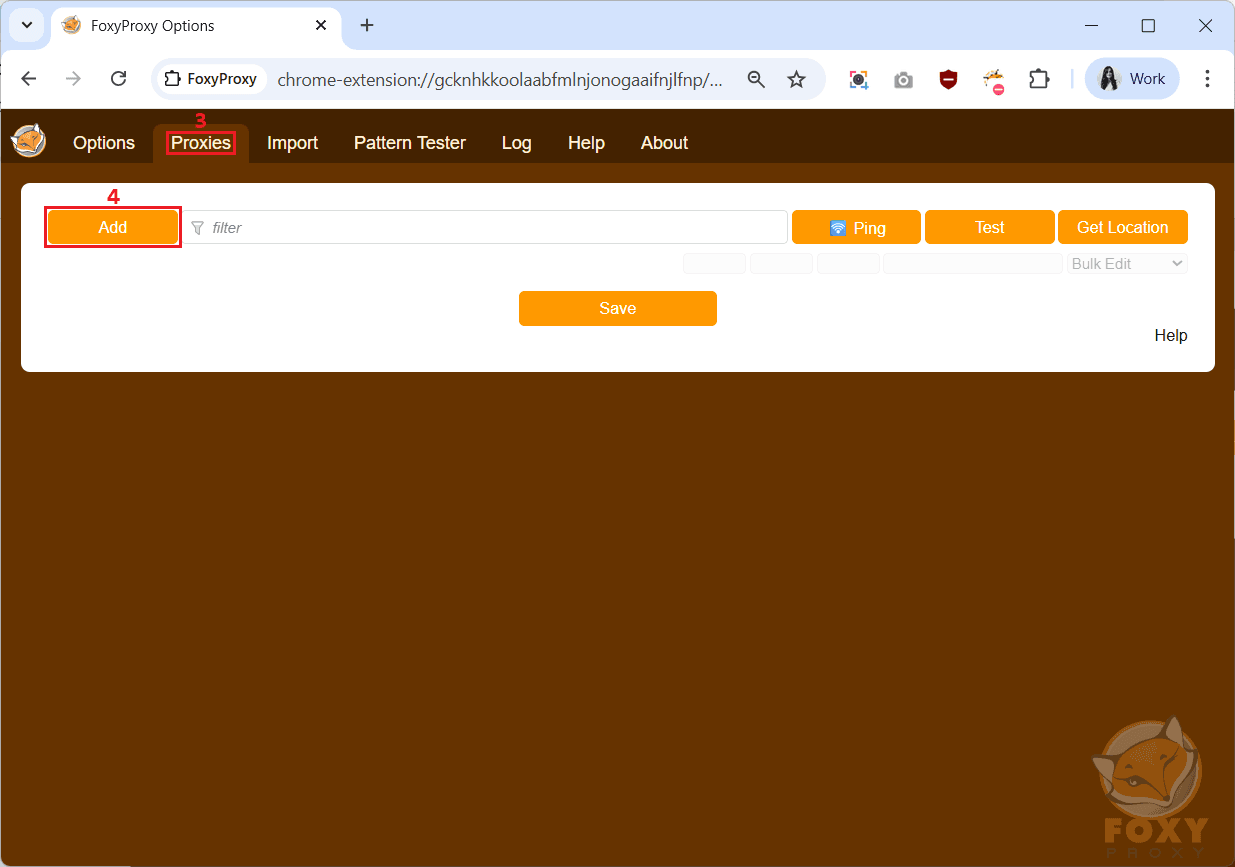
1. Click the FoxyProxy extension icon (1) and select ‘Options’ (2).
2. Go to the ‘Proxies’ (3) tab and click the ‘Add’ (4) button.
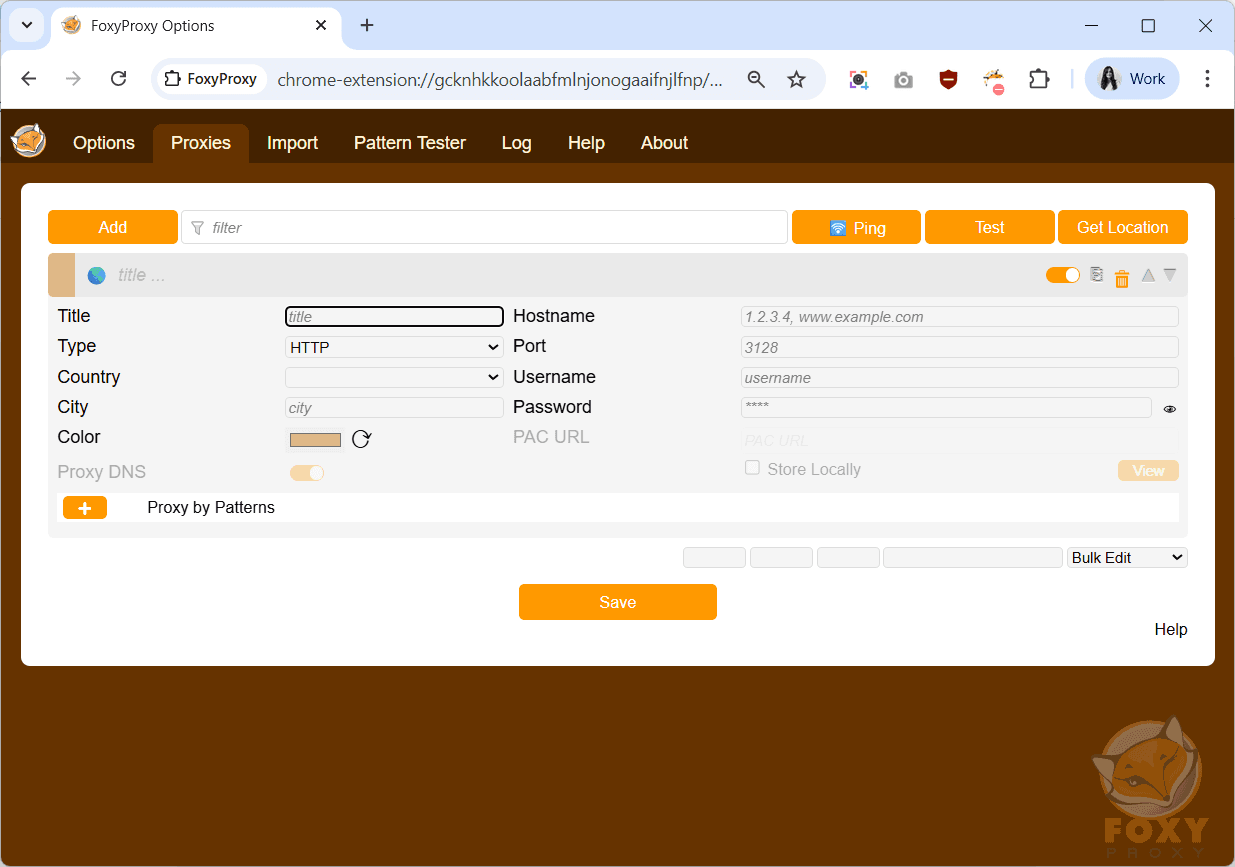
3. A new window will appear, asking you to enter your proxy credentials.
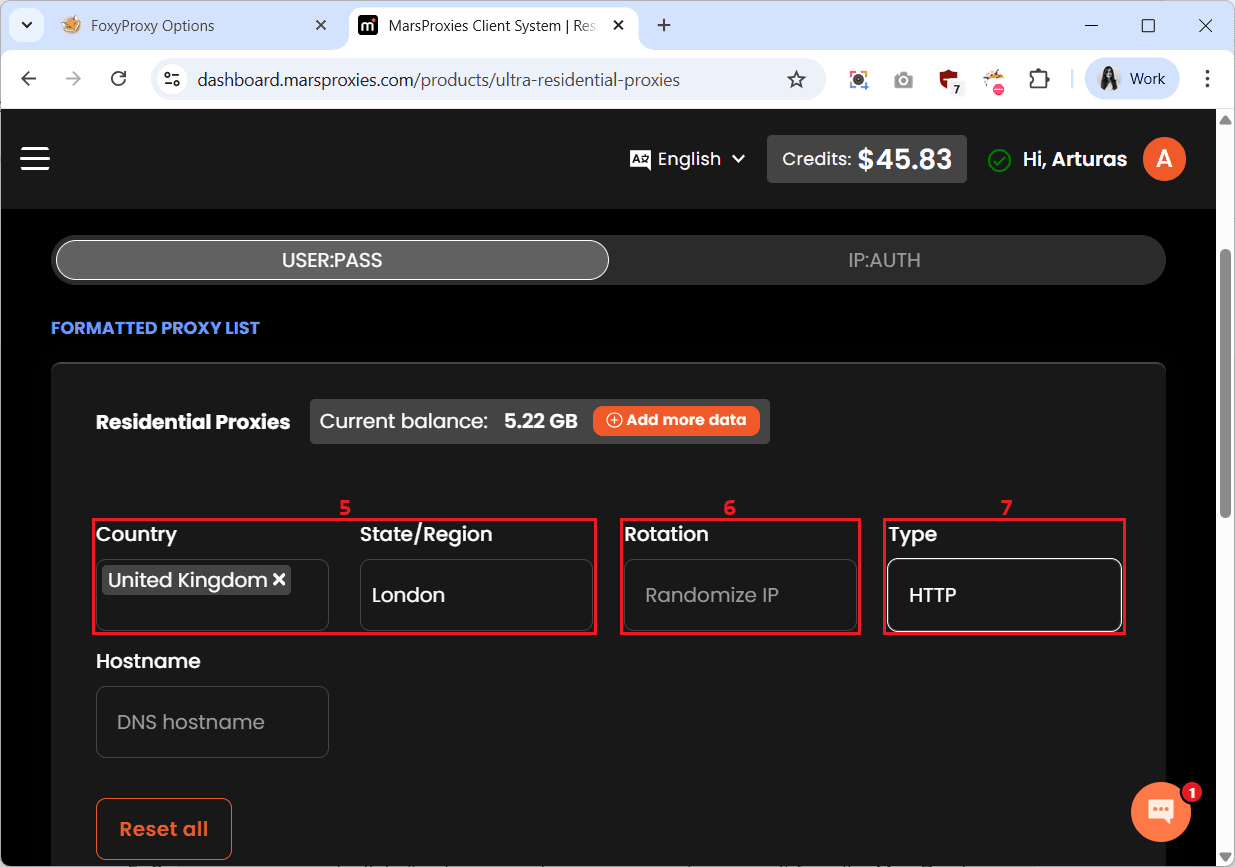
4. Open your MarsProxies dashboard to get your proxy credentials. We’ll use rotating residential proxies from London, UK, (5) with randomized IPs (6) and HTTP protocol (7). You can adjust your proxy settings according to your needs.
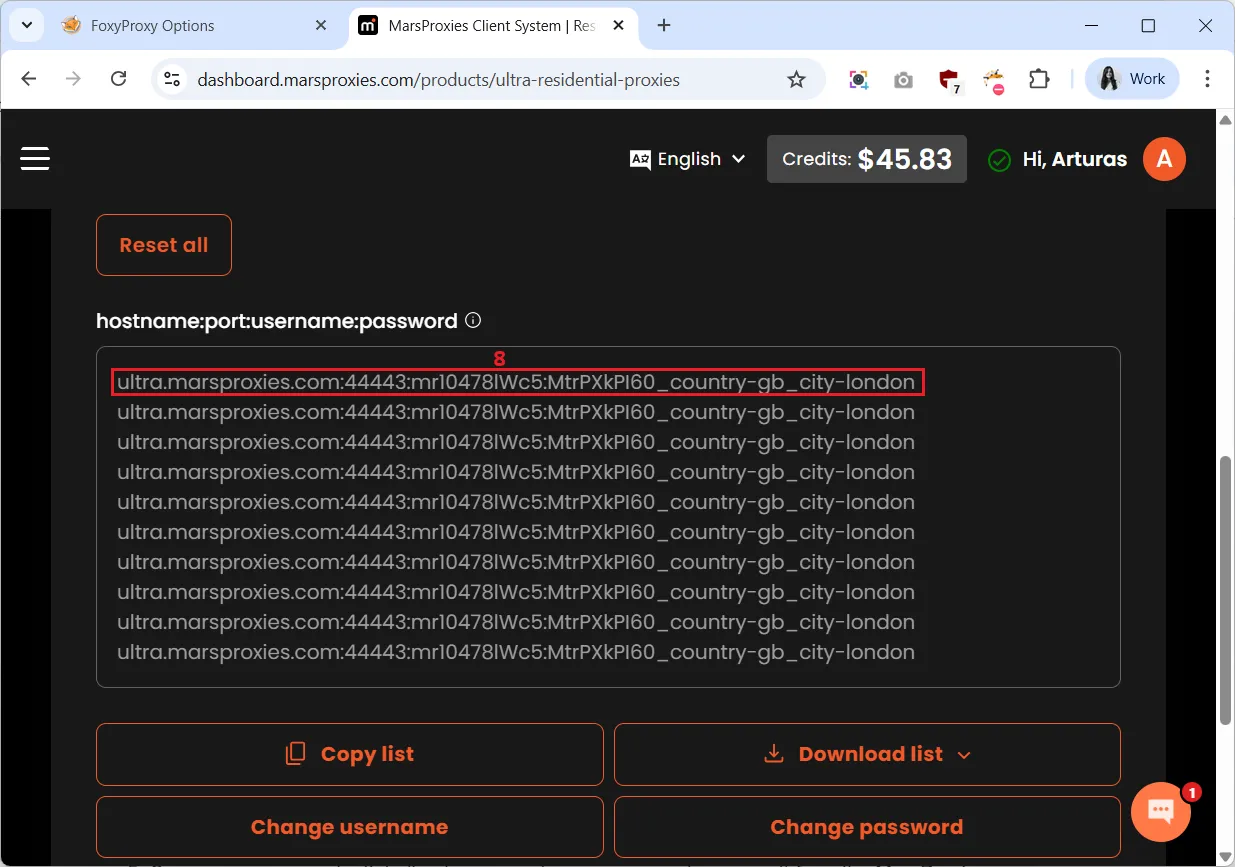
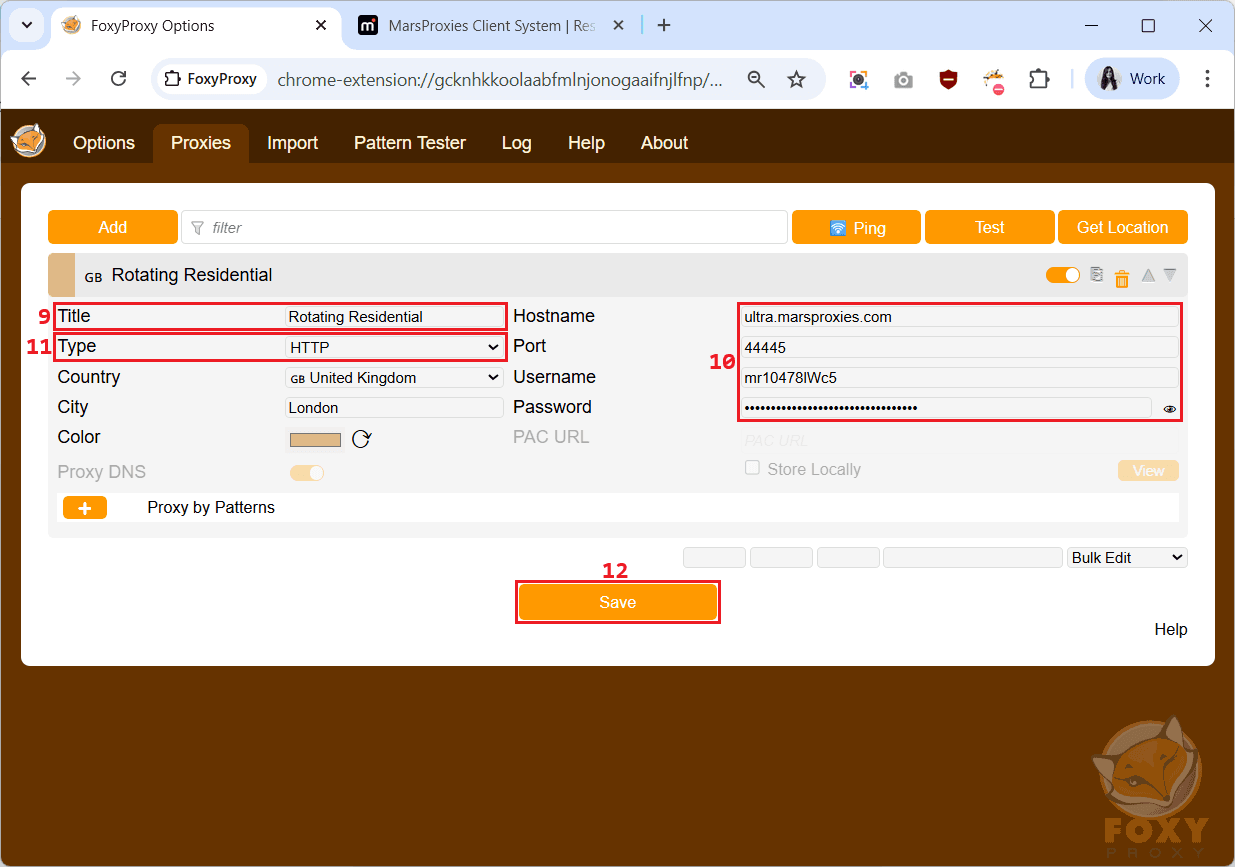
5. Copy the proxy credentials - hostname, port, username, and password (8) for one proxy from the MarsProxies dashboard.
6. Go back to the FoxyProxy extension and give your proxy a name (9). Paste your proxy credentials into the appropriate fields (10). Select the type of proxy, in this case, HTTP (11). Keep in mind that FoxyProxy doesn’t support username/password authentication for SOCKS4 and SOCKS5 proxies. Finally, click the ‘Save’ (12) button to apply the changes.
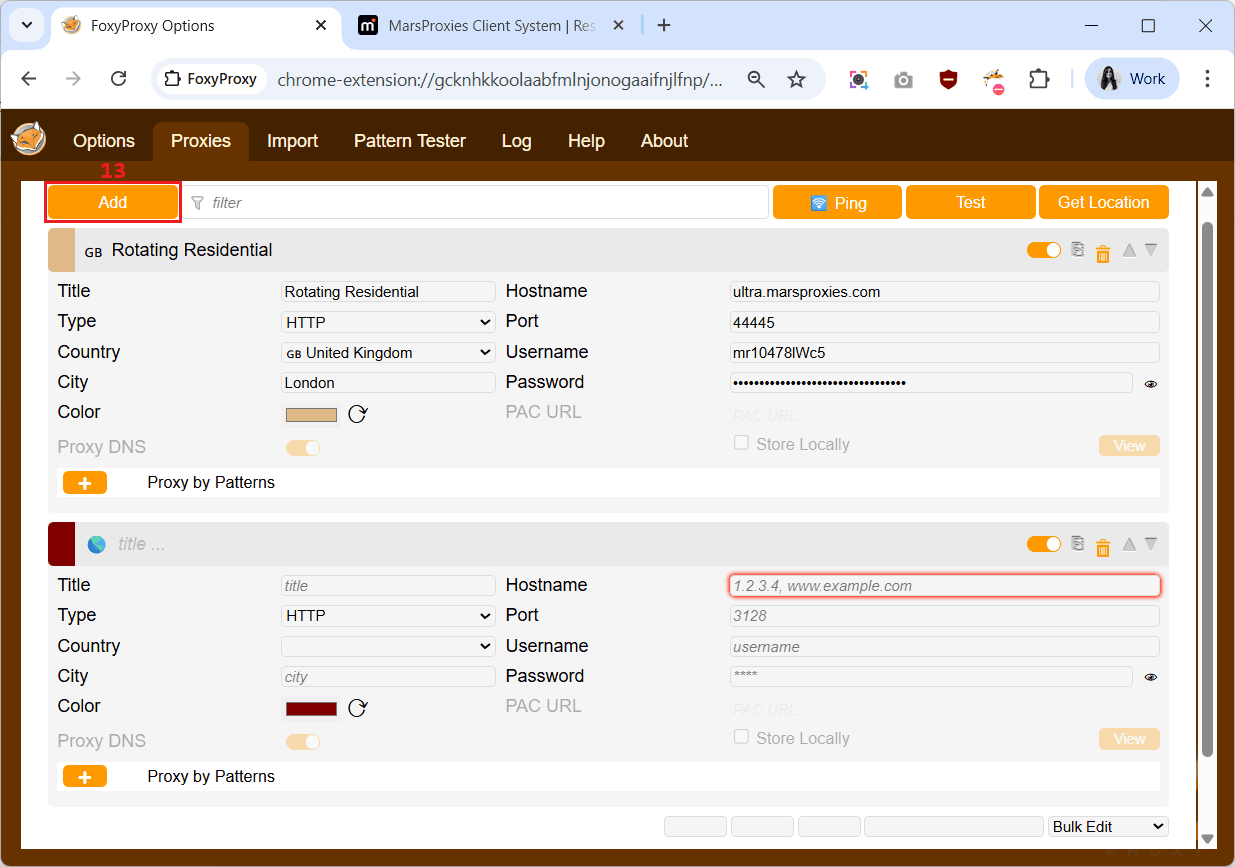
7. You can add more proxies one by one by clicking the ‘Add’ (13) button again and repeating the process.
Manage multiple proxies in FoxyProxy
If you want to add multiple proxies at once, FoxyProxy allows you to import a proxy list. You can even add different proxy types under the same list. For this example, we’ll use MarsProxies residential and datacenter proxies.
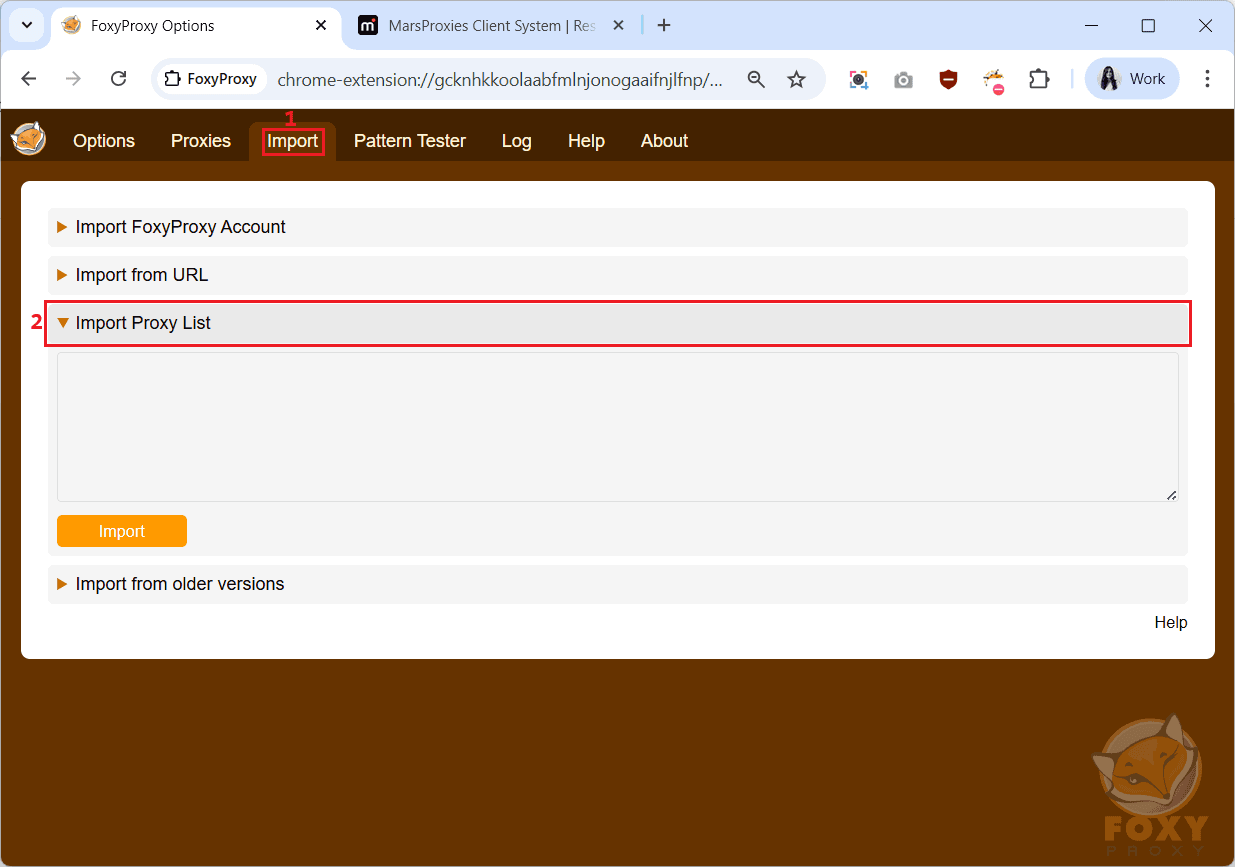
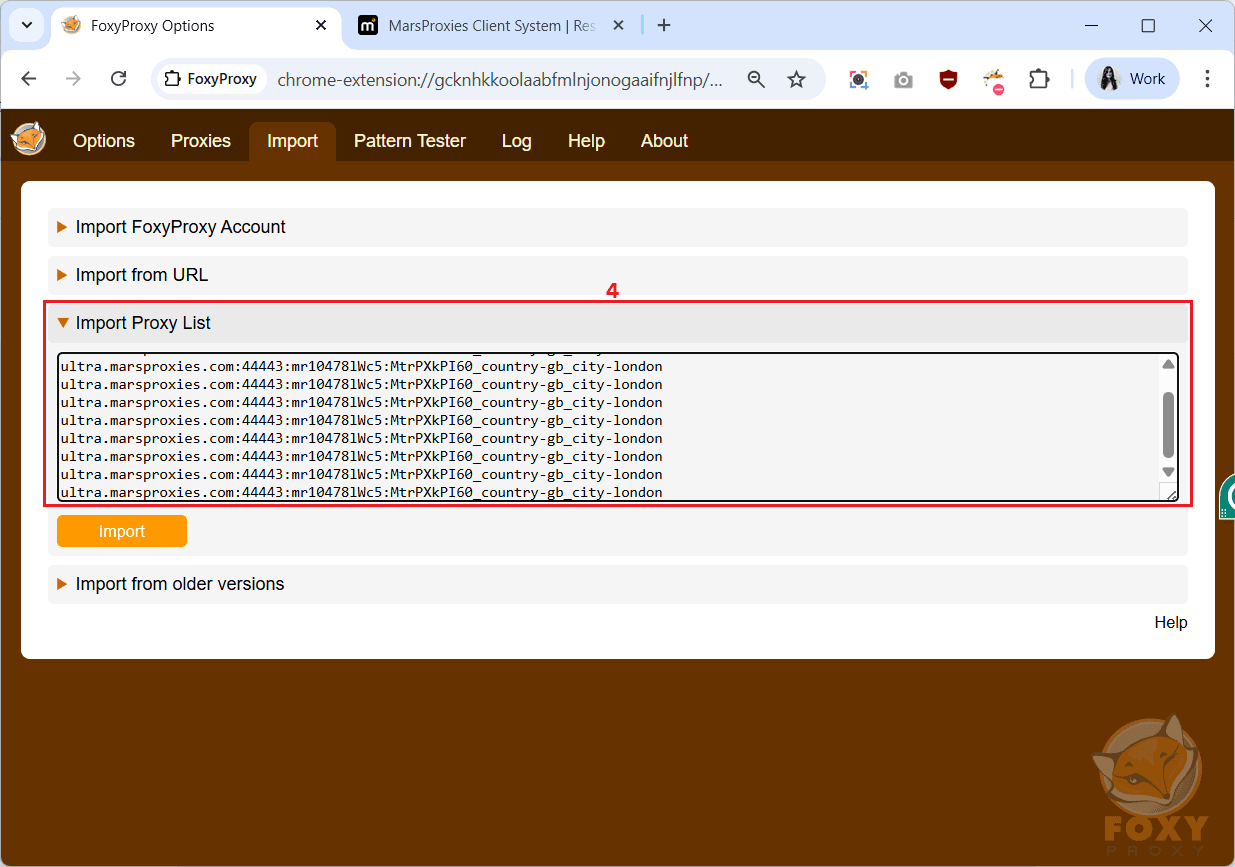
1. Go to the ‘Import’ (1) tab and select ‘Import Proxy List’ (2).
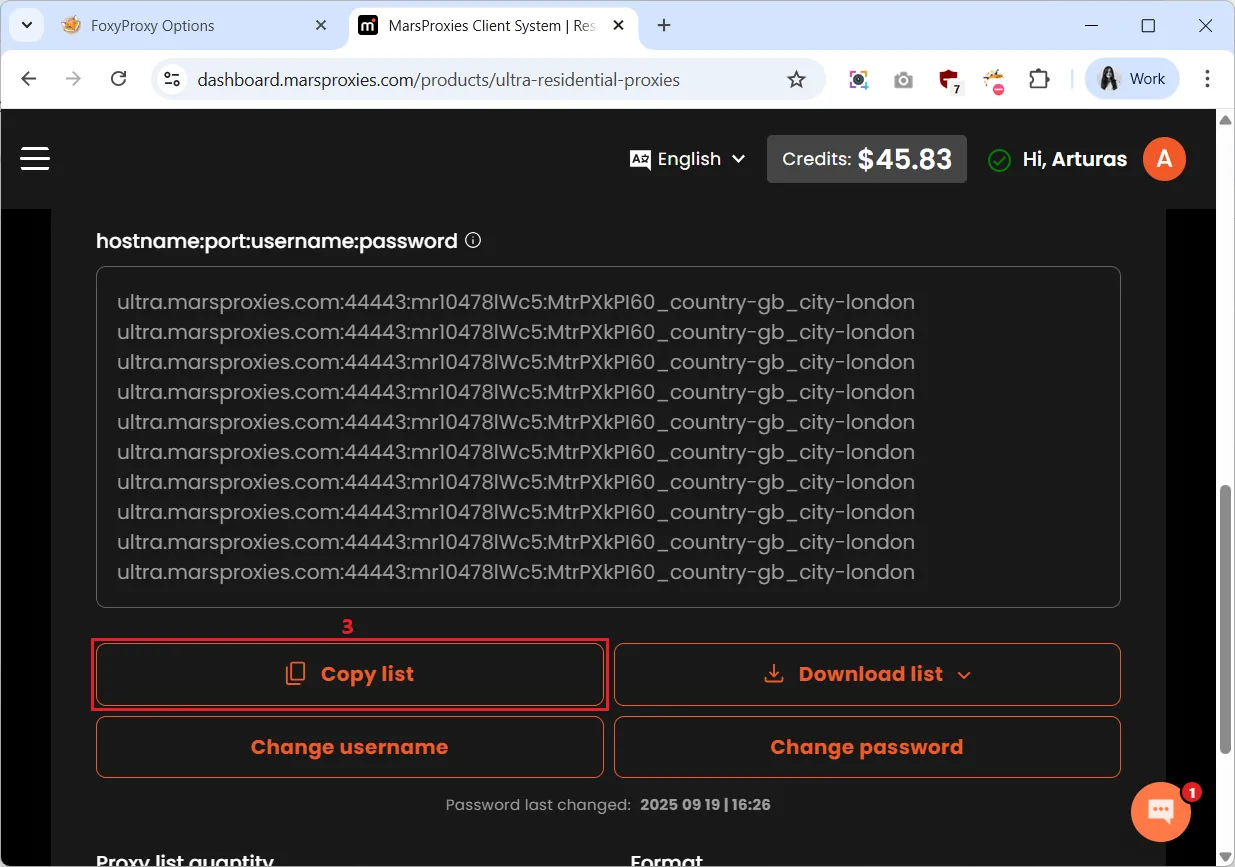
2. Open your MarsProxies residential dashboard again, find the ‘hostname:port:username:password’ section, and click the ‘Copy list’ (3) button to copy the entire list.
3. Go back to FoxyProxy and paste your proxy list into the ‘Import Proxy List’ (4) field. Before you click ‘Import’ to add all these residential proxies to FoxyProxy, let’s add a few datacenter proxies as well.
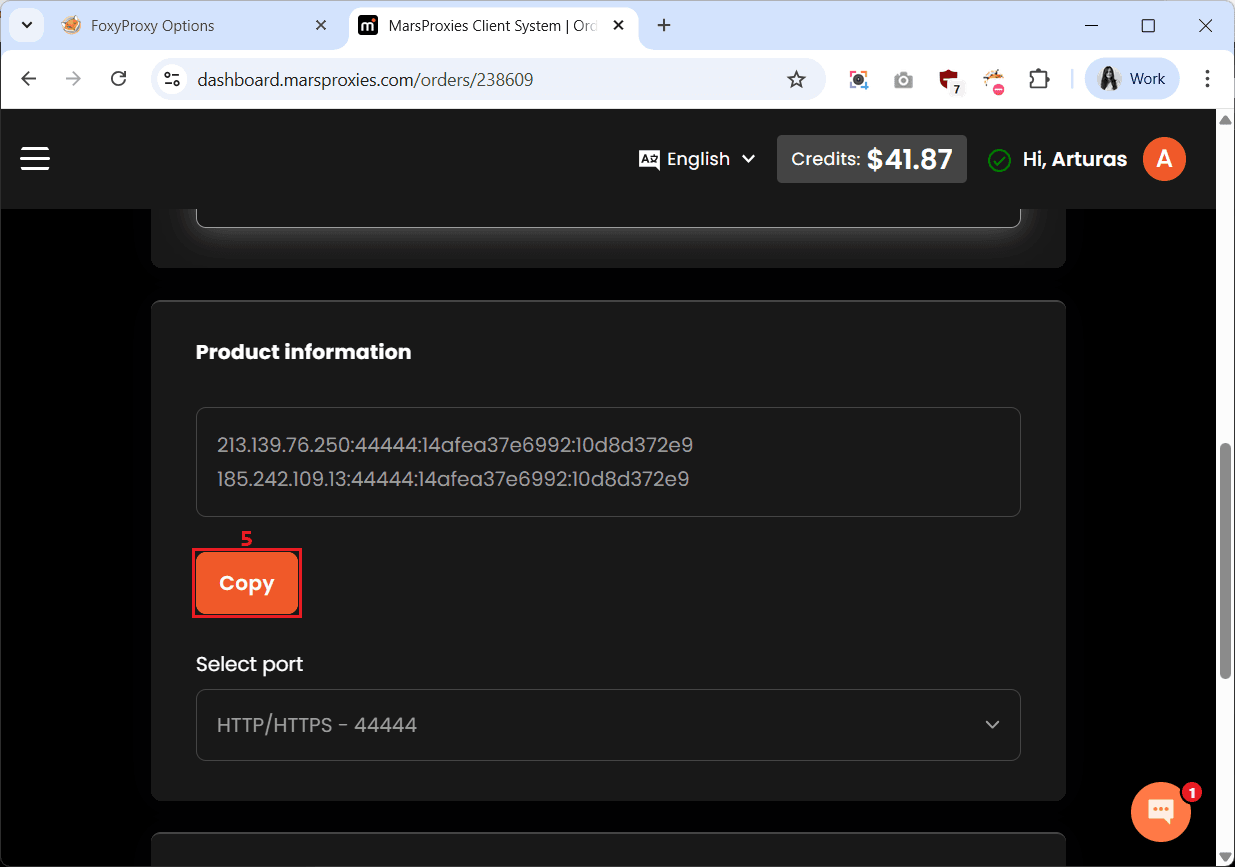
4. Go to your MarsProxies datacenter proxy dashboard, find the ‘Product information’ section, and click the ‘Copy’ (5) button to copy your datacenter proxy credentials.
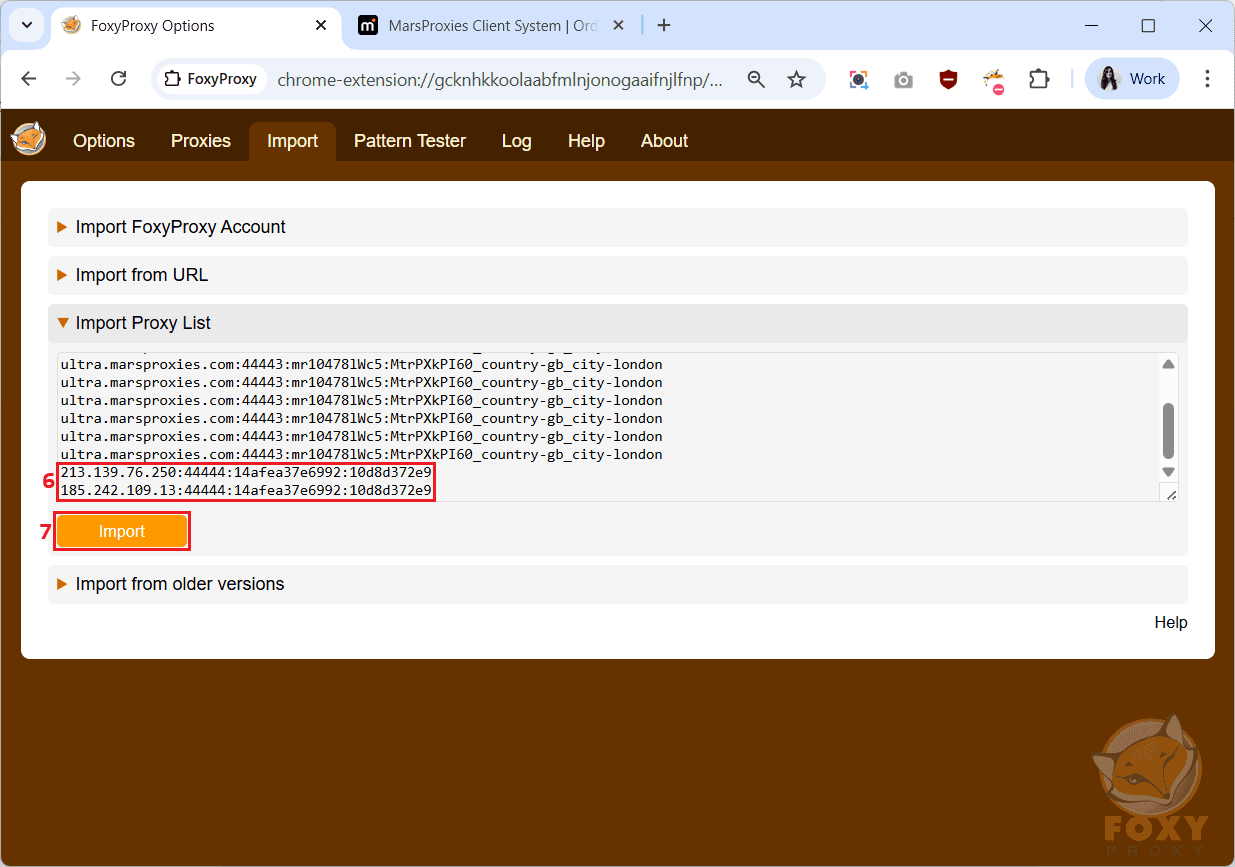
5. Paste them at the end of the list in the ‘Import Proxy List’ field (6) and click ‘Import’ (7).
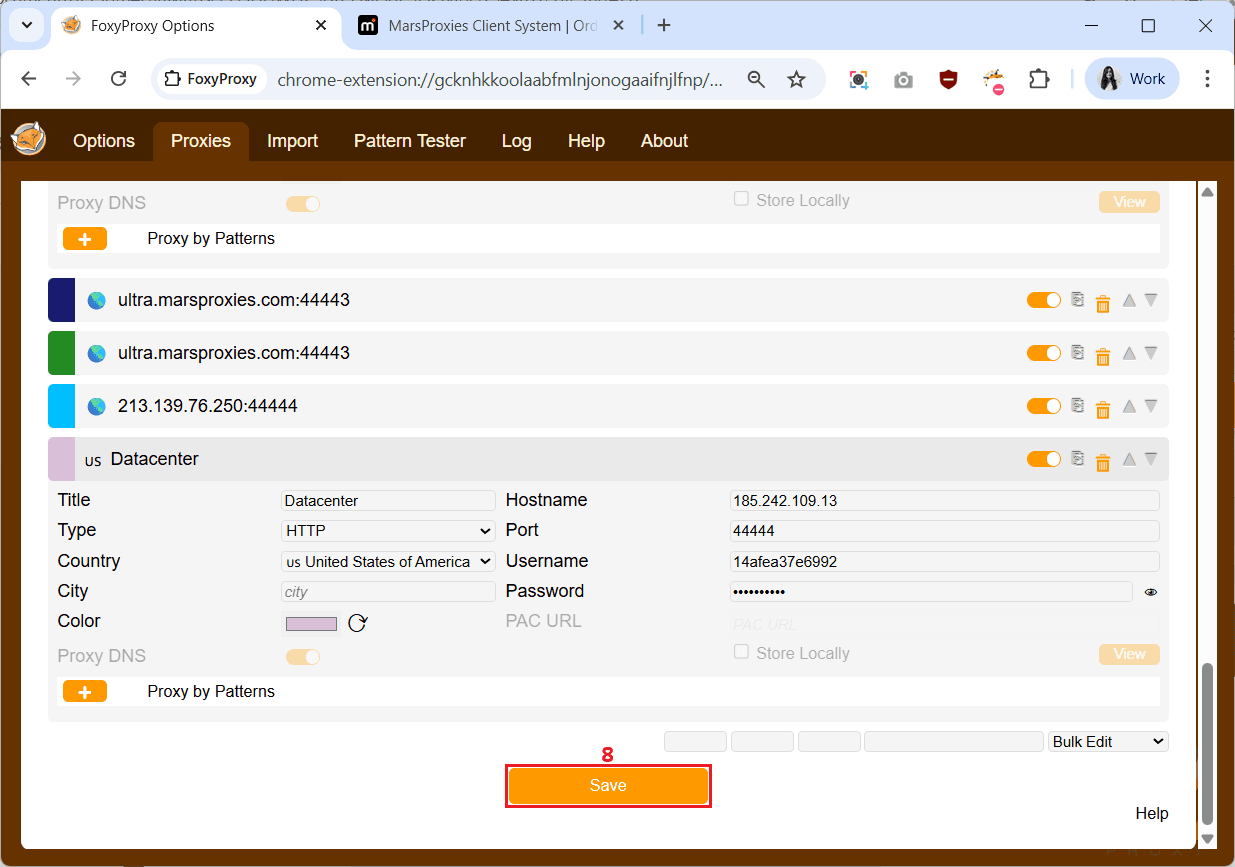
6. You’ll now see a list of all of your residential and datacenter proxies added to FoxyProxy. You can click on each to name it and set its location, and then click the ‘Save’ (8) button to confirm all the changes.
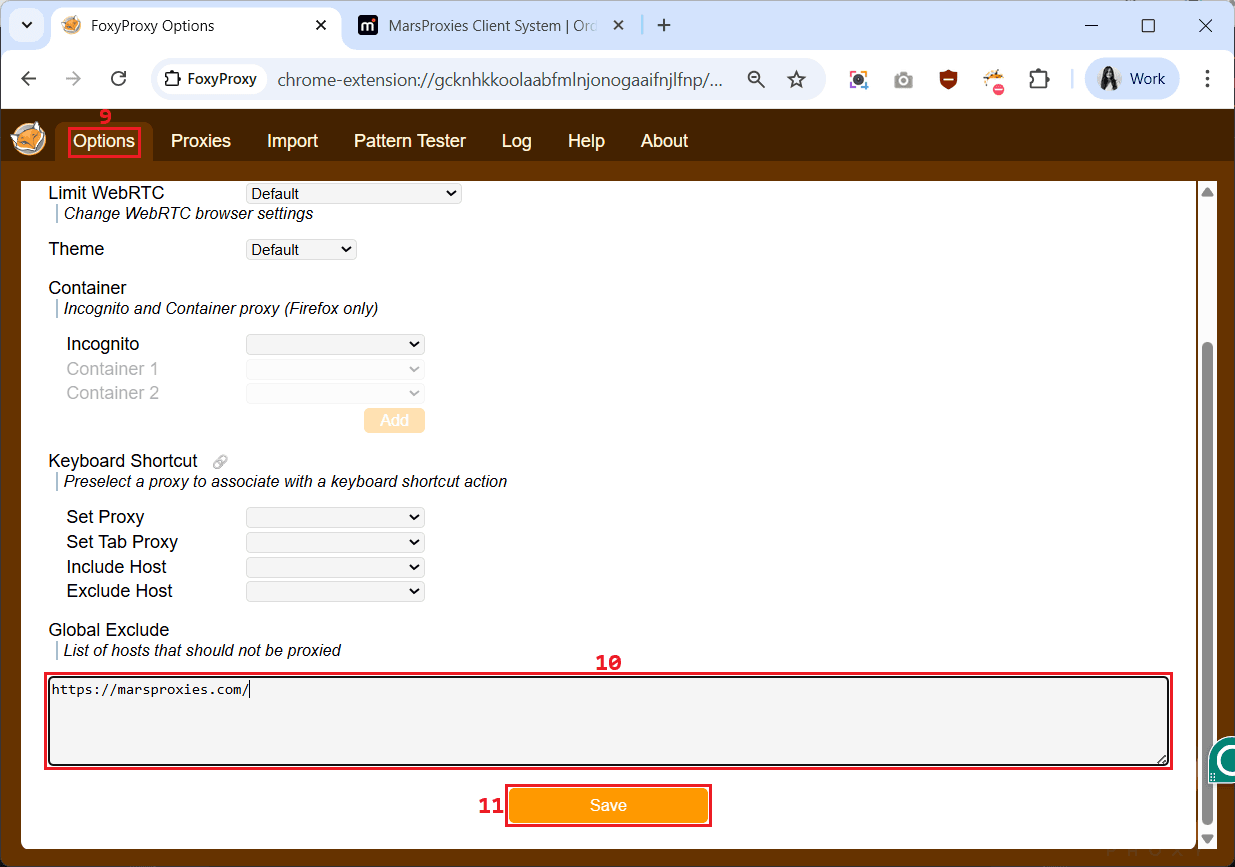
7. FoxyProxy also allows you to skip the proxy connection when visiting specific URLs. Go to ‘Options’ (9), add the URLs you want to visit with your original IP in the empty field under ‘Global Exclude’ (10) and click ‘Save’ (11).
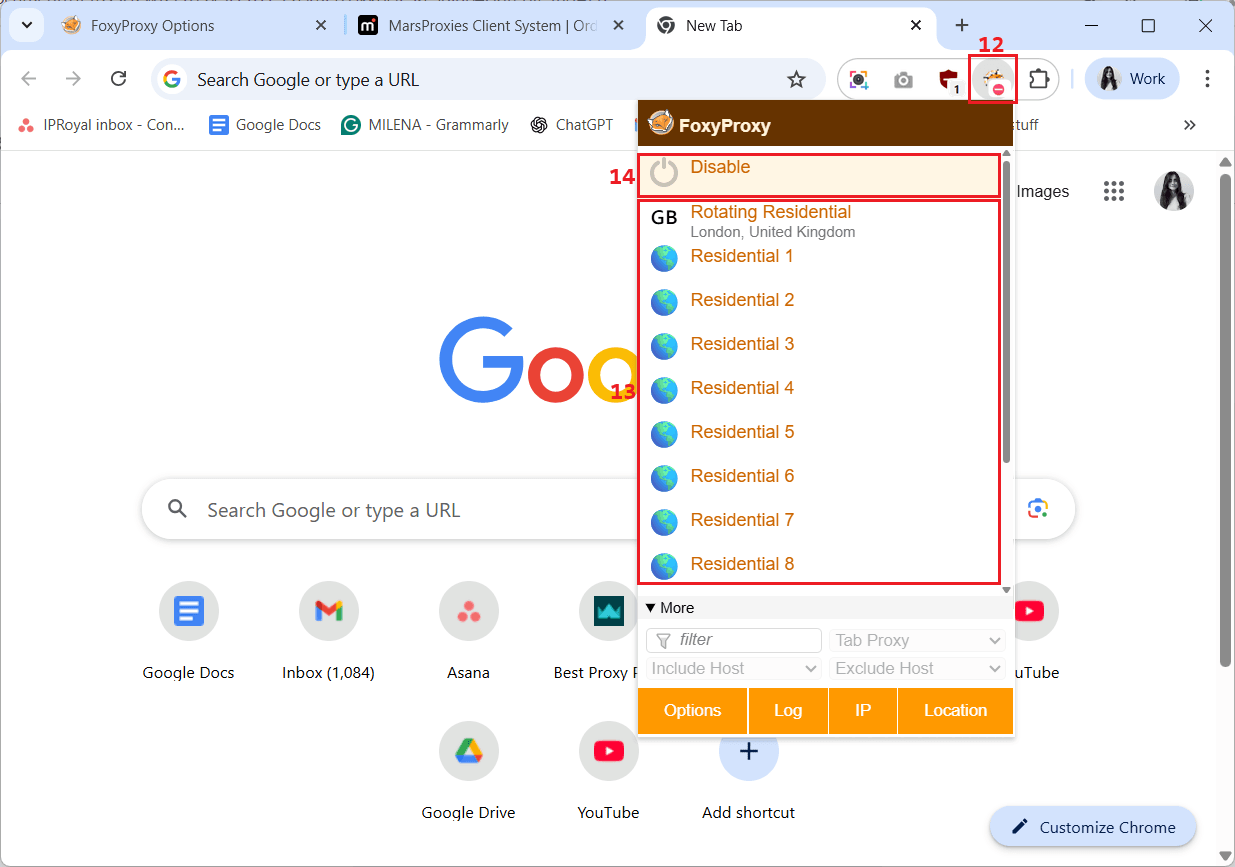
8. Now that you have added all the proxies you need, you can quickly access them by clicking the FoxyProxy icon (12). From there, you can select the proxy (13) you want to use, switch between them with a single click, and disconnect by choosing ‘Disable’ (14).
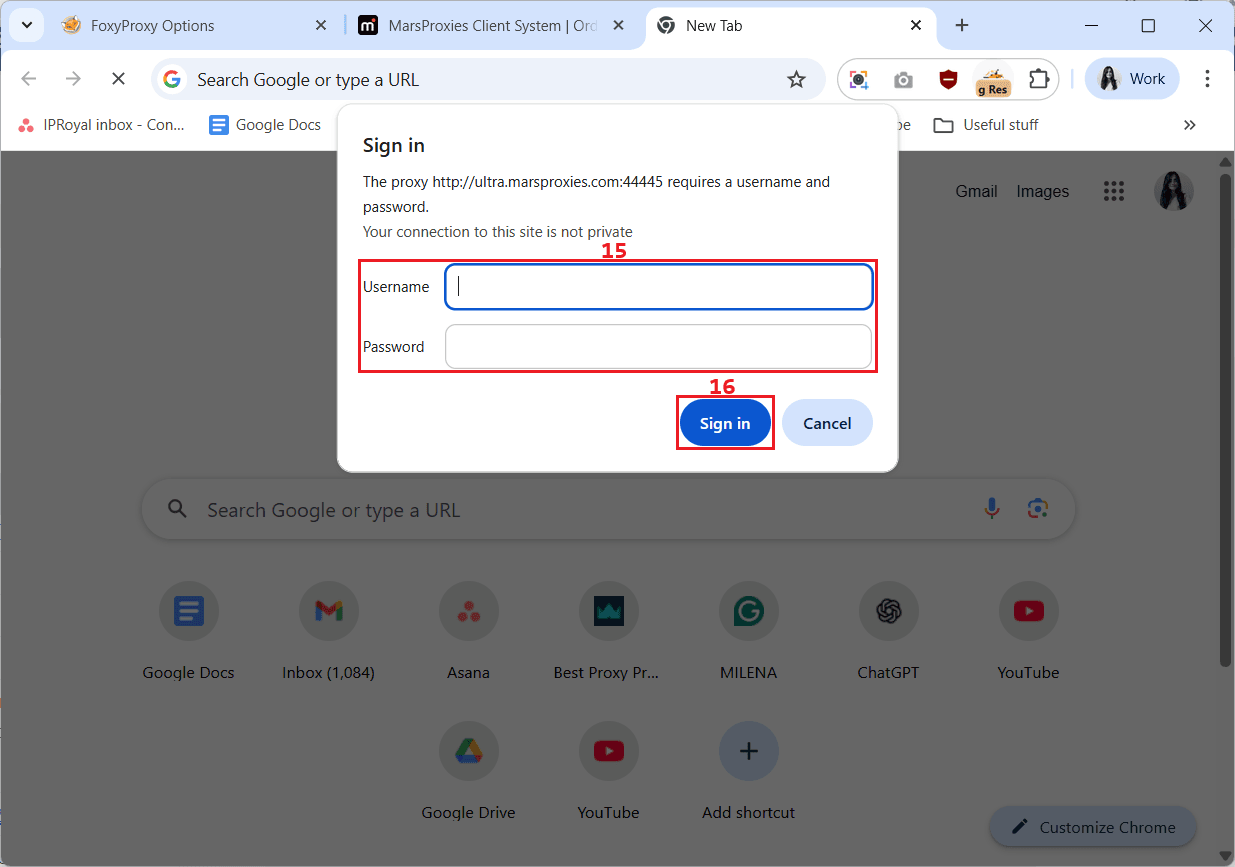
9. Once you connect to a proxy, try to open a website, and you’ll see a pop-up window asking you to enter your proxy username and password. Copy them from your MarsProxies dashboard, paste them in the appropriate fields (15), click the ‘Sign in’ (16) button, and you can start browsing privately.
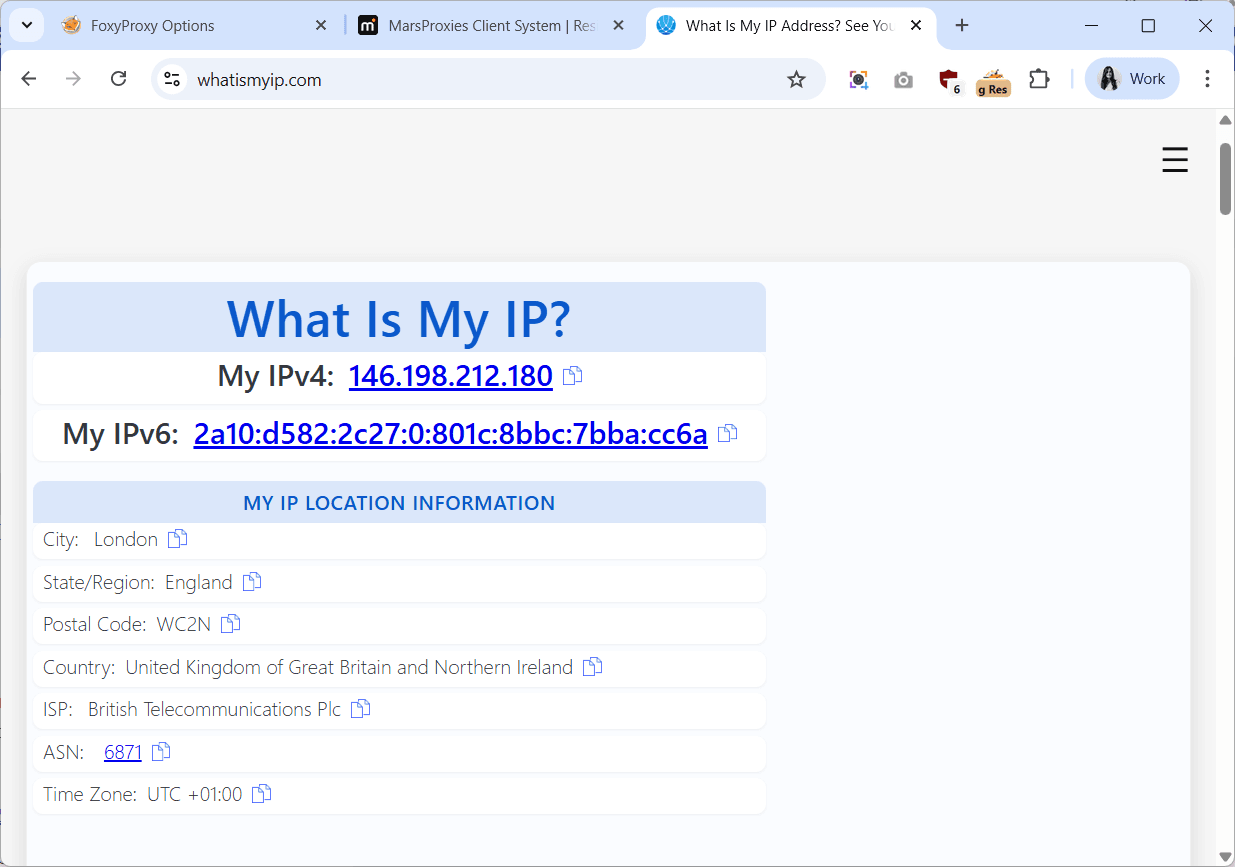
Don’t forget to test your proxy connection by visiting an IP checking website. Connect to a proxy via FoxyProxy and visit a site like WhatIsMyIP. If your IP and online location have changed, you can start using it with peace of mind.
Common issues & solutions
Even if you install FoxyProxy and set up proxies correctly, you may still run into some issues. Here’s how to solve the most common ones.
Proxy not connecting
Make sure the IP, port, username, and password you entered in FoxyProxy are correct. Also, double-check that your proxy type (HTTP, SOCKS5) matches what you’ve selected in the extension.
Geo-blocks
If your target website restricts access based on location, try switching to a residential proxy from a different region. Rotating through multiple locations can also help you bypass these blocks. Use an IP checking website to make sure the proxy’s IP comes from a supported region before you visit the site.
CAPTCHAs
Frequent CAPTCHAs are common when the site detects repeated requests from the same IP. Therefore, rotate your proxies regularly and ensure proper headers are set to mimic normal browser behavior.
Best practices for using FoxyProxy
Aside from configuring your proxies correctly, you should also consider other things to make the most of your FoxyProxy Chrome or Firefox extension. Whether you’re using it for personal browsing or business purposes, here’s how to ensure a seamless experience.
Use residential proxies for higher success rates
Residential proxies use IPs from real users and rotate automatically after each request. As a result, they help you mimic real users and are less likely to be blocked or flagged by websites. This makes them ideal for web scraping, accessing geo-restricted content, or multi-account tasks.
Keep separate profiles for different tasks
Create different FoxyProxy profiles for scraping, testing, or personal browsing. This way, you can prevent accidental data leaks, keep your workflows organized, and quickly switch between tasks without reconfiguring settings every time.
Avoid free proxies for sensitive use cases
Free proxies are often unreliable, slow, and unsafe. They are usually shared by too many people at the same time, increasing the chances of IP bans and CAPTCHA. Therefore, always use premium proxies from trusted providers, especially for tasks that require stability, privacy, or consistent access.
MarsProxies is a reliable provider offering high-quality proxies at affordable prices. Our proxies work seamlessly with FoxyProxy, Proxy Helper, or any other proxy management tool. We also provide a free Google Chrome extension and Firefox proxy extension to make managing your proxies even easier.
Conclusion
FoxyProxy is a free Chrome and Firefox extension that can make your proxy management a breeze. However, you need to use it with quality proxies and configure them correctly to get the best results.
With MarsProxies’ reliable residential and fast datacenter proxies and our step-by-step guide, you can keep your operations efficient and seamless.
Join the MarsProxies Discord channel to keep up to date with the latest news and promotions and get proxy tips from thousands of active members.
Does FoxyProxy log my browsing activities?
According to the FoxyProxy Privacy Policy, both the Chrome and Firefox extensions don’t log your browsing activities, including URLs, content, or other metadata. The only data logged is the bandwidth consumed, so they can properly load-balance their servers.
Can FoxyProxy rotate proxies automatically?
FoxyProxy has a useful Pattern Tester feature that lets you create rules to automatically switch between proxies based on specific URLs. If you’re using rotating proxies from your provider, such as MarsProxies residential proxies, FoxyProxy will use a new IP per request because these proxies handle the rotation on their own. You can also create multiple proxy profiles within FoxyProxy and switch between them manually whenever needed.
What is the difference between FoxyProxy and VPN?
A VPN, or a virtual private network, is a service that routes your traffic through its own remote server and encrypts your data for privacy. FoxyProxy is a Chrome and Firefox extension that manages third-party proxy servers, routing your traffic through the proxy’s IP without encryption.
Does FoxyProxy slow down browsing?
FoxyProxy itself doesn’t really affect your internet speed. However, you might notice slower browsing speeds when using free or low-quality proxies. Therefore, always combine it with high-performance proxies from trusted providers like MarsProxies to ensure smooth connections and uninterrupted operations.