
Ever tried opening a website with Google Chrome browser only to find it blocked or painfully slow? That's where a proxy server comes in.
A proxy is like a middleman between you and the internet, which helps you hide your real IP address, keeps your browsing private, and gives you access to geo-restricted content without hassle. It also helps add an extra layer of security if you're using public Wi-Fi.
The best part? It is easy to set up and use proxies. When configured correctly, your proxy can provide a safer browsing experience and grant you access to everything the internet has to offer, regardless of the platform you're using.
In this guide, we'll walk you through step-by-step instructions to set, change, or disable Chrome proxy settings. We'll also share tips, troubleshooting fixes, and everything you need to make your browsing more secure and reliable.
Let's get started.
How to set proxy in Chrome (Step 1: access proxy settings)
Before we deep dive into specific instructions for different operating systems (Windows, macOS, or ChromeOS), we first need to access Chrome's settings, and this step is the same for all platforms.
You can follow these instructions:
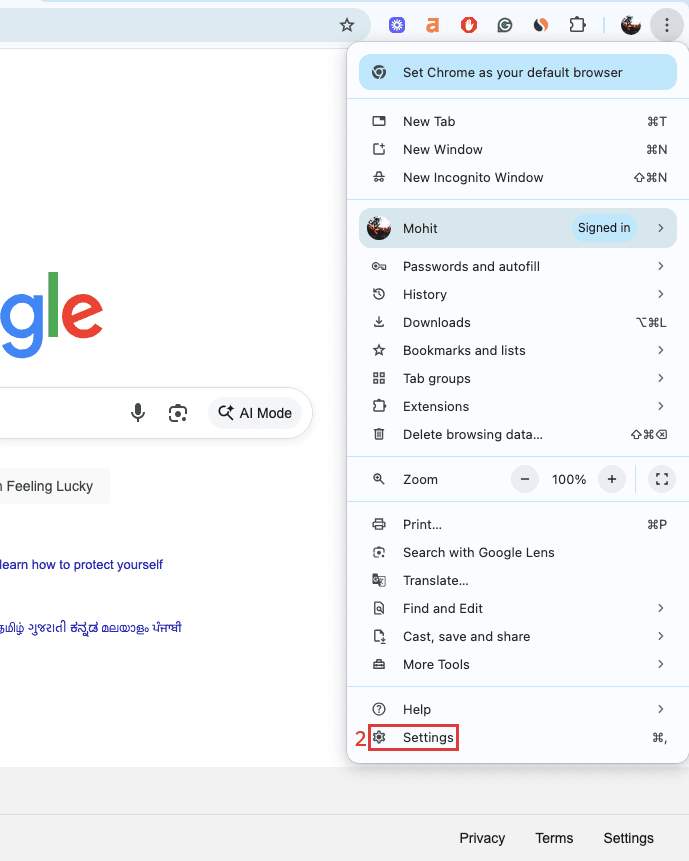
- Open Google Chrome and click the three-dot menu (1) in the top-right corner.

2. Click on 'Settings' (2) from the dropdown menu.
3. In the left-hand menu, click 'System' (3).
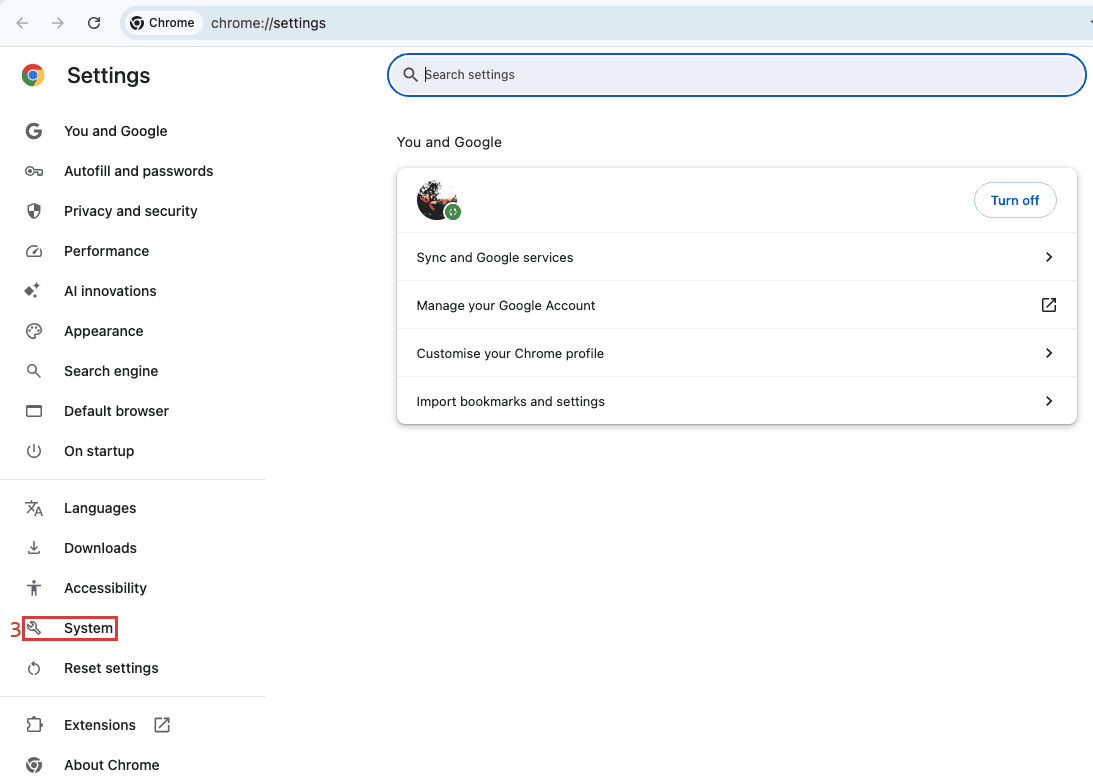
4. Click on 'Open your computer's settings' (4).
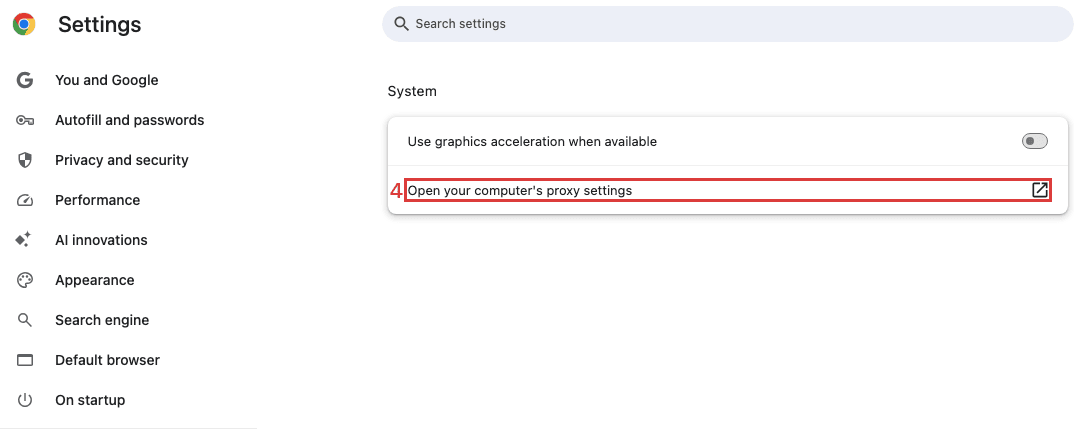
From here, the Chrome browser will redirect you to your computer's proxy settings (Windows, Mac, or ChromeOS), and the next steps will depend on your operating system.
Now, let's set up MarsProxies to obtain the correct credentials before adding them to your system.
Proxy configuration in MarsProxies dashboard (Step 2: get your proxy credentials)
You'll also need to whitelist your IP address with your proxies provider so that you can use your proxy server without providing a username and password. Here's how to do it with MarsProxies:
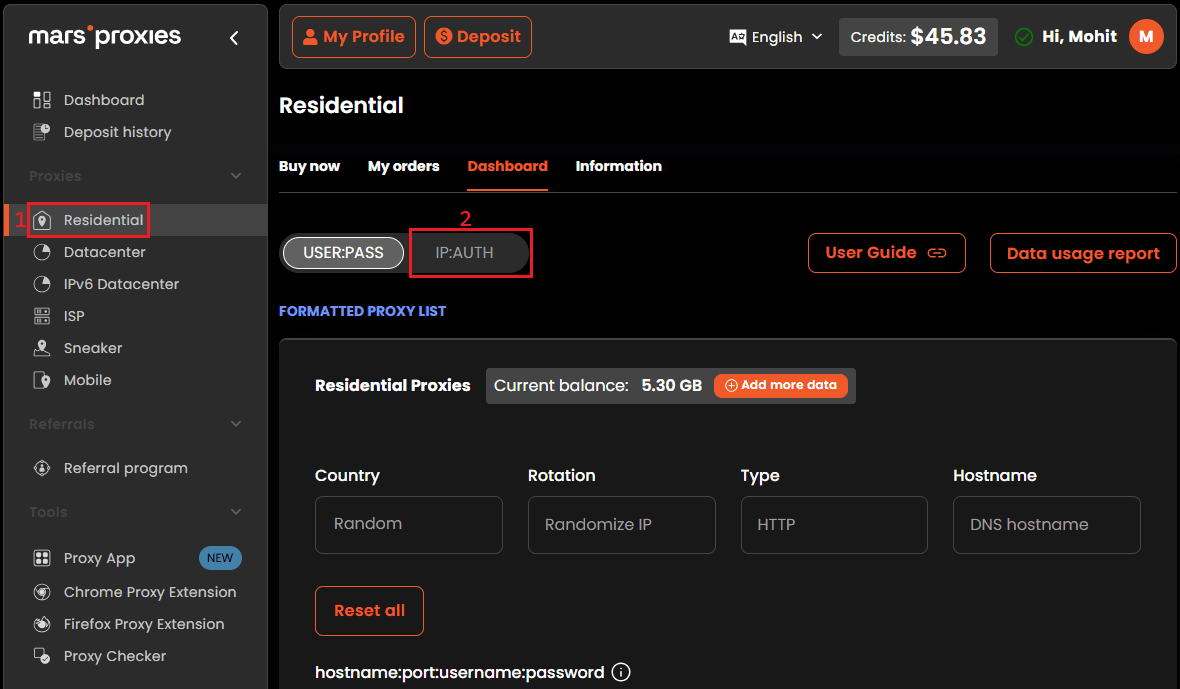
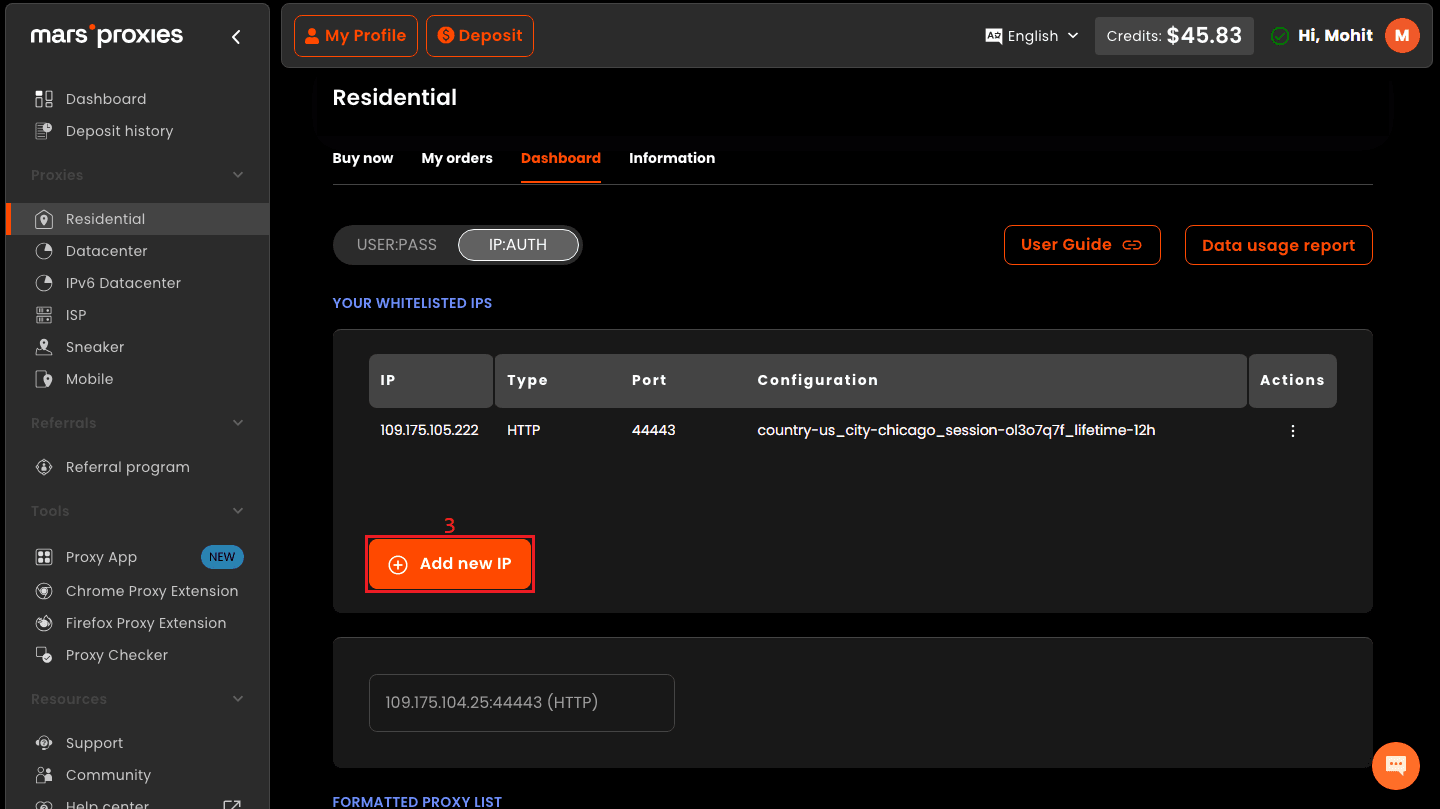
- First, log in to your MarsProxies account, go to the Residential Proxies (1) dashboard, and click on the 'IP: AUTH' (2) tab.
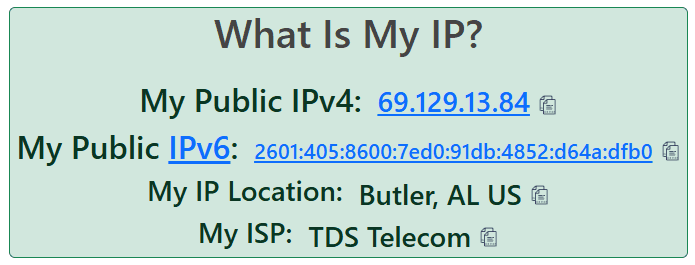
2. Next, find your current IP address by visiting WhatIsMyIP and copying your current IP address.
3. Now head back to MarsProxies and then click on 'Add new IP' (3).
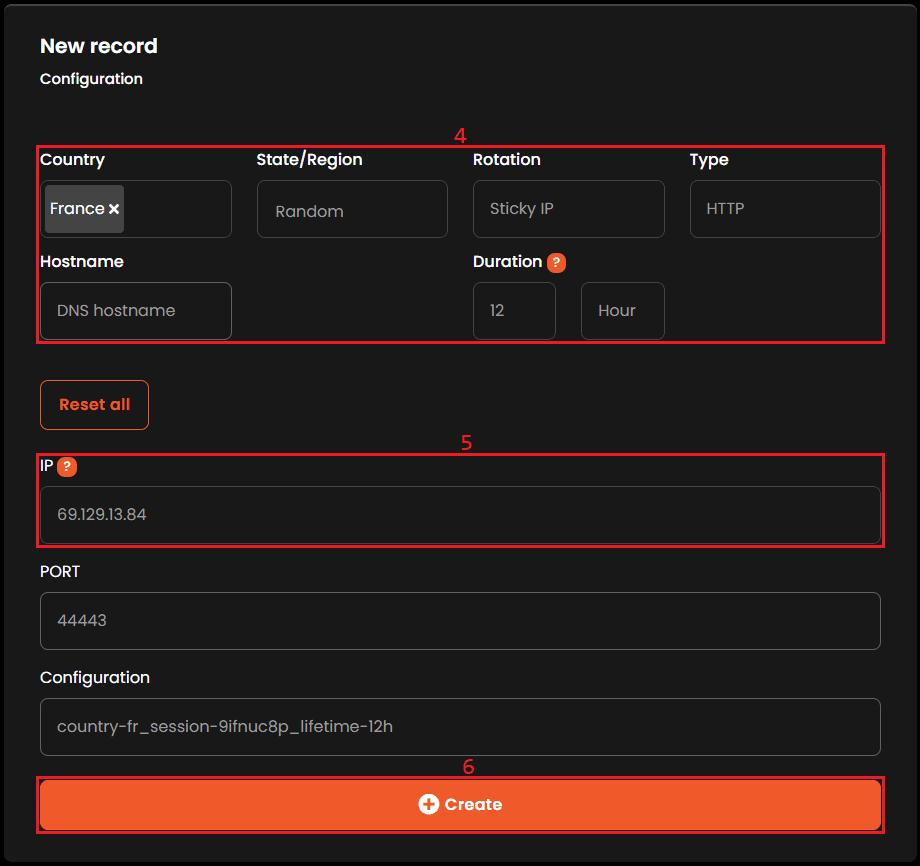
4. Configure your proxy settings (4) based on your requirements. You can choose the target country and state/city, decide on the rotation type (rotating or sticky), protocol (HTTP/HTTPS or SOCKS5), and set the session duration if needed. Paste your copied IP in the 'IP' field (5). Once your configuration is ready, you can just click 'Create' (6).
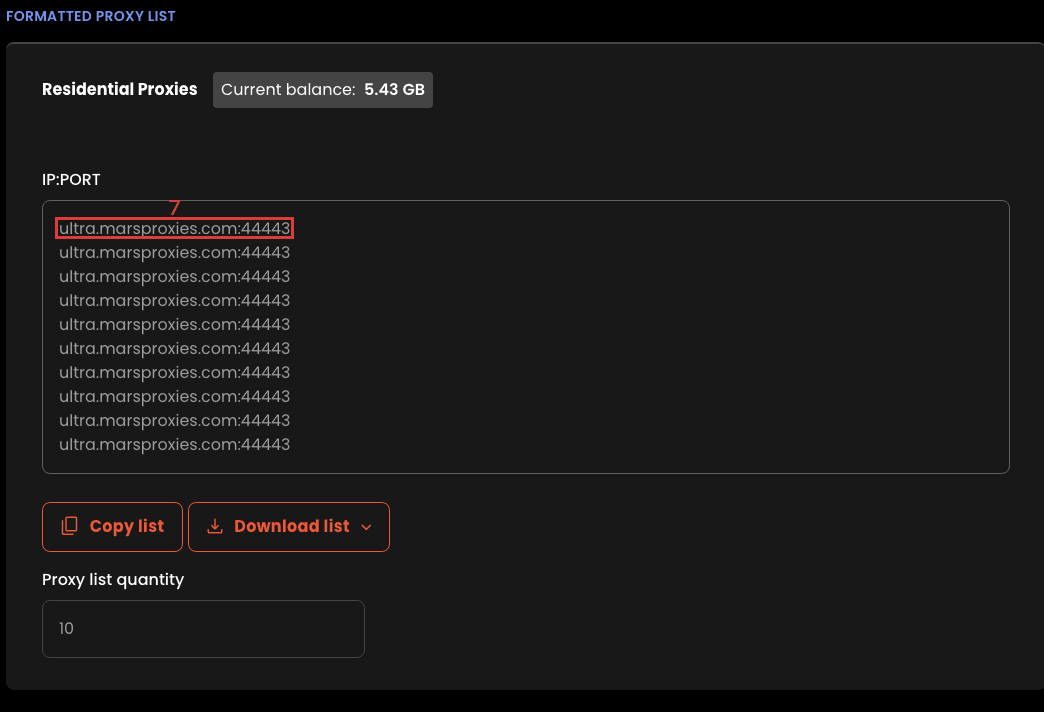
5. Scroll down to the bottom of the screen to the IP: PORT section and copy one of the credentials (7) from there. The format is IP:PORT, so in our case, 'ultra.marsproxies.com:44443', where 'ultra.marsproxies.com' is the hostname and '44443' is the port number.
Now we are done with the MarsProxies dashboard and copied our credentials that we will paste into our system settings.
These two steps (opening your operating system's proxy settings and configuring your proxies) are the same for all operating systems. Now we'll go over proxy configuration for each platform.
How to set proxy on Windows
Now, we will configure settings at the operating system level. For Windows 10 and 11, setting up a proxy server is almost identical. If you prefer not to use proxy managers, you can configure the most important options through the settings application on your Windows OS.
After clicking on 'Open your computer's proxy settings' in Chrome, you'll be redirected to your Windows system settings.
From here, follow these steps:
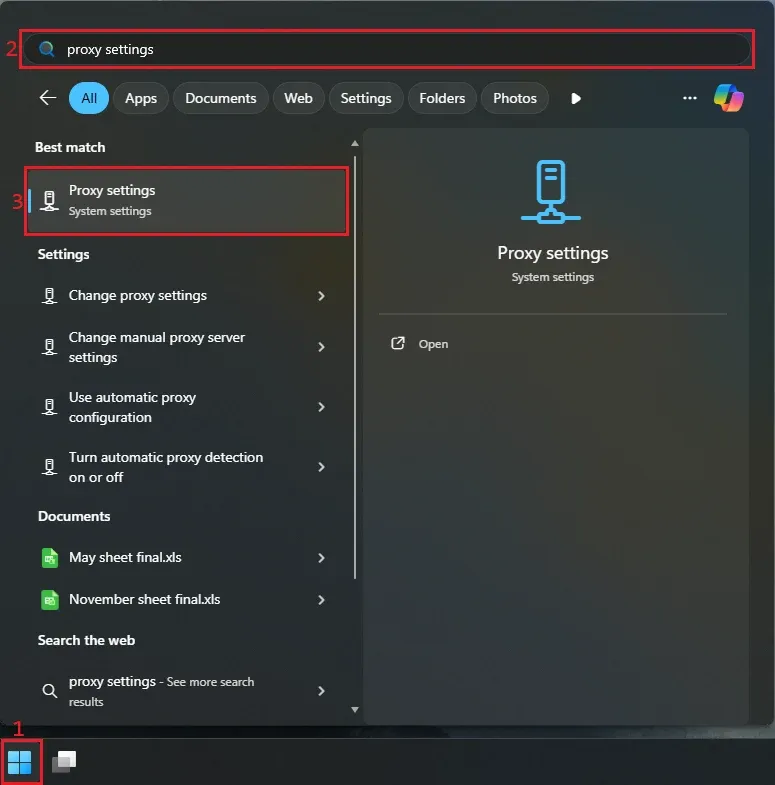
- Click the 'Start' button (1) and type 'proxy settings' (2) in the search bar. Click on 'Proxy settings' (3) in the results.
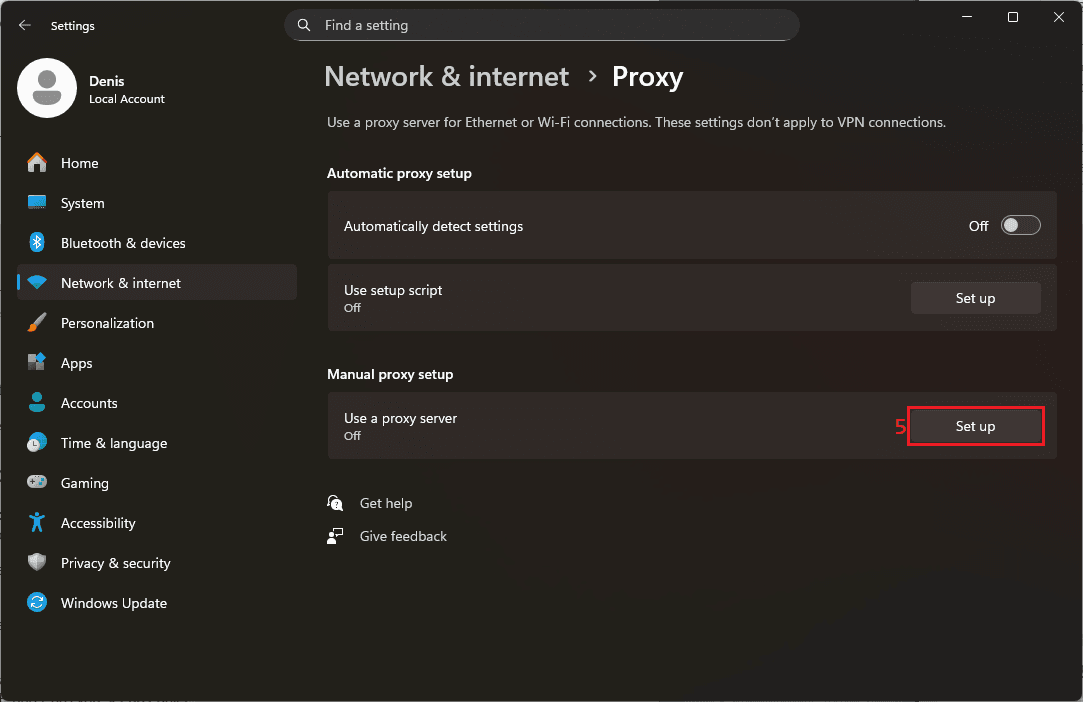
2. Toggle 'Automatically detect settings' (4) to OFF.

3. Scroll down to 'Manual proxy setup' and click the 'Set up' (5) button.
4. Toggle 'Use a proxy server' (6) to ON. Paste your MarsProxies credentials to the 'Proxy IP address' and 'Port' (7) fields, and click 'Save' (8).
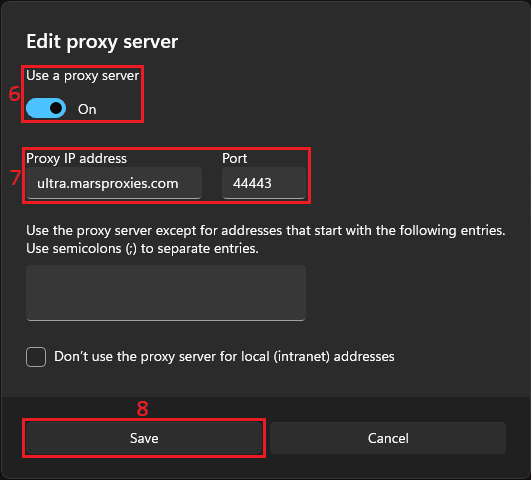
5. Visit WhatIsMyIP or a similar site to confirm your proxy is active.
How to set proxy on Mac
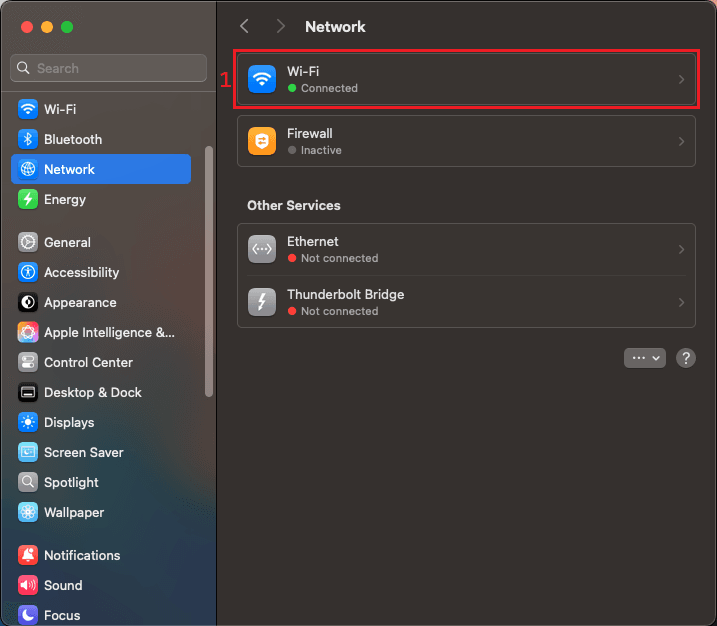
- After clicking 'Open your computer's settings' in the Chrome browser, you'll be redirected to your Mac's network settings for proxy setup.
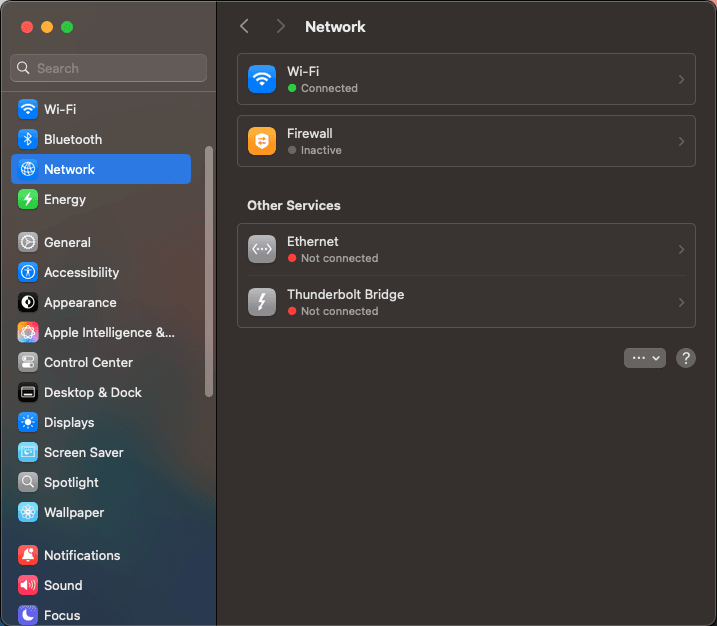
2. In the 'Network' window, select your active connection (1).
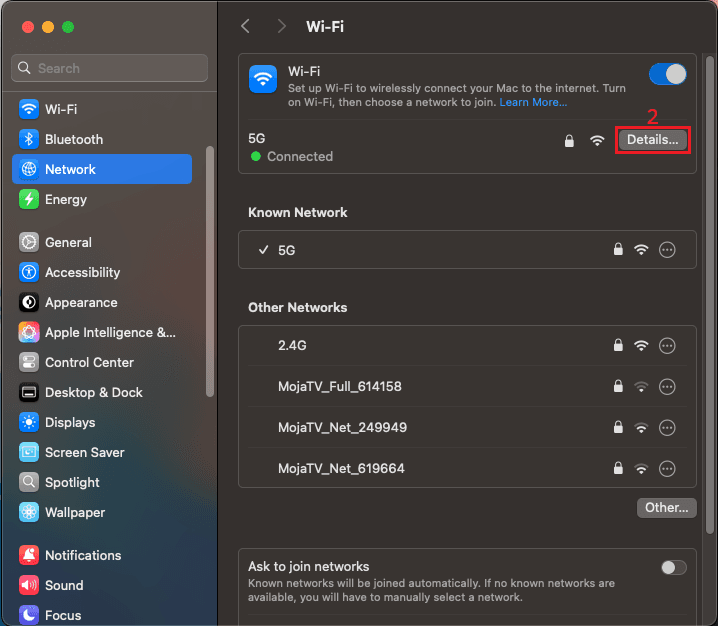
3. In the new window, click the 'Details' (2) button.
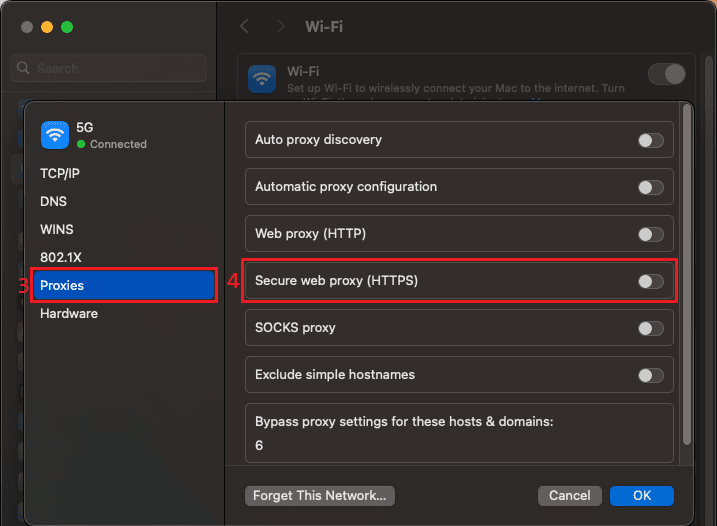
4. Click on 'Proxies' (3) on the left and select the type of proxy protocol (4) you want to configure. In our case, we can use HTTP or HTTPS.
5. Paste your MarsProxies credentials into the 'Server' and 'Port' (5) fields, and click 'OK' (6).
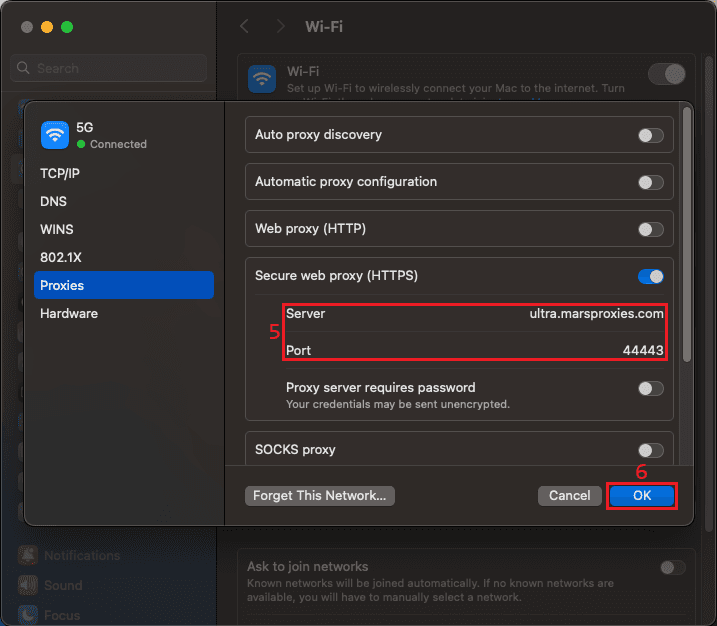
6. Restart Chrome and visit WhatIsMyIP to confirm your proxy is active.
How to set proxy on ChromeOS
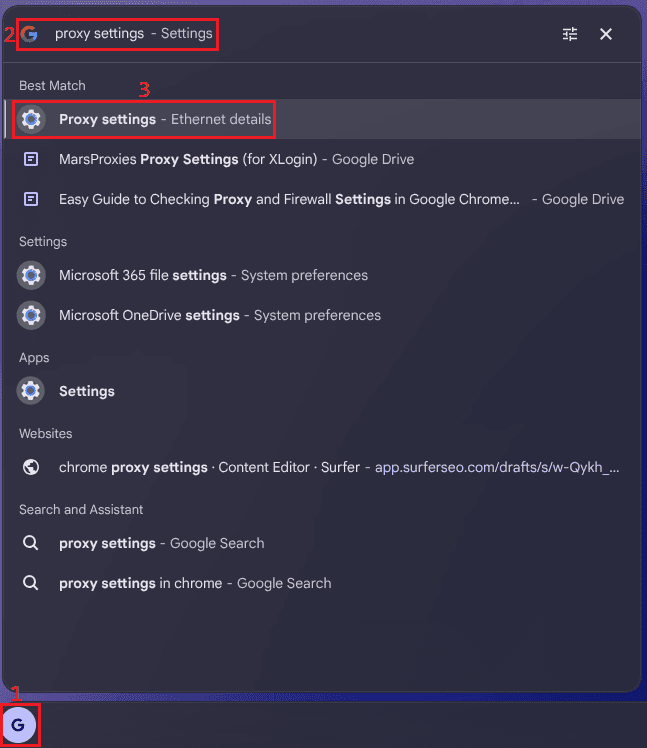
- Click the Google icon (1), type “proxy settings” (2) in the search field and click on 'Proxy Settings' (3) in the results.
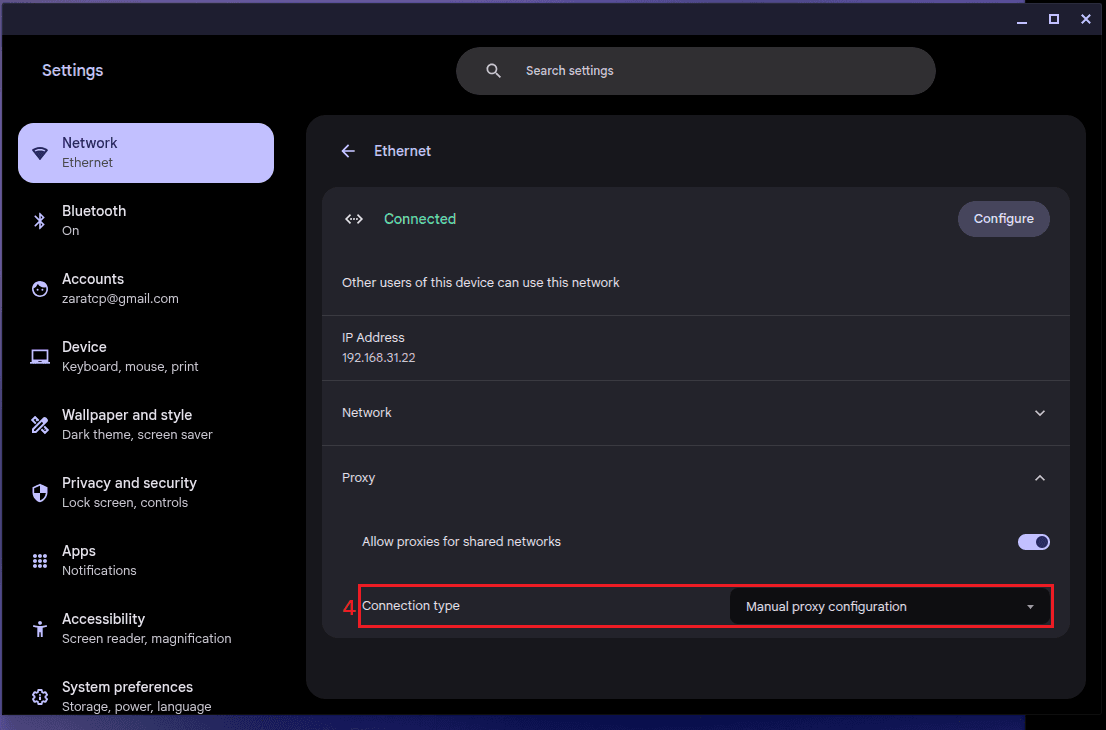
2. Change the 'Connection type' setting to 'Manual proxy configuration' (4).
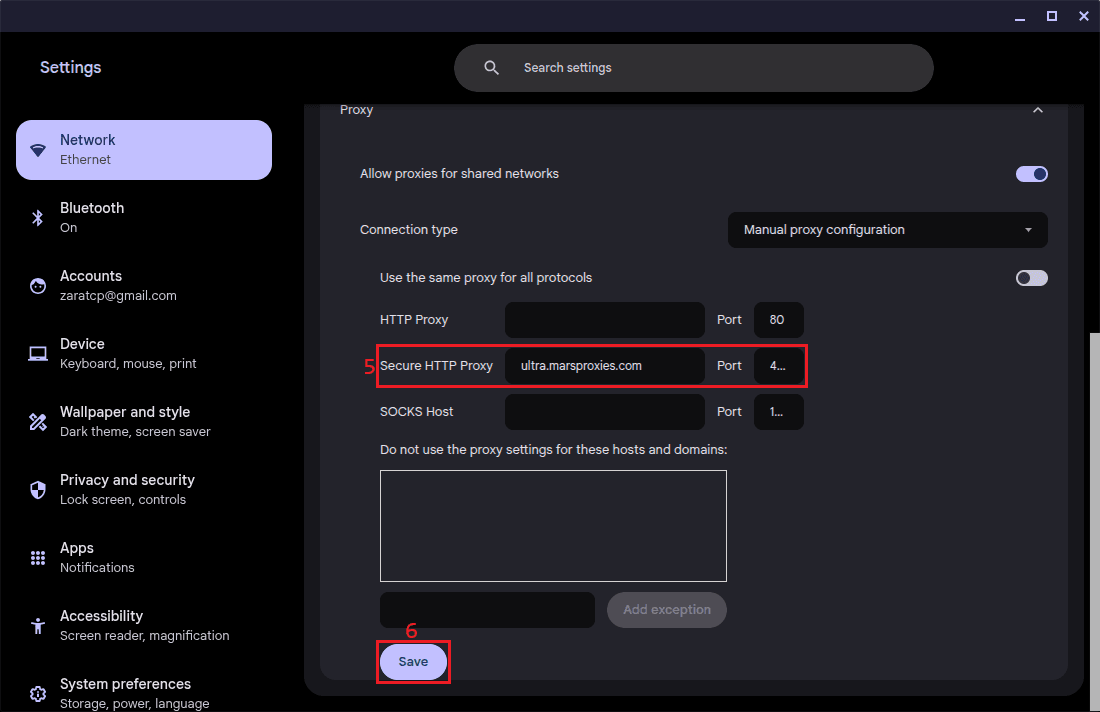
3. Add your MarsProxies credentials (Proxy IP and Port) to the 'Secure HTTP Proxy' (5) fields and click 'Save' (6).
4. Restart Chrome and confirm your proxy is working by visiting WhatIsMyIP.
How to set proxy on mobile
Mobile versions of Chrome can’t take you to your device’s network settings. Instead, you can follow the steps below to change proxy settings as needed.
How to set a proxy on Android
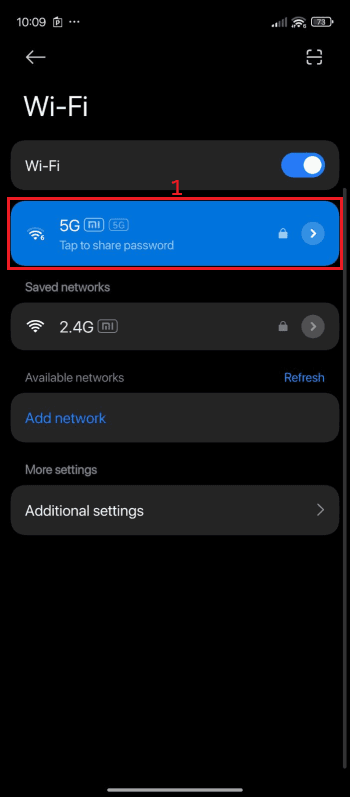
- On Mobile settings, find your active Wi-Fi network (1) and tap on it.
2. Find the Proxy setting and set it to 'Manual' (2).
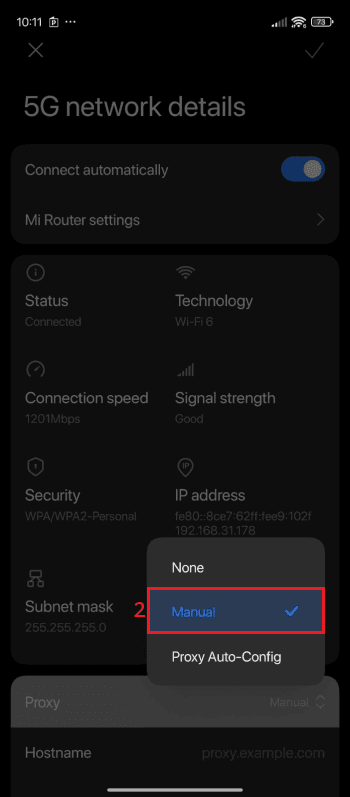
3. Add your MarsProxies credentials to the appropriate fields (3) and tap the checkmark icon (4) to save your settings.
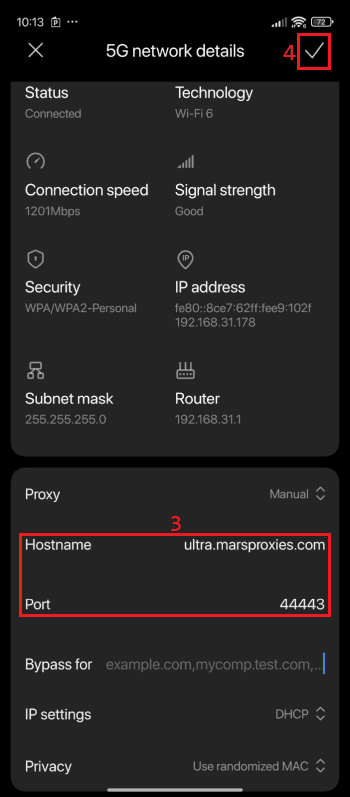
4. Restart Chrome and confirm your connection by visiting WhatIsMyIP.
If configured correctly, you'll see your proxy's IP address. Note that these steps may vary depending on your device and Android version.
How to set a proxy on iOS
- Tap the blue 'i' icon (1) next to your active Wi-Fi connection.
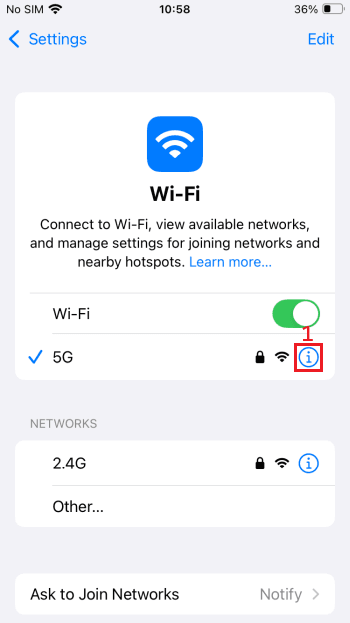
2. Scroll down and tap the 'Configure Proxy' (2) option.
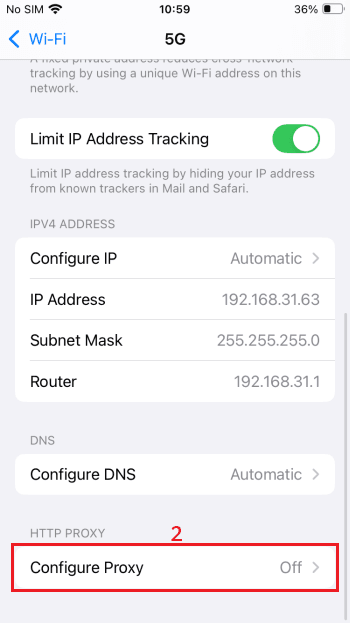
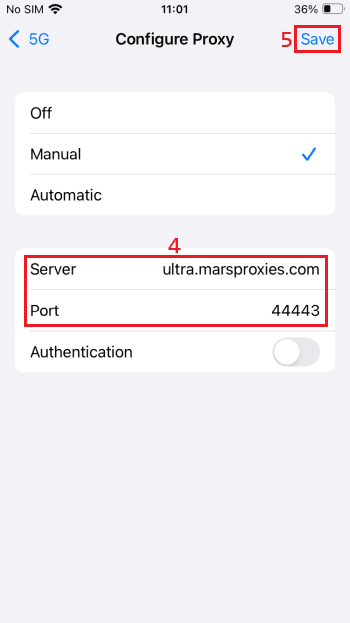
3. Tap the 'Manual' (3) option.

4. Add your credentials to the appropriate fields (4) and tap 'Save' (5).
5. Open Google Chrome and visit WhatIsMyIP. If your IP has changed, your proxy is working.
A simpler alternative: MarsProxies Google Chrome extension
Chrome proxy settings don’t exist, so users can either configure them manually through the system's settings, as Chrome provides an option for that, or use a Chrome extension. And among them, the MarsProxies Chrome extension offers the fastest, simplest, and most reliable way to manage and use proxies in Chrome.
Why use Chrome extensions?
Configuring proxies manually on your system requires you to dig through settings at the system level, enter or change IPs and ports. After you're done with your work, you have to switch them off each time, making it a time-consuming and confusing process, especially if you switch between different proxies too often.
With a Google Chrome extension, everything is managed inside your browser:
- One-click setup: You don’t need to repeatedly open your device's settings.
- Easy switching: You can switch between different proxies instantly.
- More control: Apply proxies only for Chrome without affecting your entire system.
- Security built-in: Your login and authentication details stay protected inside it.
- User friendly: Its easy-to-use UI makes proxy management a breeze even for beginners.
Steps to set proxy on Windows using MarsProxies
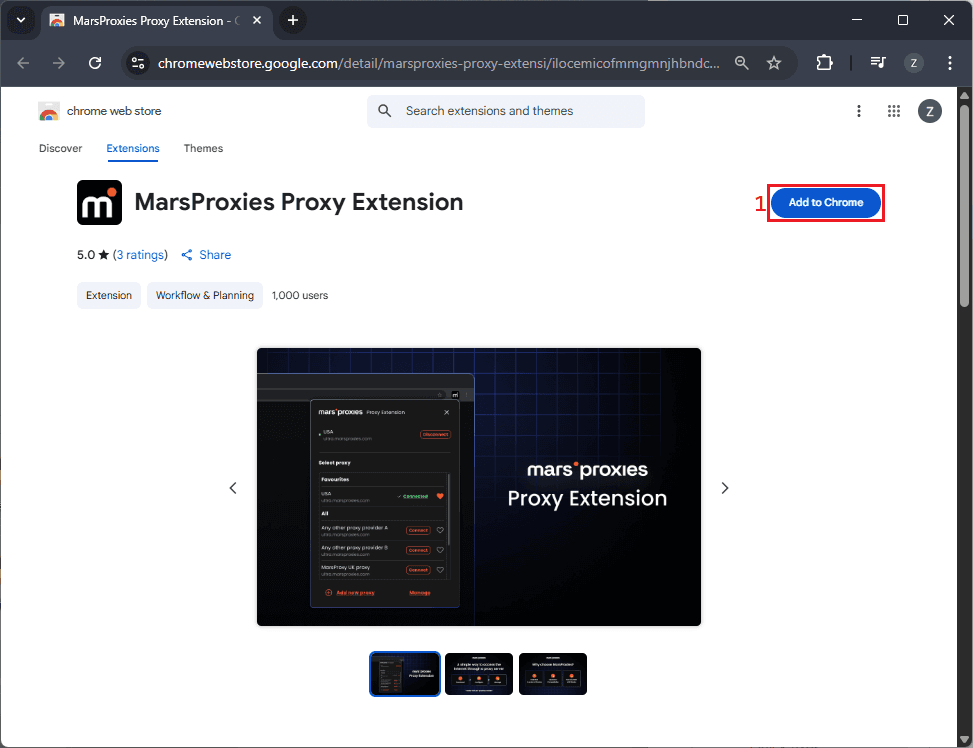
- 1. First, download the MarsProxies Chrome Extension by clicking 'Add to Chrome' (1).
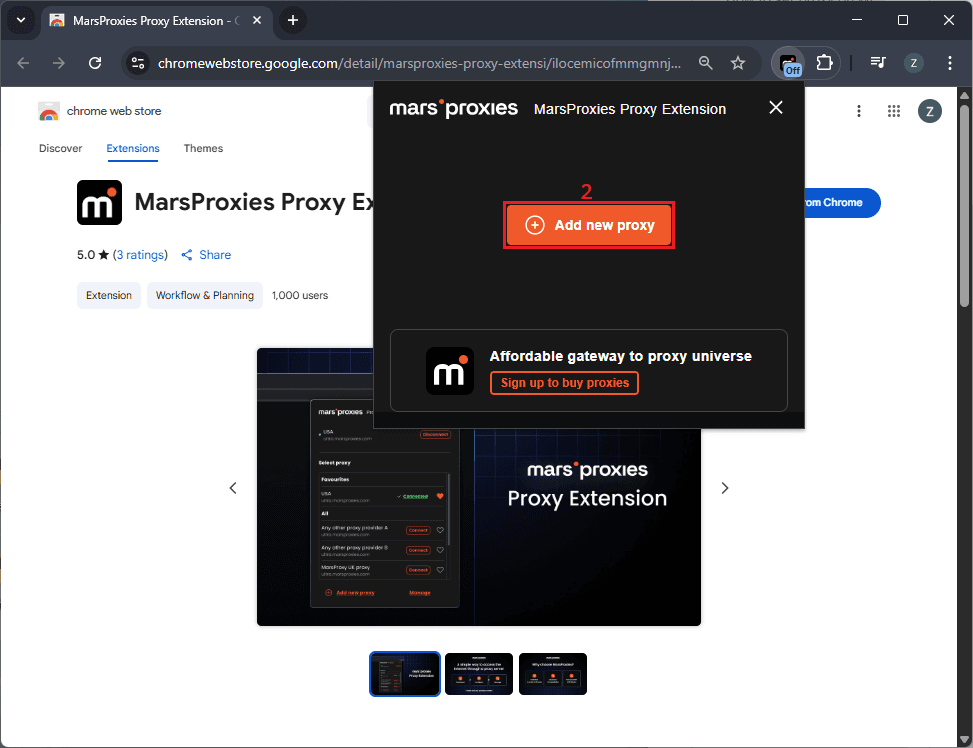
2. Open the extension and click the 'Add new proxy' (2) button.
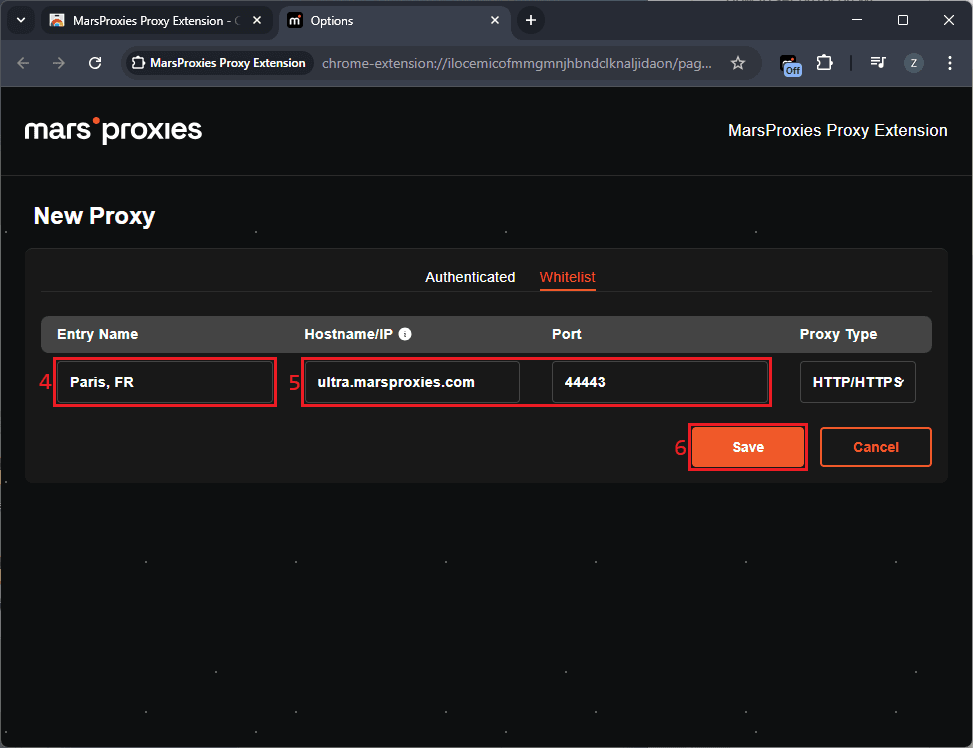
3. Click on the 'Whitelist' (3) tab since you previously whitelisted your IP address in the MarsProxies dashboard.
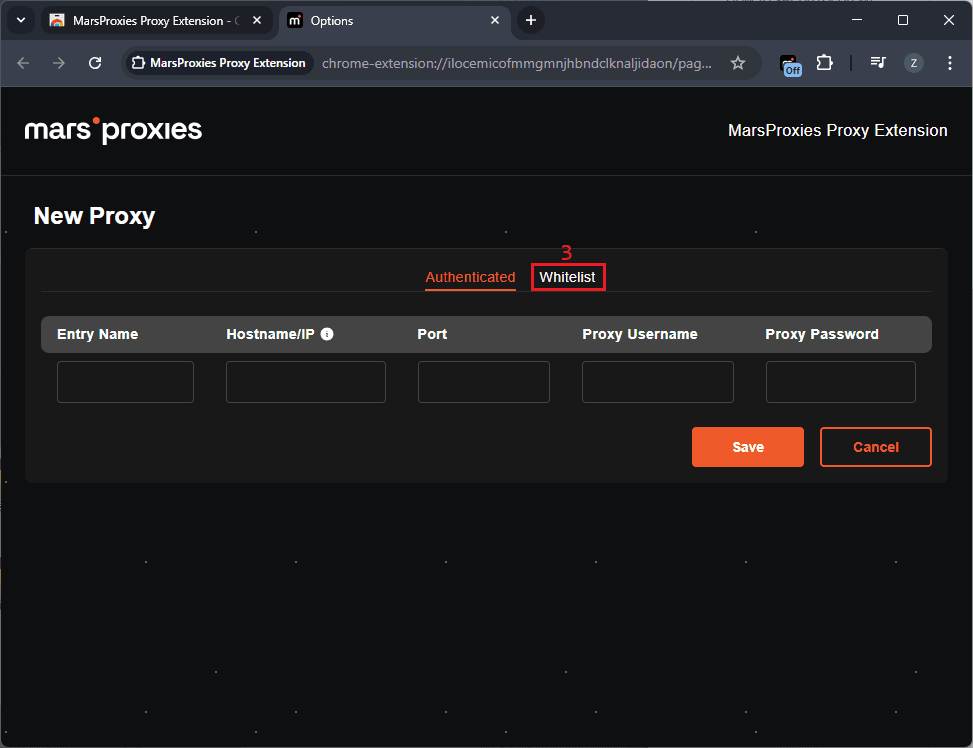
4. Name your proxy (4), paste your credentials into the required fields (5), and click 'Save' (6).
5. Click the extension icon (7), select your newly added proxy from the list, and click 'Connect' (8) to start using it.
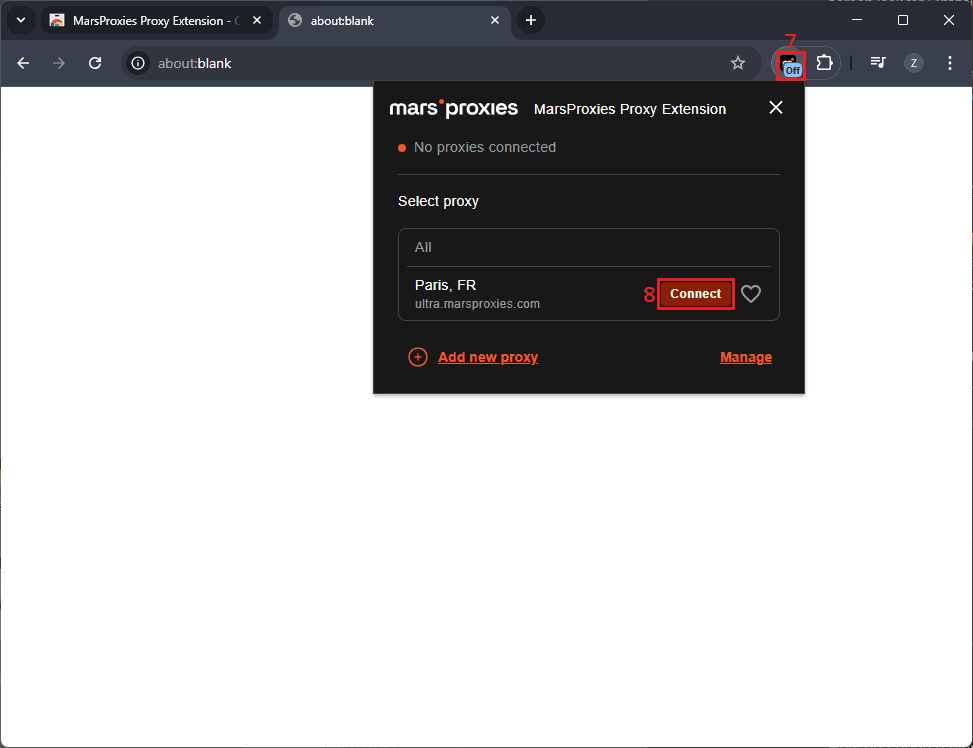
6. To confirm the connection, visit WhatIsMyIP. If everything is configured correctly, you'll see your proxy’s IP address and location.
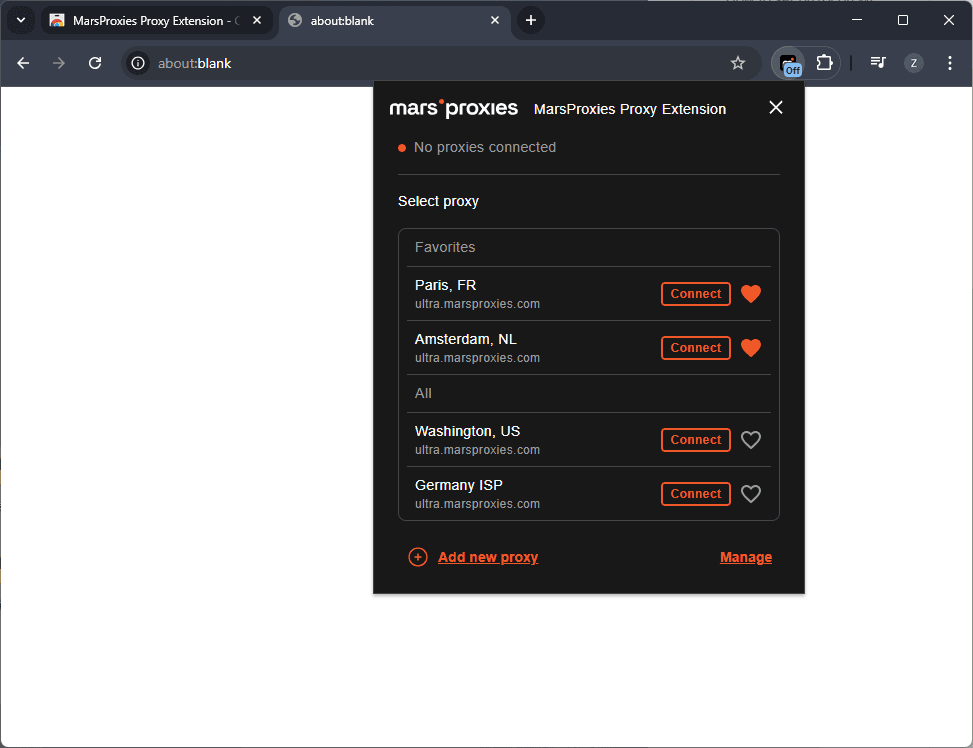
You can also disable the active proxy at any time directly from the extension, switch between different proxies, set favorites, and more.
How to disable proxy in Chrome
Proxies are great for privacy as they mask your network and security, and help in bypassing geo restrictions. It's also important to turn them off so that you don't waste your credits/bandwidth.
If you're trying to troubleshoot a slow internet connection on your system, disabling your proxy and switching to a direct connection is a good starting point.
Unlike some browsers, Chrome itself doesn't support built-in proxy management. Instead, it uses your operating system's settings. This implies that Chrome will immediately stop using a proxy if you do so on Windows, Mac, ChromeOS, Android, or iOS.
Here's how to turn off active proxies across different platforms:
Windows
- In the Windows system proxy settings, scroll to 'Manual proxy setup'.
- Toggle 'Use a proxy server' to OFF.
- Click 'Save' and restart Chrome.
Tip: If you're using the MarsProxies Extension, you can turn off proxy servers directly from your Chrome browser. This will stop all active proxy sessions.
Mac
- In 'Network Preferences', select your active connection and click the 'Details' button.
- Uncheck any active protocols (HTTP, HTTPS, SOCKS).
- Click the 'OK' button and restart Chrome.
Note: If you feel the website is loading faster after disabling the proxy, it means your proxy was causing a delay. It's a common issue if you're trying to access some websites far from your proxy server's location.
Android
To turn off proxies on Android, you need to follow these steps:
- Open 'Settings' and tap on 'Wi-Fi'.
- Long-tap your active Wi-Fi connection.
- Under 'Proxy', switch from 'Manual' to 'None'.
- Save changes and restart Chrome.
iOS
- Open 'Settings' and tap on 'Wi-Fi'.
- Tap the blue 'i' icon next to your active connection.
- Scroll to 'Configure Proxy' and switch from 'Manual' to 'Off'.
- Tap the 'Save' button and restart Chrome.
Tip: On iOS, some apps follow the default system proxy settings, so turning them off here affects both Chrome and other apps.
Common proxy issues in Chrome
Even with the best proxy setup, you may run into problems while using Google Chrome. There are many such issues, but the most common among them are slow browsing speed and connection errors. So let's discuss and try to solve them.
1. Slow browsing speed
A proxy can sometimes cause slower page loading times. In most cases, it happens because:
- The proxy server is overloaded with too many users.
- The proxy server is free or low-quality.
- The proxy server is located in a region far from the website's server.
These are the most common issues that can slow your speed, and here are some quick fixes to help you avoid them.
- If you need reliable access to a particular website, make sure to choose a proxy server from MarsProxies' dashboard that is close to your target website's server. This will minimize delays.
- Use a premium proxy instead of public or free ones for more stable speeds.
- While using proxies, make sure to clear your browser's cache and cookies, as these can also affect speed.
2. Connection errors
In most cases, you'll see errors like “ERR_PROXY_CONNECTION_FAILED” or “Unable to connect to the proxy server.” These errors are mostly caused by entering the wrong host addresses and port numbers. Here are some quick fixes.
- Double-check you’ve entered the proxy host (or IP address) and port number from the MarsProxies dashboard correctly.
- Make sure to enter your current IP in the MarsProxies dashboard by checking WhatIsMyIP.
- Whitelist your IP address in the IP:AUTH section of the MarsProxies dashboard as described above.
- To check if the issue is proxy-related, you can temporarily disable the proxy.
- If using rotating proxies, try switching to a static session for better stability.
Manual proxy vs. Extension vs. VPN
There are three main options when setting up proxies in Chrome. Manual proxy configuration, browser extension, and VPNs. Each option has its pros and cons:
Basic, good for IP masking, but traffic isn’t encrypted
Safer and faster than manual
Highest, encrypts all traffic, not just browser activity
Fast with high-quality proxies, but switching requires extra steps
Setup and management is faster, zero performance impact
Slower than proxies due to the added encryption layer
Not beginner-friendly
Easiest option, advanced proxy management control
Easy to install but per-app controls may not be available
Conclusion
Setting up a proxy in Chrome might sound technical, but once you know where your device’s internet settings are, it's a simple process. With proxies, you get more control over browsing, whether you’re concerned about privacy, security, or trying to access region-restricted websites.
If reliable internet access is important to you, premium services like MarsProxies can spare you the trouble that free proxies can bring. If you’re looking for more tips on proxy usage or want to share your experiences, make sure to visit our Discord community.
What is a Chrome proxy?
A Chrome proxy routes your browser traffic through a server, hiding your real IP address. It’s commonly used to access geo-restricted content and improve online privacy and you can set it up in your OS settings or using extensions and proxy managers.
Where are Chrome proxy settings?
Chrome uses your device's system settings since it has no proxy server settings built in. To check your proxy and connection settings from Chrome, click the three-dot icon and select 'Settings'. Click on 'System' in the menu on the left, and then click the 'Open your computer's proxy settings' option.
How to fix proxy errors in Chrome?
Double-check if the proxy host or IP address and port number of the specified proxy server are correct. If using MarsProxies, whitelist your IP address. After making any changes to your configuration, make sure to restart Chrome.
Can I use free proxies in Chrome?
Yes, free proxies are widely available, but they're often slow and insecure. Premium providers like MarsProxies are a significantly safer option, especially for sensitive tasks.
How to tell if Chrome proxy is working?
Visit WhatIsMyIP or a similar website before and after setting up your proxy. If your IP address changes after configuring your proxy, it's working.