An iPhone proxy can open a whole new world of opportunity and convenience for your iOS internet experience. With it, you can say goodbye to targeted ads that make you feel uneasy and location-based restrictions that cause frustration.
Even better, you can use an iPhone proxy server address to manage your social media business with multiple accounts on your iPhone. And if you're into the world of sneakers, iPhone proxies can help you cop the latest releases with finesse.
With this in mind, this article will take you through the process of configuring proxy settings on iOS. Keep reading below for detailed insights.
What Is a Proxy?
Think of a proxy server as a middleman in regard to your internet connection. Its job is to reroute your internet connection via a new IP address, ideally in a new location.
Therefore, when you send a request to a website via an iPhone proxy, the website server won't interact with your original IP address, as with a standard internet connection. This time, it will recognize the new proxy-provided IP and send the response to that address.
Benefits of Proxies
So, why go through all this trouble? Here are the benefits you stand to gain when using a proxy server.
- Improved privacy
These tools facilitate better online privacy by masking your original IP address, which, in turn, hides your location and identity. This way, websites cannot track your online activity since your digital footprint is anonymous.
- Better security
You can configure a proxy server to block access to malicious websites that can compromise network security. Similarly, a HTTPS-supported proxy server can encrypt web requests, further enhancing security.
- Access to geo-restricted content
It's common for websites to restrict their content to specific locations. To evade these blocks, simply use proxy servers with IPs in locations with access to your desired content. It's as easy as that.
Potential Issues With Using a Proxy Server
Here are some of the possible risks associated with proxies:
- Possible decrease in speed
It's possible to experience a slight decrease in internet speed when using proxy servers. The proxy's rerouting action may increase the time it takes for data to travel from your device to the host, causing a slight delay.
Additionally, the physical distance between your device, the proxy, and the host can affect your speed. For best results, opt for a proxy server geographically close to your location and the target web server.
- Free proxies may be unreliable
Free proxies are rarely what they seem. Most are compromised IPs that can breach your data and even infect your device with viruses. Even worse, many free IPs offer lackluster performance compared to premium proxy addresses.
- Security risks with untrusted proxies
Hackers use compromised proxies to infect user devices with malware. Such untrusted IPs can corrupt your data's integrity and expose personal information to hackers. This is why you should only choose trusted proxy providers like MarsProxies.
Types of Proxies
There are different types of proxies, each with their unique features. They are listed below.
- HTTP proxy
An HTTP proxy is designed to handle HTTP traffic, the primary protocol for web browsing. It is ideal for general surfing and sending as well as receiving requests.
- HTTP(S) proxy
This tool is similar to an HTTP proxy with one slight modification—it handles HTTP(S) traffic, which is simply HTTP traffic encrypted using SSL or TSL.
- SOCKS proxy
A SOCKS (Socket Secure) proxy offers a higher level of functionality than the two types discussed because it isn't limited to HTTP traffic—it can handle many different protocols, including FTP, SMTP, SSH, and others
Why Use a Proxy on iPhone?
By now, you're familiar with proxies, their various types, and their general benefits. Let's delve deeper and explore the specific advantages they offer for iOS devices.
So, why configure your iPhone to connect to the web using a proxy server? The benefits are way better than you think. Keep reading below.
Control Over iOS Security
iOS allows users to configure proxy settings directly within the WiFi options. This means you can set up an iPhone proxy server for every WiFi network, allowing you to enjoy better security, especially when using public networks prone to security issues.
On top of that, you can use a VPN to configure your proxy settings. Doing so will ensure all data sent from your device is encrypted. More on that later.
Access to Restricted Content
It's common for applications to be restricted to select locations on the App Store. To get access to restricted apps, websites, and other digital content regardless of your location, switch to an iPhone IP address in a country with access to the app by using an iPhone proxy.
Improved Browsing Speed and Experience
An iPhone proxy server can cache frequently requested website pages and distribute load traffic, enhancing browsing speed and experience. For caching, it stores a copy of the resource, delivering this cached version when you make the same request later, which significantly reduces load time.
Additionally, to enhance efficiency, it can distribute traffic load across multiple servers, ensuring no single server gets overwhelmed during heavy tasks.
How to Set Up a Proxy on iPhone
There are two ways to set up a proxy server on iPhone: using Wi-Fi settings or VPN applications with built-in proxy functionality. We've explained them in detail below.
Using Wi-Fi Settings
Here's how to configure iPhone proxy settings using the iOS Wi-Fi configuration feature:
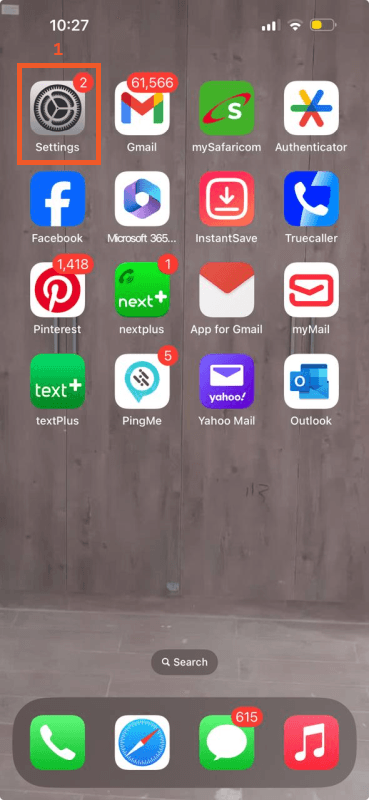
Step 1: Open Settings
Navigate to the main iOS Settings app (1) on your device.
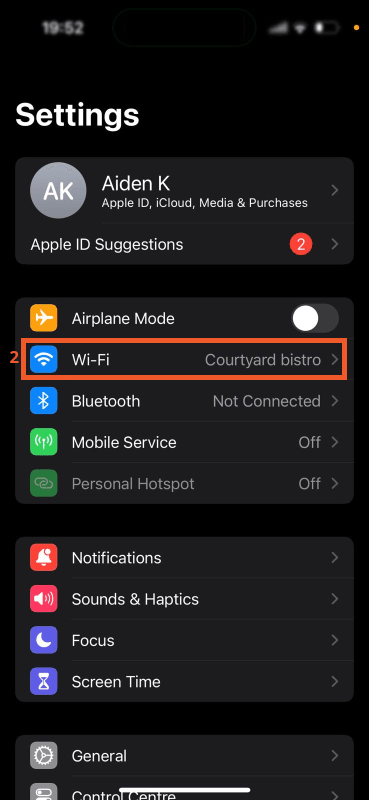
Step 2: Open Wi-Fi
Tap on Wi-Fi (2) to open the network's list.
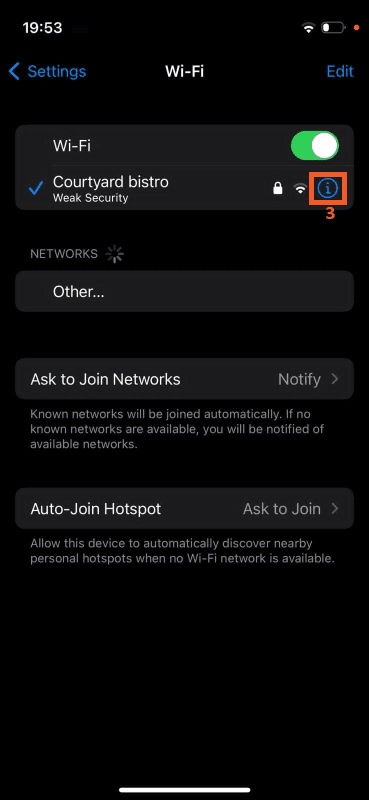
Step 3: Select your network
Find the network you are connected to from the list and tap the blue "i" icon (3) next to the network's name.
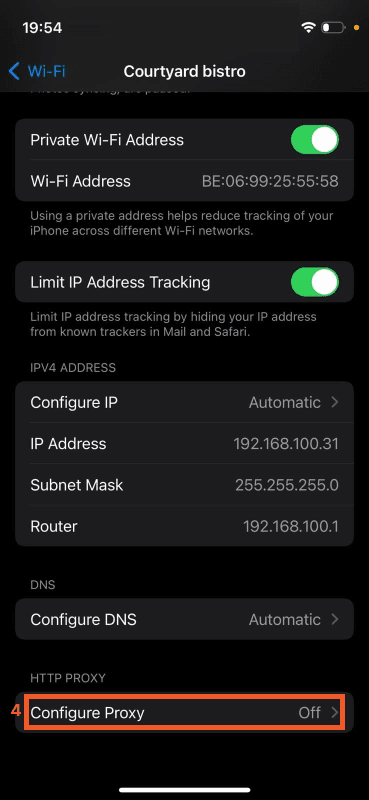
Step 4: Configure iPhone proxy settings
Now, it's time to enter the proxy details from your provider. Scroll to the bottom of the screen and find the HTTP proxy section (4). Toggle it on.
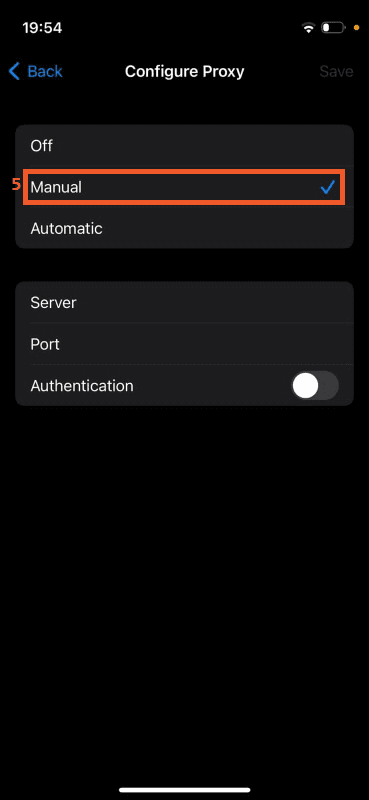
Step 5: Select manual proxy configuration
Since we will be using manual configuration to set up the proxy settings, select Manual configuration (5).
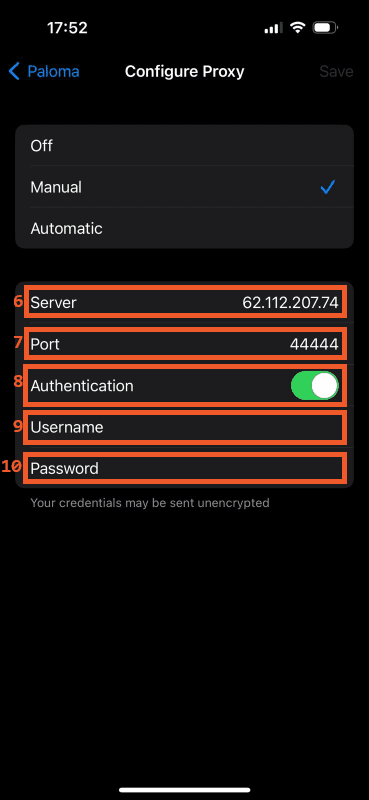
Step 6: Add your proxy credentials
Fill in the Server field (6) with the proxy server address. Once done, enter the port number of your proxy server in the Port field (7). Finally, if your proxy requires authentication, toggle Authentication (8) on and enter your proxy username (9) and proxy password (10).
Step 7: Save your settings
Finally, press the Save button in the top right corner of the screen to save your proxy settings.
Keep in mind that these instructions work for residential proxies and any other proxy type. Now that you understand how manual configuration works on iOS let's look at the second option.
Using VPN Apps With Built-in Proxy
If you don't want to configure the iPhone proxy server manually, you can use VPN apps with built-in proxy server functionality. Popular examples include NordVPN, Express VPN, and Surfshark.
To configure proxy server on iPhone via these applications, select one and open an account. Once done, find a section labeled "Proxy," "HTTP Proxy," or something similar. The exact labeling will vary depending on the app you choose.
After locating this feature, enter your proxy details, including the address, port number, and authentication details, to browse the web via iPhone proxies configured in the app.
How to Verify the Connection
To confirm that your IP address has changed, regardless of the method you use to configure proxy servers, use connection tools like whatismyipaddress.com and iplocation.net. Ideally, the IP should correspond to the address and location you chose when selecting the proxy.
How to Troubleshoot Common Issues
In case the connection verification tools mentioned above still display your original IP or you can't access the internet, there's a problem somewhere. Here's how you can diagnose and resolve such issues.
- Start by confirming that the proxies are online using a different network. If they're offline, contact your proxy provider or switch to different servers.
- In other cases, incorrect proxy settings may jam the connection. Access your iOS proxy settings using the steps we've discussed and verify that the address, port, and authentication details are correct.
- If the connection problem persists, consider checking your internet connection. Try disconnecting from the proxy server and accessing the web directly. If your internet is still unavailable, check the network cables and restart your modem or router.
And if you come across any proxy error codes, our blog explains how to diagnose and resolve them.
Conclusion
By now, you are well equipped to set up a proxy on your iPhone. You may use the WiFi settings or set up the proxies using a VPN app with built-in proxy server features.
With an iPhone proxy, you don't have to worry about privacy and websites tracking your digital footprint since this tool will make your internet activity anonymous. Even better, you can use iPhone proxies to boost connection quality by choosing an IP address close to your location and the target host server. Try iPhone proxies today!