Modifying the user agent string in Chrome changes how websites identify you. They may display a version for a different browser or the mobile version, which developers widely use for testing.
It can also help you overcome content blackouts due to browser incompatibility or geographical restrictions. The easiest way is to use Chrome Developer Tools, but there are also user agent switchers if you need to change them often.
In this article, we walk you through it step by step.
How to change user agent in Chrome using DevTools
Here is the easiest way to change the user agent in the Chrome browser.
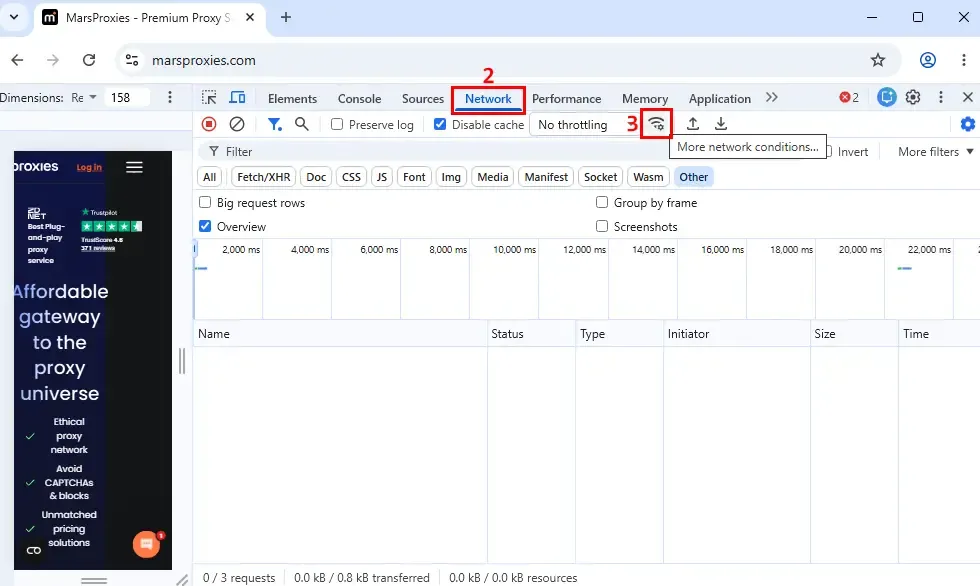
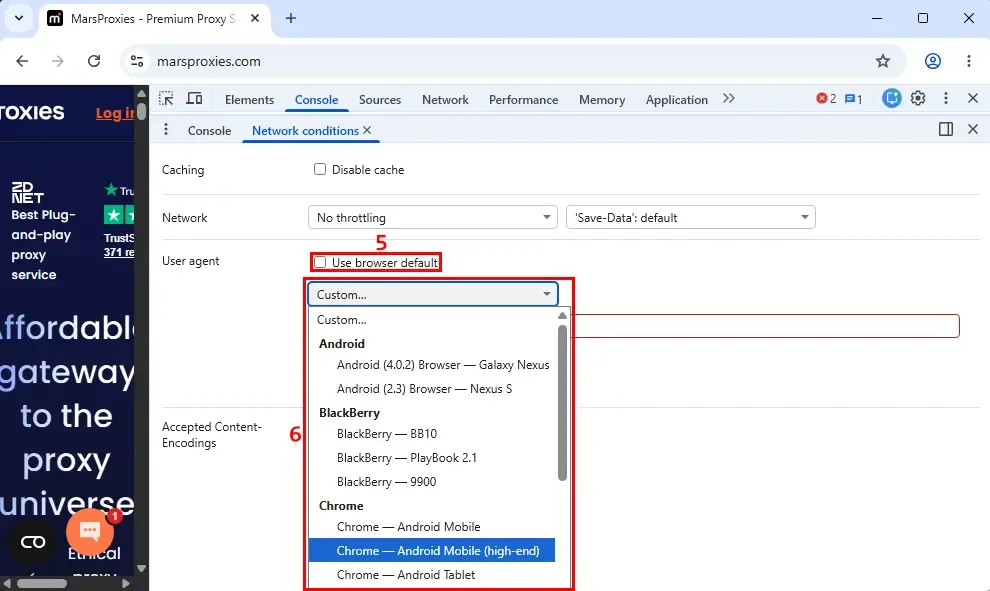
1. The Developer Tools are on your right. Click the 'Network' (2) option in the top side menu, followed by the 'More network conditions' (3) icon.

2. If you don't see the new options below, drag the options bar up until you see the User Agent selection (4).
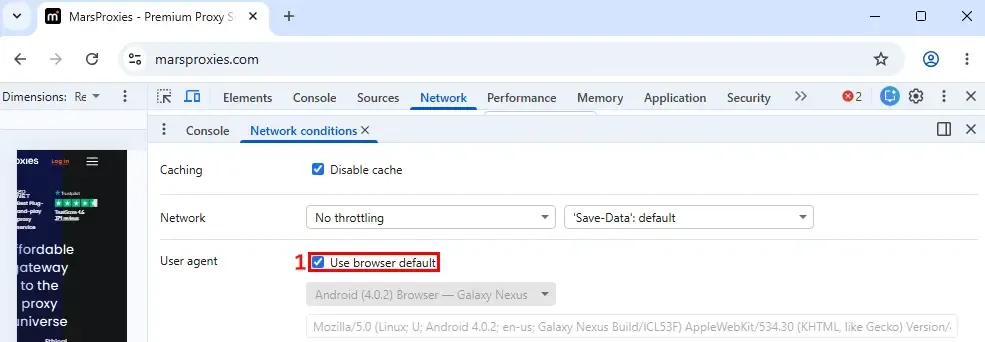
3. Uncheck the 'Use browser default' (5) option and pick a user agent from the list (6).
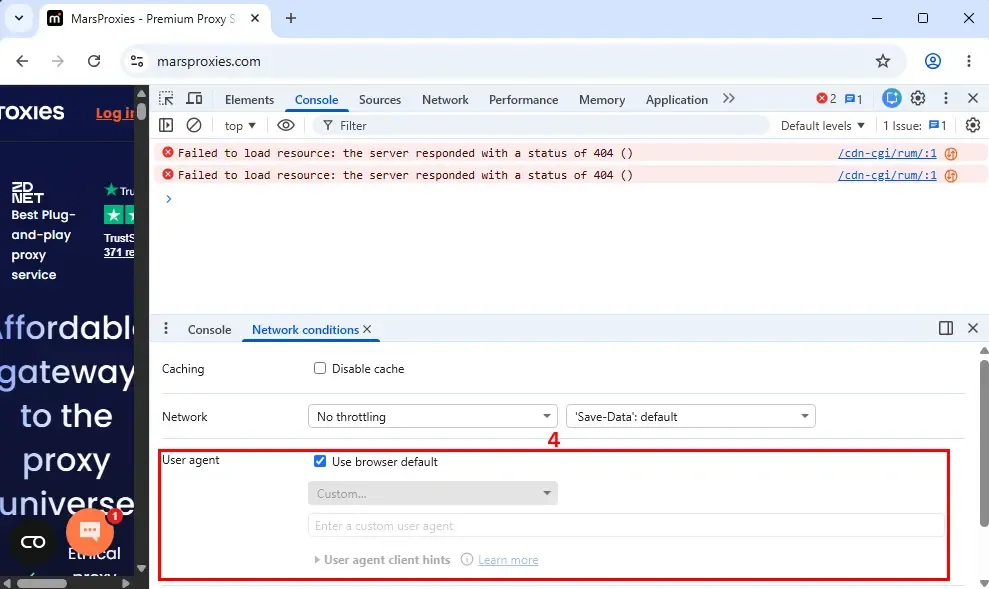
4. Alternatively, you can specify a desired user agent in the field (7) below the list.Refresh the page, and that's it. Now your Chrome has changed its user agent and pretends to be a different device on selected websites.
5. Alternatively, you can specify a desired user agent in the field (7) below the list.
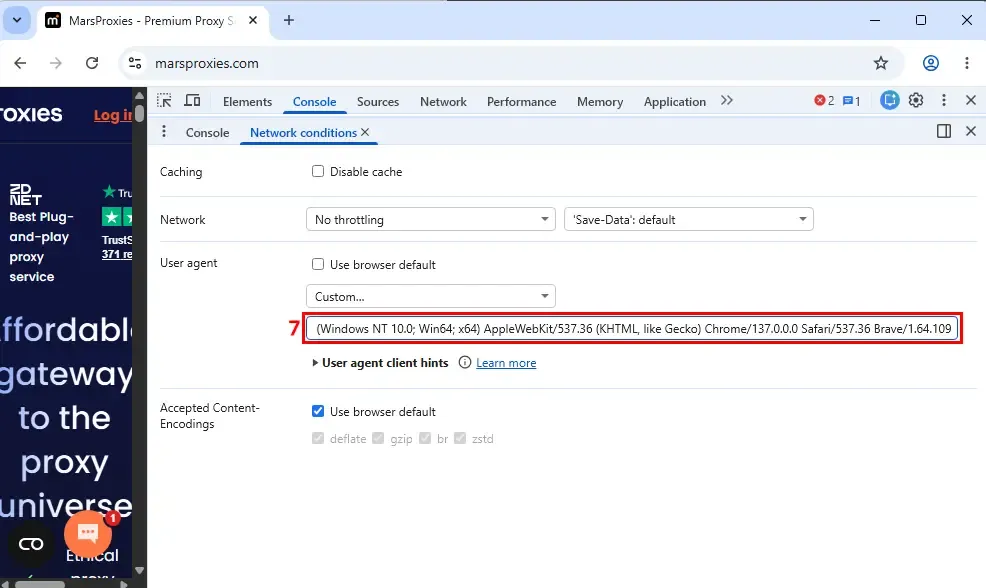
Refresh the page, and that's it. Now your Chrome has changed its user agent and pretends to be a different device on selected websites.
How to use a custom user agent string in Chrome
Using a custom user agent is beneficial to test specific environments. Suppose you are testing your website for a certain mobile device, like the Google Pixel 10 Pro Fold. In this case, in the DevTools 'Network conditions' panel, you have to input a custom mobile user agent for this device to modify HTTP headers.
Keep in mind that this works for server-side environments, like what data is sent to the client device. For the visual environment testing, the client browser considers aspect ratio, touch boundaries, and screen dimensions, which aren't specified in the user agent.
Chrome on Windows 11
Mozilla/5.0 (Windows NT 10.0; Win64; x64) AppleWebKit/537.36 (KHTML, like Gecko) Chrome/142.0.0.0 Safari/537.36
Chrome on macOS
Mozilla/5.0 (Macintosh; Intel Mac OS X 10_15_7) AppleWebKit/537.36 (KHTML, like Gecko) Chrome/142.0.0.0 Safari/537.36
Chrome on Android
Mozilla/5.0 (Linux; Android 14; Pixel 8) AppleWebKit/537.36 (KHTML, like Gecko) Chrome/142.0.0.0 Mobile Safari/537.36
Don't be surprised that Chrome browser user agents start with the word “Mozilla.” This is a historical technical nuance of the internet's development.
The essential information begins after it. In the first string, “Windows NT 10.0” and “Win64” define the operating system and its architecture. “AppleWebKit” defines the rendering engine. “KHTML, like Gecko” is the compatibility token, which is another historical technicality. Lastly, “Chrome/142.0.0.0” tells the exact Chrome version and indicates that Chrome can be treated like Safari.
Make sure you write down all user agent strings correctly. There shouldn't be any unnecessary empty spaces, mismatched parentheses, or wrong attributes. User agent strings are also case-sensitive.
How to check that the user agent changed
Whether you're testing your website performance or web scraping, it is always best to verify whether you did override user agent successfully. Below, we show you two methods for verifying your new user agent.
Use this method after you have specified a user agent string in the Network conditions panel and refreshed the website.
1. In the 'Network conditions', look for the 'Name' (1) section, located above it in the 'Network' tab.
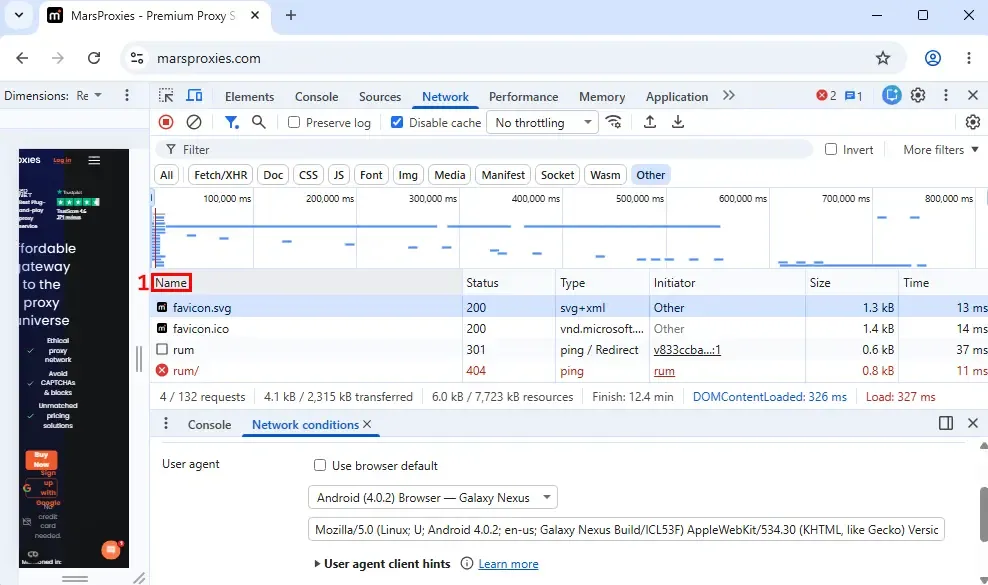
2. Left-click on the name, like the 'favicon.svg' (2) in our example. Notice the 'Headers' (3) tab to the right and scroll all the way down.
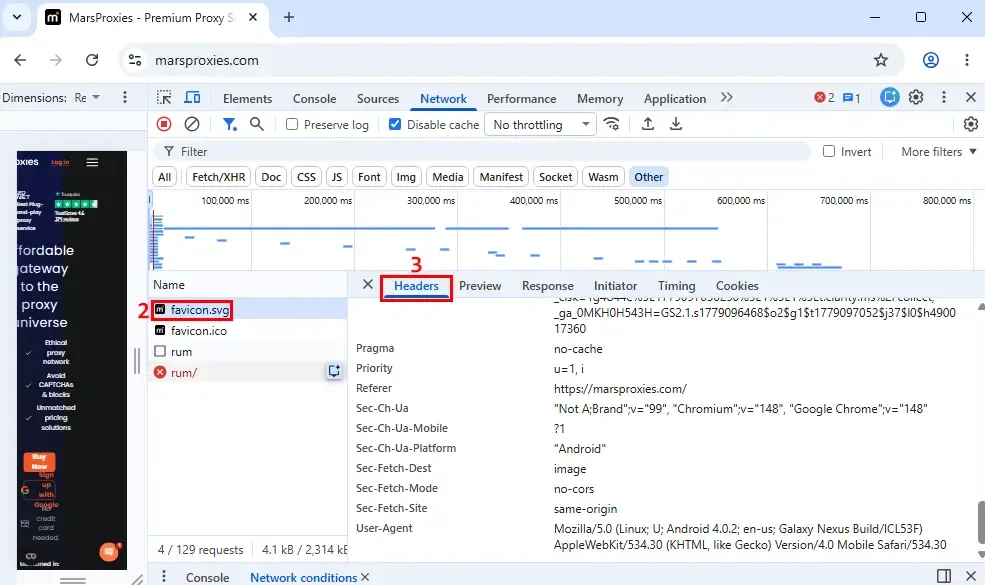
The user agent string is at the very bottom. Although we are writing this guide on a Windows 11 PC, it shows our user agent belongs to a Linux running Android, which we specified as an example.
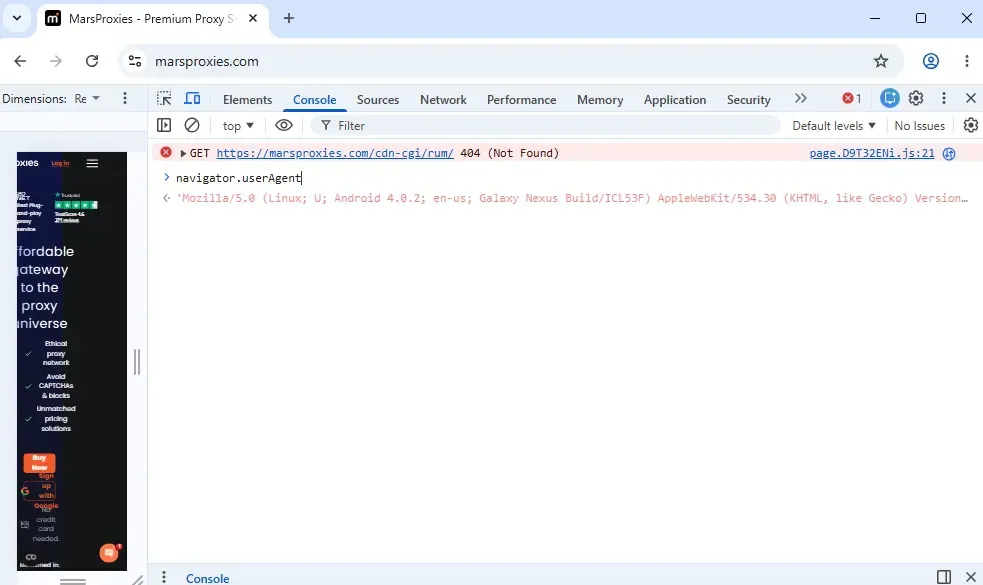
Alternatively, you can use the Console tab in the same developer tools. Select Console from the top options menu and type:
navigator.userAgent
The Console will automatically display your current user agent.
Please remember that you do need to refresh the website for the user agent switch to occur.
How to reset Chrome to the default user agent
Switching back to the default user agent string is exceptionally easy. In the same 'Network conditions' panel, simply tick the 'Use browser default' (1) checkbox and refresh the website once again.
Common issues when changing user agent in Chrome
As you can see, this process is easy and takes a few steps. You also don't need a user agent switcher to get a different user agent. However, you may still run into common issues.
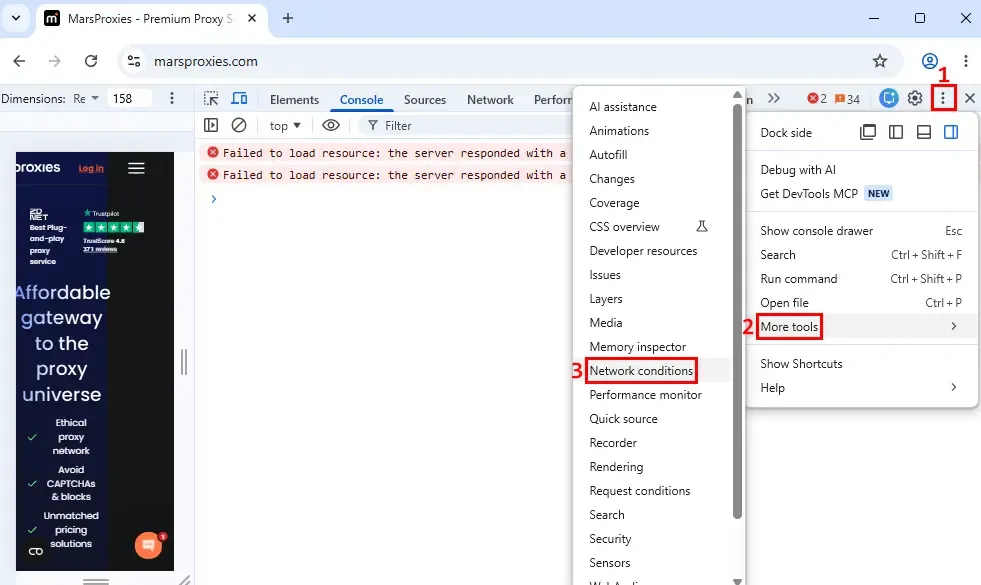
DevTools can be a bit hard to navigate, especially if you're new to them. If you can't find the 'Network conditions' panel, click the three vertical dots (1) on the right side of DevTools. Then, select 'More tools' (2) and click on 'Network conditions' (3) there.
If you use a custom user agent string, make sure it is written correctly. Firstly, spellcheck to fix any grammar and capitalization errors. Also, make sure it is a legitimate user-agent string that is technically correct. For example, you cannot specify an operating system and a rendering engine that do not work together.
A few problems may cause websites to display the same content even after you verify the user-agent switch. Firstly, you may have simply forgotten to refresh the website.
If you did, clear out the browser's cache. Sometimes, the browser displays the cached version instead. Lastly, make further modifications using the 'Client Hints' feature, which is found in the same 'Network conditions' panel. They break down your device into information units, which you can modify to get different server responses.
Alternative: Use a Chrome extension
Manual setup is great because it gives you more control over details. However, it is also more time-consuming. Instead, you can use a browser extension like User Agent Switcher.
Although you still have to add your user agents manually, you won't have to navigate to the 'Network conditions' panel each time you require a new user agent.
Conclusion
You don't have to leave Chrome to switch your user agents. All you have to do is locate the required settings in its 'Network conditions' panel, as we've shown above. But if you're web scraping, you will also need to change Chrome proxy settings.
FAQ
Where is the Network conditions panel in Chrome?
Open Chrome DevTools by pressing CTRL+shift+J simultaneously. Find the 'Network' tab to your right and then three vertical waves that open the 'More network conditions' section.
Why is the site still detecting Chrome after I changed the user agent?
First, make sure your user agent string doesn’t contain any grammatical or technical errors. Also, some sites implement online surveillance methods that reveal what browser you use, even if you have modified the original user agent.
Does changing the user agent make Chrome act like another browser?
No, it makes only websites respond to Chrome like it were a different browser. Your Chrome version will work exactly the same regardless of the user agent you use.
Does the user agent change stay active after I close DevTools?
No, Chrome will immediately reset the user agent to the default value after closing DevTools.
Why does changing the user agent not always show the mobile version of a site?
Modern web development tools do not rely only on the user agent to display the website. They inspect the actual resolution and aspect ratio of your screen and send the correct layout, even if your user agent says otherwise.