
SOCKS5 is an internet protocol that routes traffic through a proxy server. It supports proxy username and password authentication, adding an extra layer of security. Also, it is protocol-agnostic, finely tuned for P2P use cases (such as torrenting), and web scraping modern applications using the UDP protocol.
SOCKS5h protocol version also resolves proxy DNS to route all DNS requests through the established connection, preventing DNS leaks.
If you're using Firefox for these activities, you can add SOCKS5 proxies in two ways. You can use a Firefox extension, like the MarsProxies Firefox browser extension. Or you can set them up using native Firefox settings.
Either way, it will mask your original IP address and route the traffic through a proxy server. Here's how to do it.
What you need before setting up
SOCKS5 connects to a proxy server using the following four criteria:
- Host/IP. This is the online "address" of the proxy server.
- Port. It shows which "doors" to use to access this server.
- SOCKS5. You need a proxy that supports the SOCKS5 protocol.
- Credentials if required. Proxy credentials are required if authentication is enabled.
In the following section, we will show you how to get this data from the MarsProxies dashboard and add it to the Firefox extension. Once you get the hang of it, you can do it within a few minutes.
How to set up a SOCKS5 proxy in Firefox with MarsProxies extension
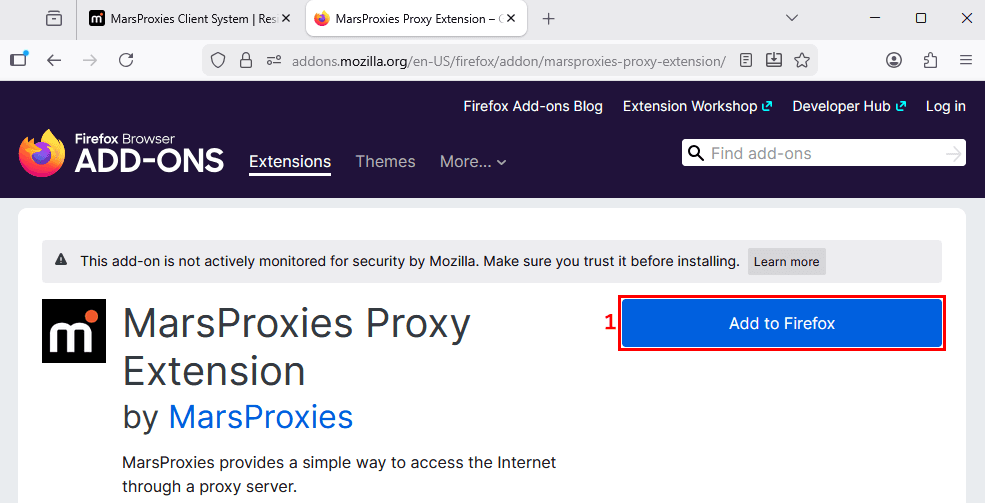
1. Install MarsProxies Firefox browser extension by clicking the 'Add to Firefox' (1) button.
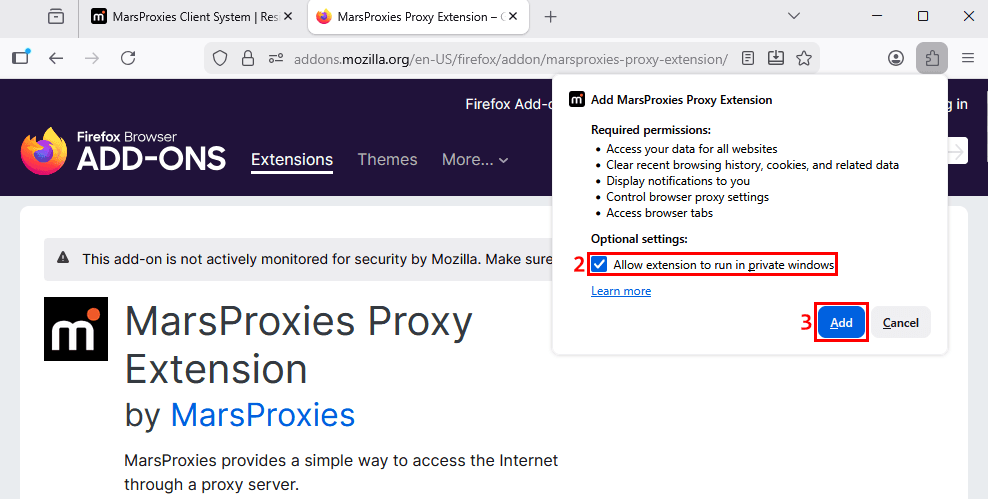
2. Make sure you select the 'Allow extension to run in private windows' (2) option and click the ‘Add’ (3) button.
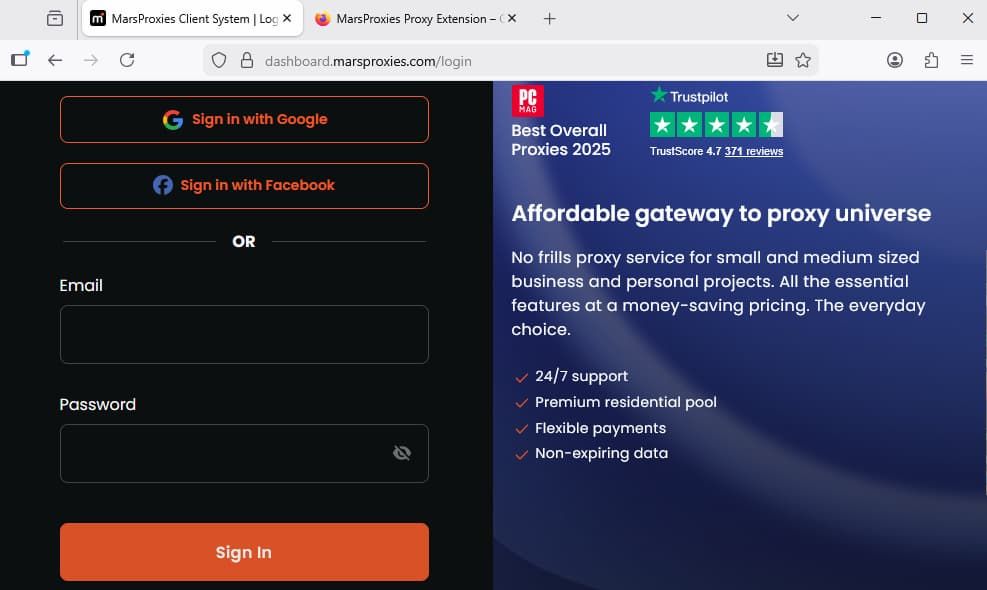
3. Go to MarsProxies website and log in to your account.
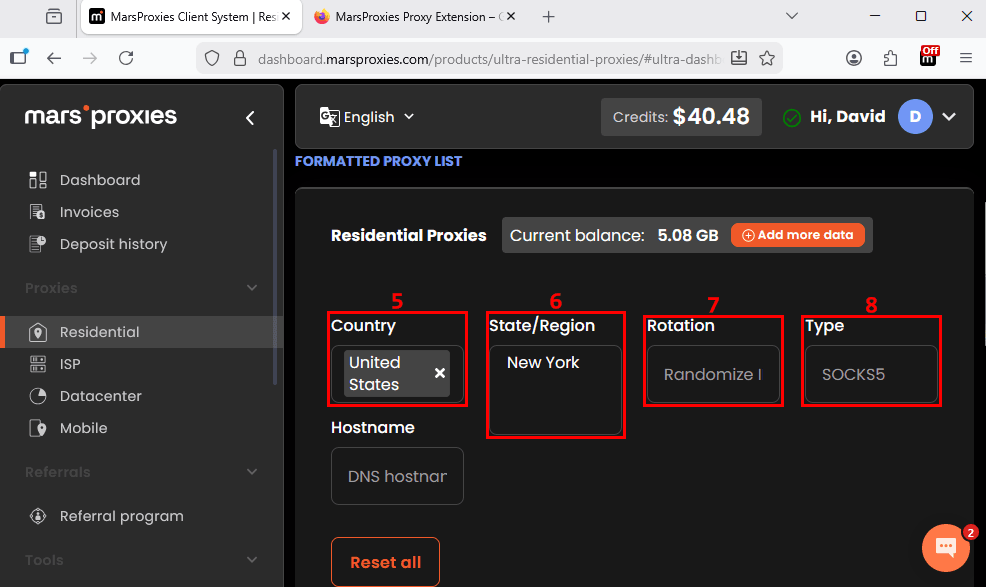
4. We’ll use our Residential Proxies. Click on 'Residential' (4) on the left side navigation menu.
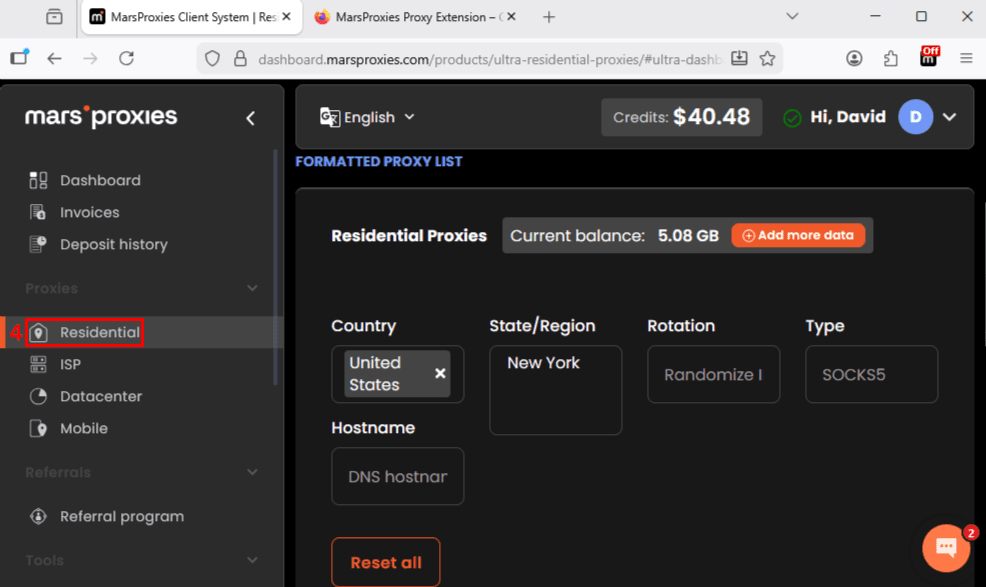
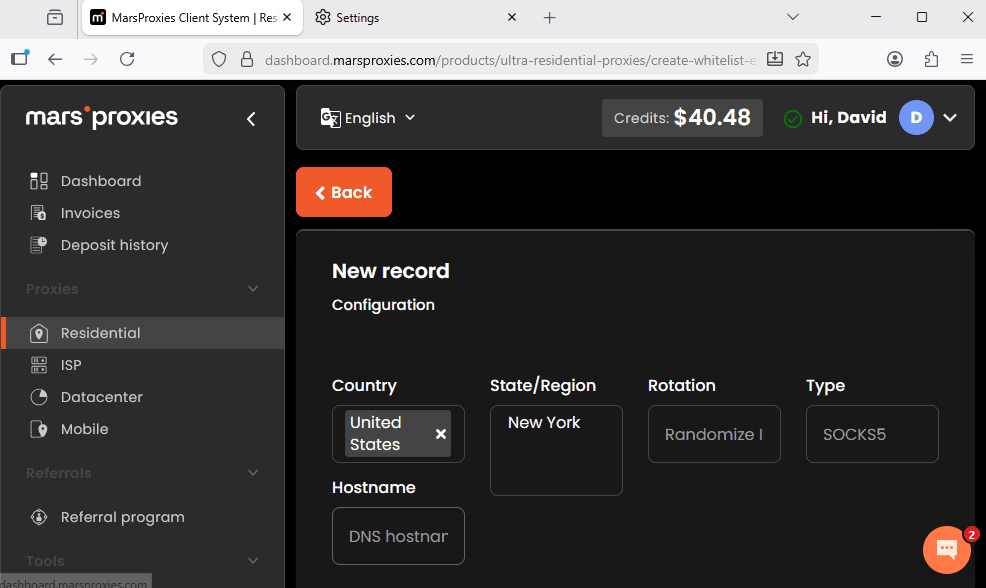
5. Select the desired proxy server country (5), specify the state or region (6) and rotation (7) if required, and, most importantly, set the type (8) to SOCKS5.
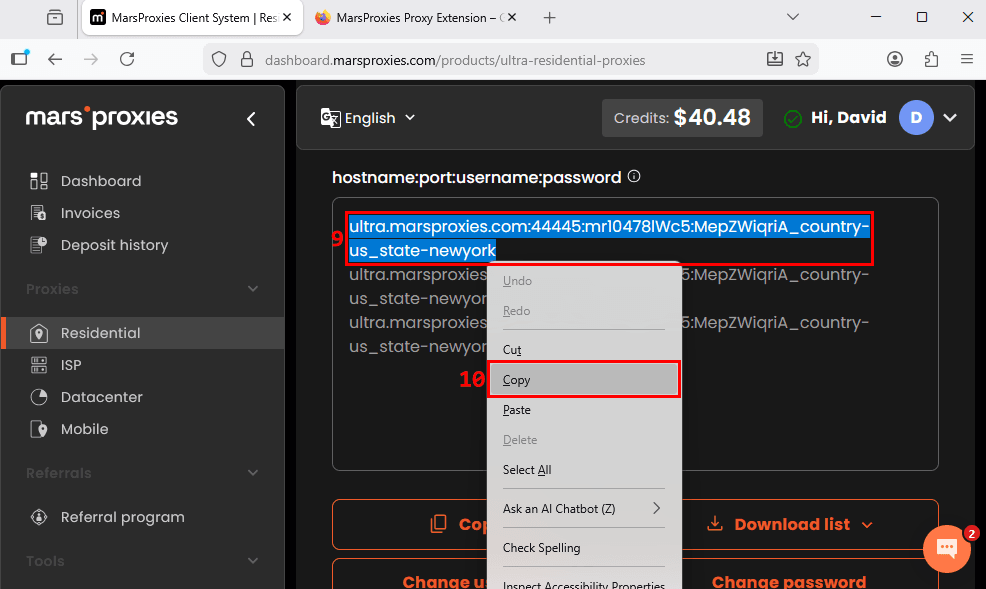
6. Scroll down to the 'hostname:port:username:password' section. Select one proxy string (9) and copy (10) it to the clipboard.
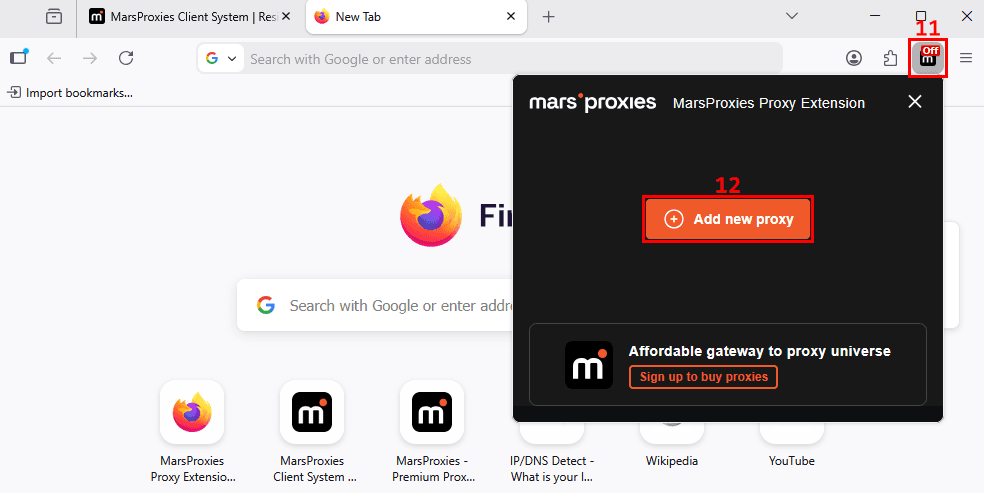
7. Left-click on the MarsProxies browser extension icon (11) in Firefox and click on the 'Add new proxy' (12) button.
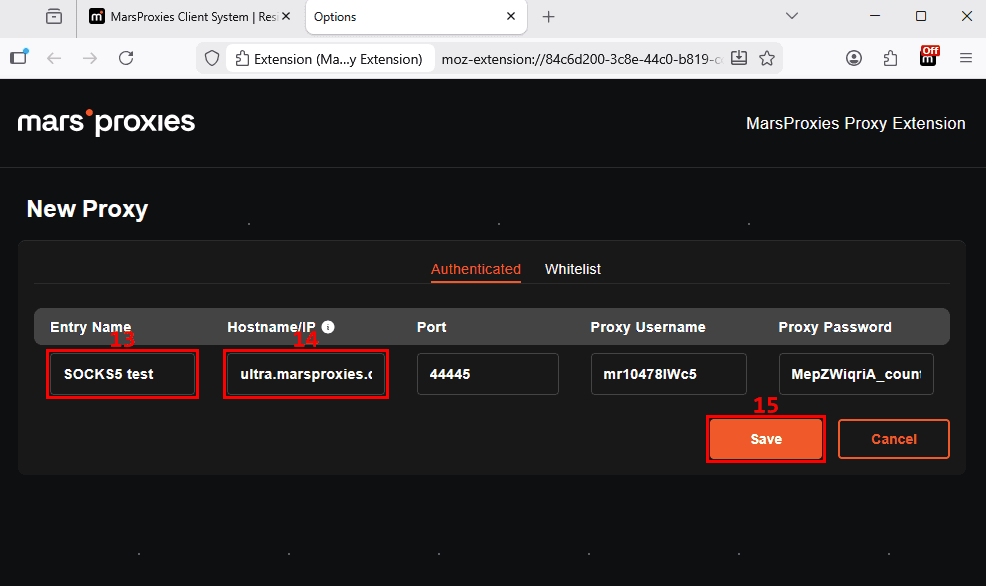
8. Name (13) your entry and paste the copied string into the 'Hostname/IP' (14) field. Our extension will autofill the rest. Click the 'Save' (15) button.
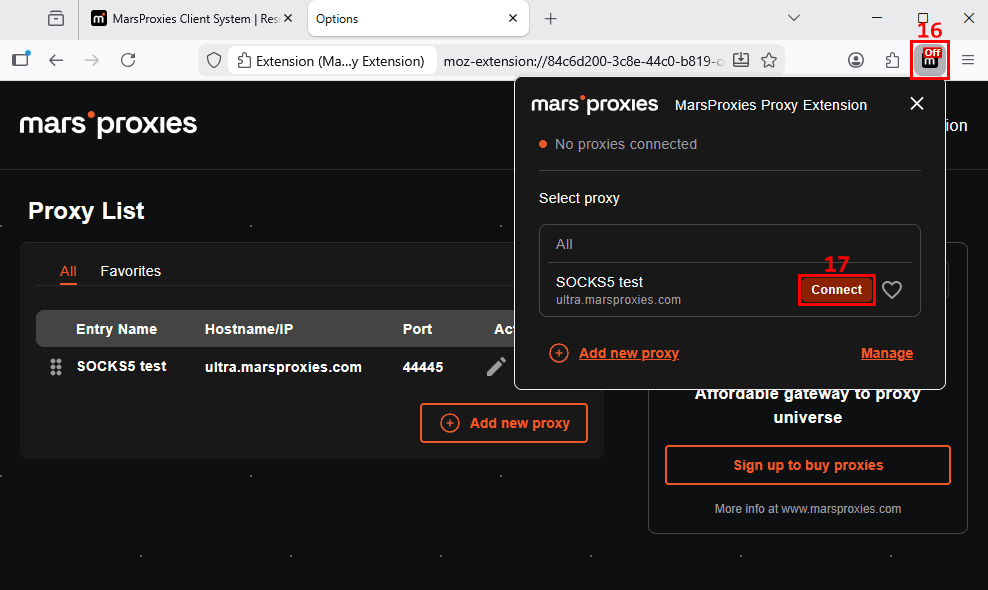
9. Left-click on the browser extension icon (16) again and click the 'Connect' (17) button next to your entry name.
That's it, now all your Firefox traffic goes through an intermediary proxy. Remember, you can always add more proxy entries and change your IP address with a few button clicks.
How to set up a SOCKS5 proxy in Firefox manually
Alternatively, you can use manual proxy configuration within Firefox settings. Here are the exact steps.
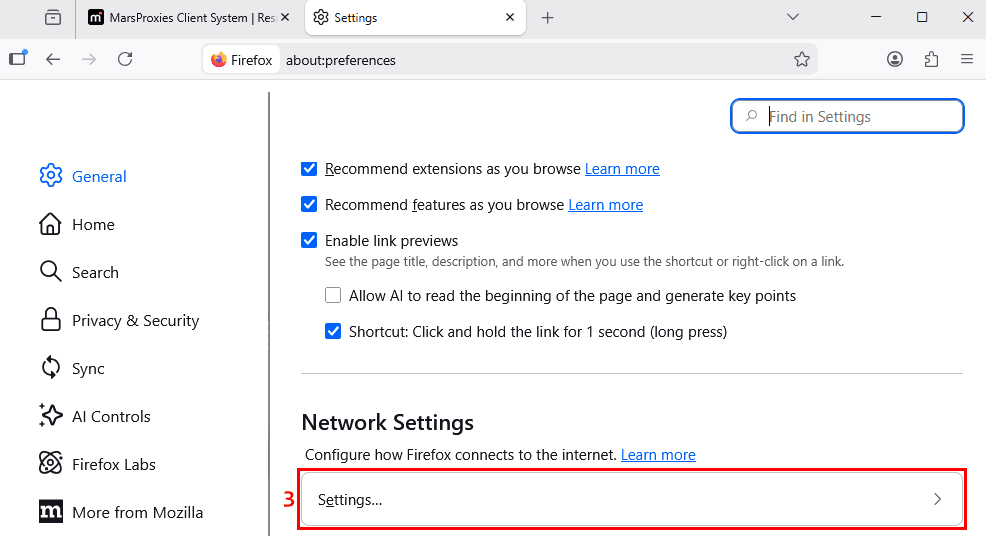
1. Left-click on the icon (1) with the three horizontal lines on the top right corner of Firefox and go to 'Settings' (2) near the bottom.

2. Scroll all the way down to the 'Network Settings' section and click on the 'Settings' (3) option.
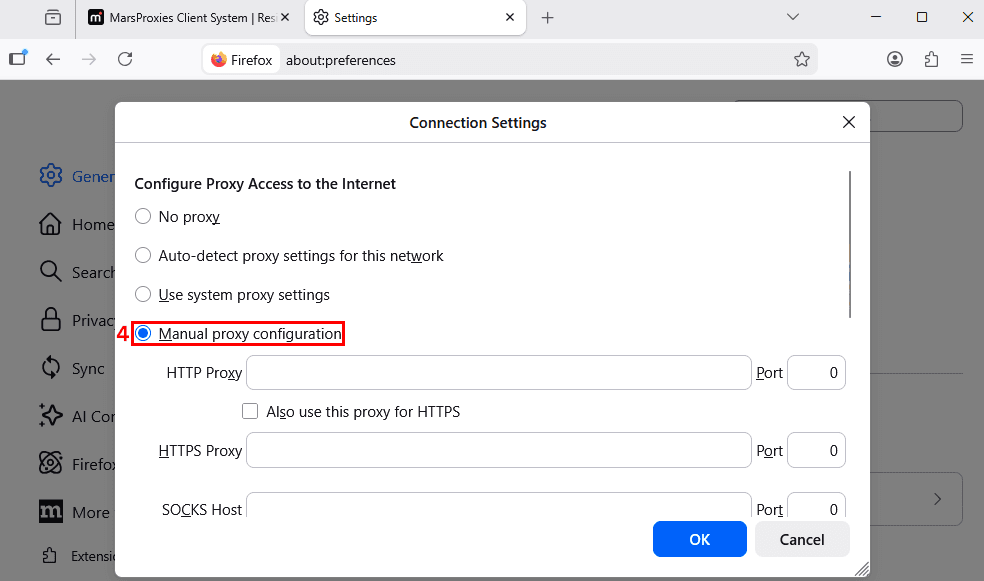
3. Select 'Manual proxy configuration' (4) in the 'Connection Settings' window.
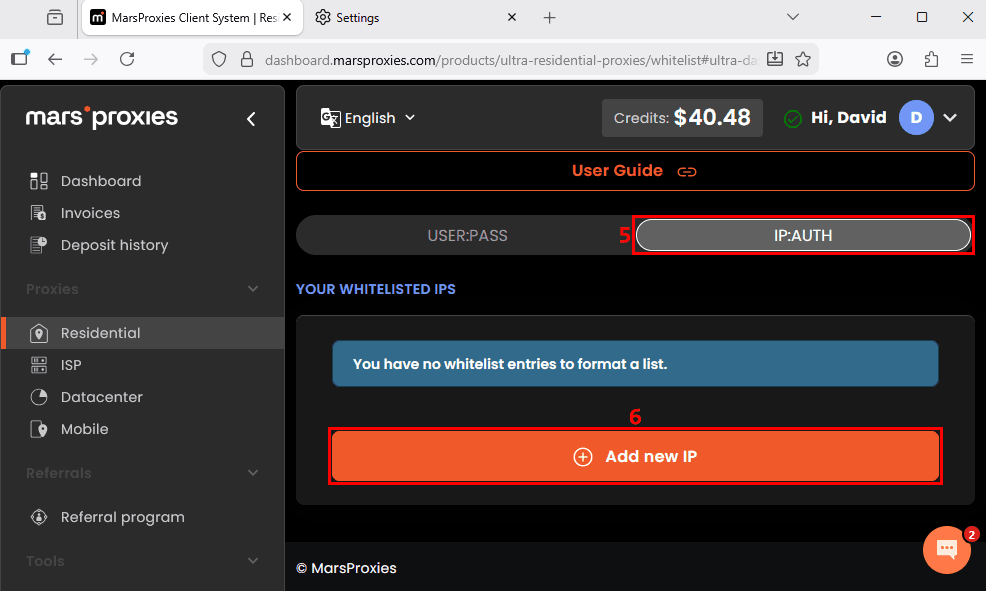
4. For now, leave this window and get back to the MarsProxies dashboard. Find the 'USER:PASS / IP:AUTH' (5) toggle and select the latter. Click the 'Add new IP' (6) button.
5. Once again, specify your desired proxy settings - location, rotation, and type. We will use the same SOCKS5 proxy in the United States, New York.
6. Scroll down to the IP section. In this field, you must write down your original IP address (7). You can find it on websites like IPLeak. Click the 'Create' (8) button.
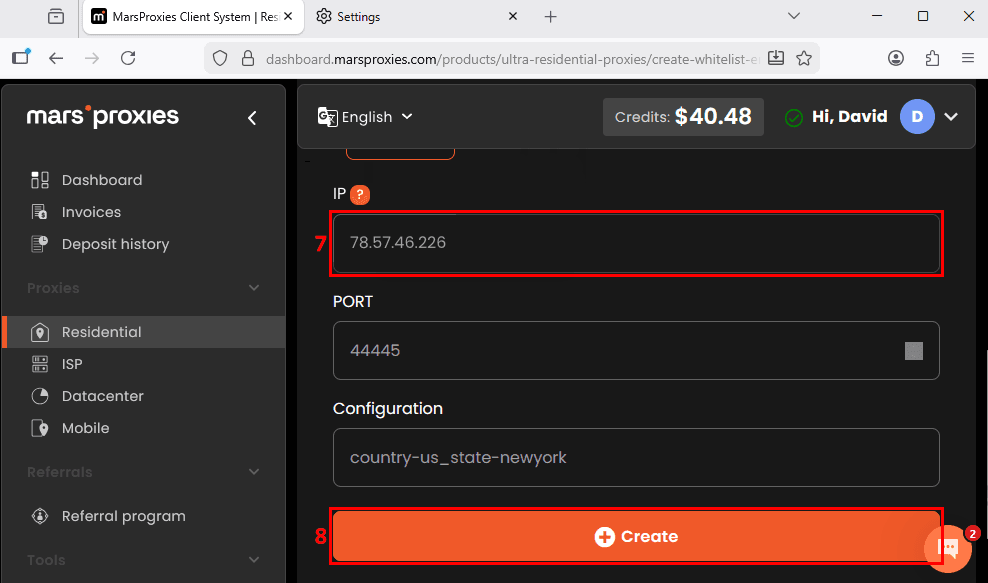
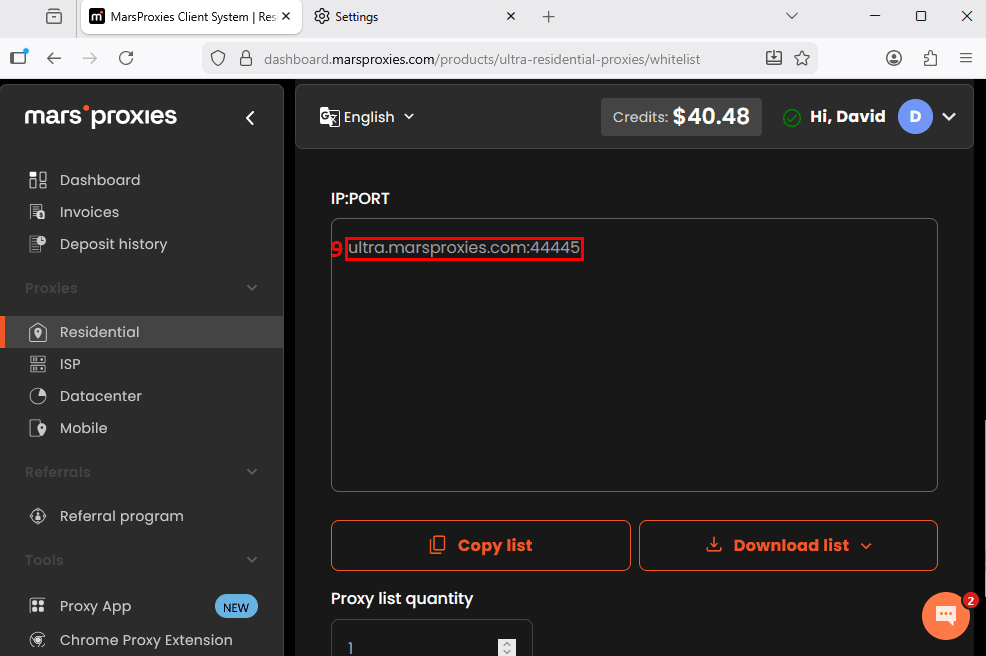
7. Scroll down to the IP:PORT section and copy the proxy string (9) to your clipboard.
8. Paste the proxy host in the 'SOCKS Host' (10) field. Paste the port number in the 'Port' (11) field. And choose the SOCKS5 proxy protocol (12).
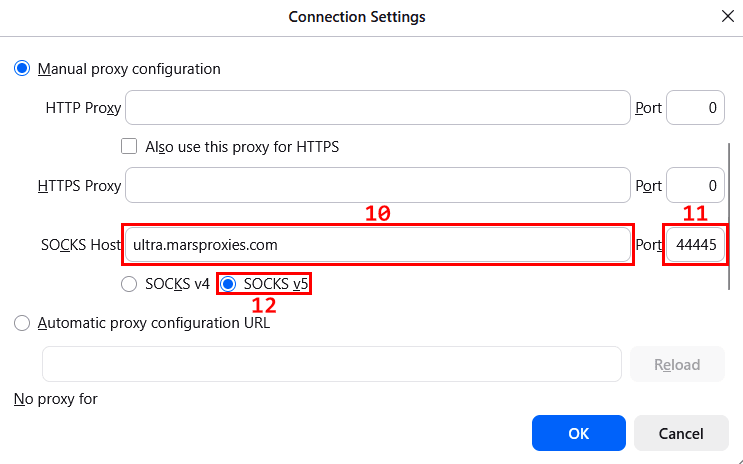
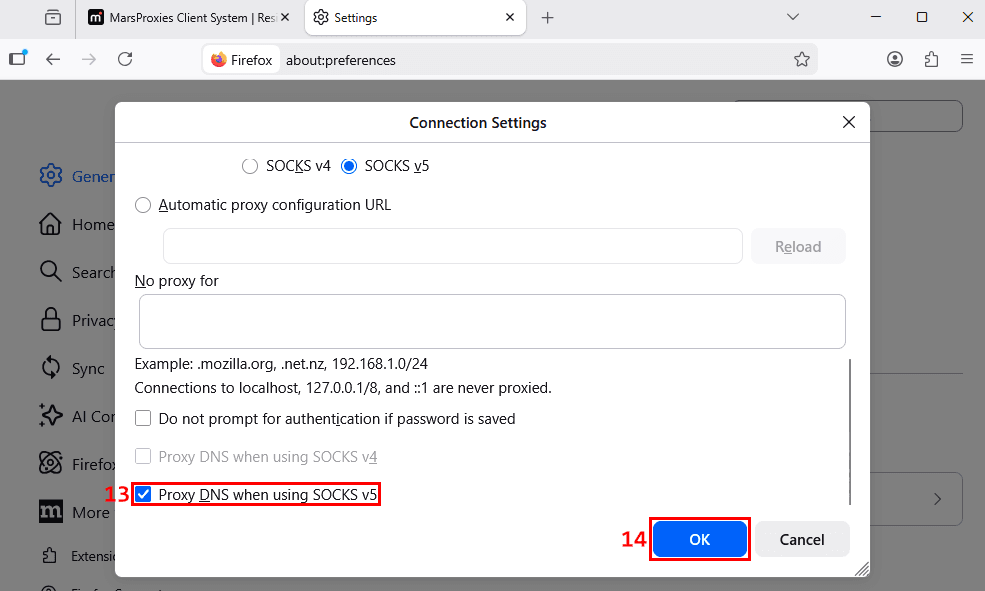
9. Scroll all the way down and tick the 'Proxy DNS when using SOCKS v5' (13) box. Click the 'OK' (14) button.
Like in the previous case, Firefox now routes your traffic through a SOCKS5 proxy. However, you will have to follow all the steps again whenever you want to switch IP addresses. With our extension, you only have to add your SOCKS5 proxies once.
How to check if your Firefox SOCKS5 proxy is working
In both cases, it's best to verify that the IP address has indeed been switched to the SOCKS5 proxy. Visit IPLeak to verify it.
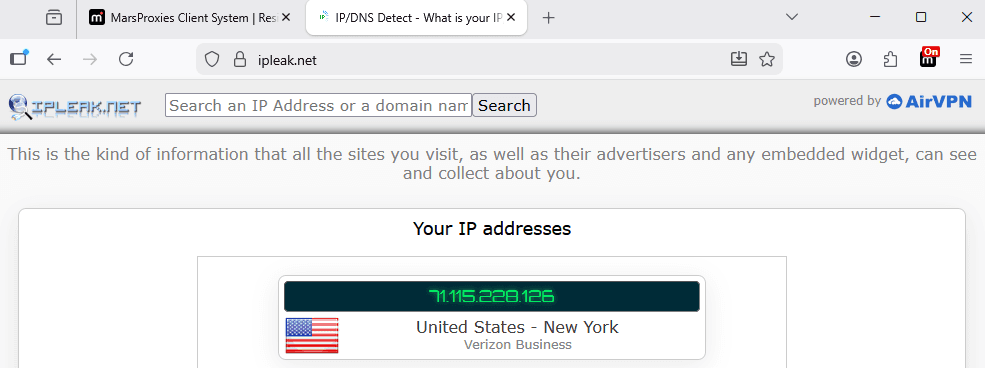
As you can see, we now have an IP address from New York, United States. That is exactly what we specified in our dashboard. Firefox now sends all its traffic through the selected SOCKS5 proxy.
If you scroll down a bit more, you will also notice a list of DNS addresses.
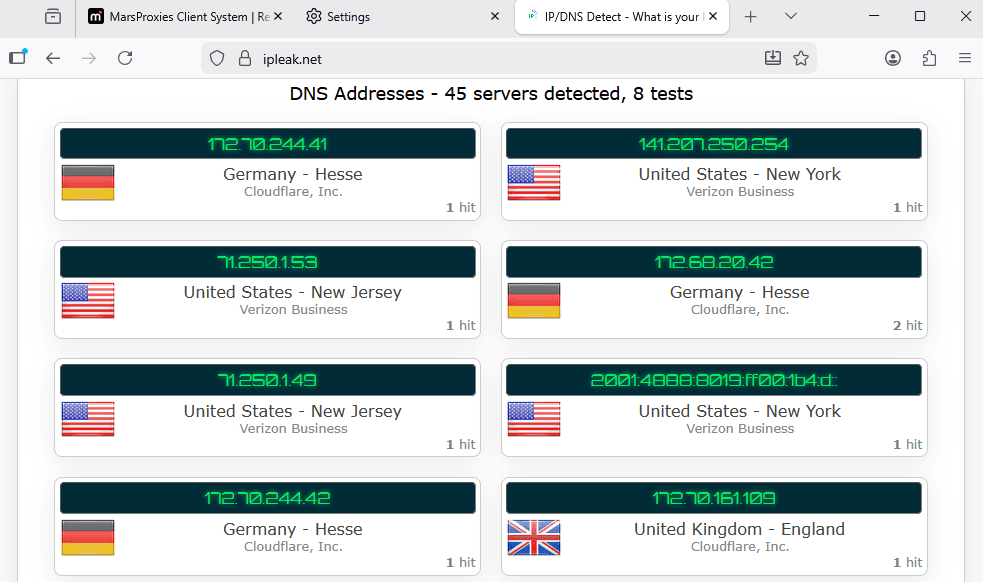
That means the SOCKS5 proxy resolves DNS queries using remote DNS servers. It prevents DNS leaks and also helps bypass geographical restrictions and firewalls.
Firefox SOCKS5 proxy not working? Fix these issues
Before concluding, we'll list common SOCKS5 proxy errors so that you can immediately jump to the solution if you encounter one.
Authentication failures
Firstly, double-check that you correctly wrote down the proxy username and all proxy credentials. Inspect the words for mistypes and special symbols.
If everything's correct, clear the saved proxy credentials in Firefox. Go to ‘Settings’, then ‘Privacy & Security’, then ‘Saved passwords’ and delete proxy credentials. Then re-enter them manually and try to connect to the proxy again.
Sites not loading
If all sites are not loading, then Firefox fails to connect to the proxy at all. Ensure that you have selected the SOCKS5 proxy type in all required fields. Verify that you have written down the proxy port number and SOCKS host correctly.
If your proxy still doesn't work, it may be experiencing downtime. Find any free online proxy tester tool, paste your proxy string in the required format, and it will outline whether it's working as it should.
DNS leaks
If you notice DNS-related issues, verify that you have checked the 'Proxy DNS when using SOCKS v5' box in Firefox proxy settings. If you did, your proxy may be genuinely leaking DNS queries, and you should look for a safer alternative.
Traffic not routing as expected
Similarly to DNS leaks, check for IP leaks also. If you notice that you, for example, cannot bypass geographical restrictions, you may still be using your original IP address.
Also, some proxy providers use virtual IPs. The proxy server may be located in one country, but it displays an IP address in another. This is no good, because your traffic is routed to the physical proxy server.
Final words
It may seem like there are many steps in this process, but they are all very simple. Once you do it a few times, you will be connecting to a different SOCKS5 proxy within minutes.
You can use our MarsProxies Firefox proxy extension with proxy username and password authentication for quick and easy switching between different profiles. If you prefer to use just one, you can manually change Firefox network settings by whitelisting your IP address first.
Can I use a SOCKS5 proxy in Firefox without an extension?
Yes. Firefox is one of the few browsers with built-in proxy settings. You can change its network settings to manually add SOCKS5 proxy details and use it without an extension.
Can I use the MarsProxies Firefox extension with another proxy provider?
Yes. The MarsProxies Firefox extension supports proxies from any provider.
Does Firefox send DNS through SOCKS5?
No. Firefox routes DNS queries through a SOCKS5 proxy only if you first set it up manually in its settings.
How do I know if my Firefox SOCKS5 proxy is working?
The best way is to verify whether your IP address has been changed to the SOCKS5 proxy. Search online for free IP lookup tools. If you see your original IP address, then the SOCKS5 proxy is not working.
Why is my Firefox SOCKS5 proxy not working?
There are several reasons. Your proxy may be experiencing downtime. You may have written down its details incorrectly. If the proxy uses authentication, ensure your proxy username and password are correct. And don't forget that configuring a proxy in Firefox settings requires IP whitelisting.
How do I disable a SOCKS5 proxy in Firefox?
Click on the three horizontal lines in the top right corner of the Firefox screen. Go to ‘Settings’, choose ‘Network Settings’, and select the ‘No proxy’ option there.