Key takeaways:
- Set up a proxy on Mac in minutes by entering your server address, port, and authentication details.
- Choose the right proxy (residential, datacenter, ISP, or mobile) based on whether you need anonymity, speed, or session stability.
- Confirm your proxy is working by checking your IP address and testing your connection before you start browsing or automation tasks.
To set up a proxy on Mac, all you need is a reliable set of IP addresses and a minute inside your System Settings. This guide walks you through how to use a proxy on Mac without confusion, showing you where the proxy settings are located and how to adjust them properly.
What you need before setting up a proxy on Mac
A smooth proxy server setup depends on having the correct details in place before you touch the Mac proxy settings.
- Proxy server address
Start with a good proxy. Avoid free IP lists - most are often flagged or unstable. Go with a trusted provider like MarsProxies and choose the right set of IP addresses for your needs.
- Port number
Every proxy uses a specific port number to route your traffic to the correct server endpoint. The exact port depends on your proxy and is listed in your dashboard.
- Username and password
Premium providers require a username and password, or you can whitelist your IP instead. If your IP address changes frequently, using login credentials is usually better since they continue working even when your IP changes.
- Proxy server type
Choose the proxy type that best fits your use case. Residential proxies are best for anonymity. Datacenter proxies prioritize speed. ISP proxies offer a balance of stability and performance. Mobile proxies simulate real mobile traffic within your Mac proxy settings.
How to set up a proxy on Mac
This tutorial uses macOS Tahoe 26.3 to show how to use a proxy on Mac. Earlier versions are similar. The most significant difference is that 'System Preferences' is now called 'System Settings'.
Let’s walk through the Mac settings you need to change:
Open network settings
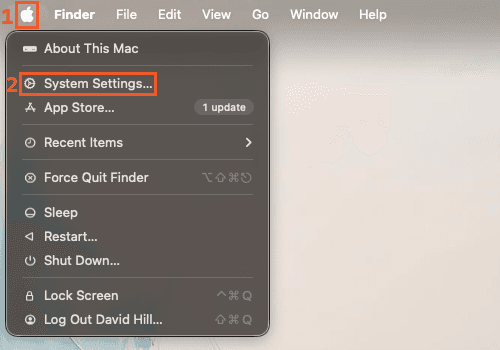
- Step 1: Click the Apple icon (1) in the top-left corner of your screen. Choose 'System Settings' (2) from the menu.
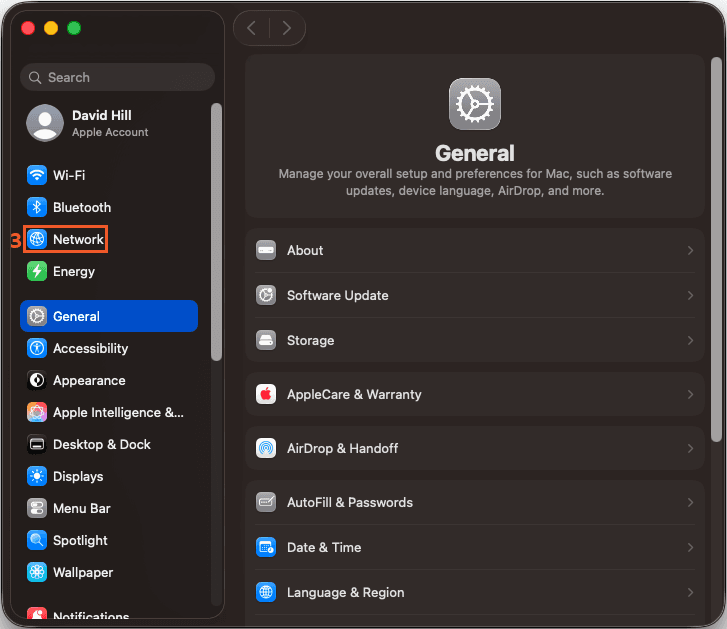
- Step 2: Inside the new window, click 'Network' (3) in the left-side menu.
Choose your active connection
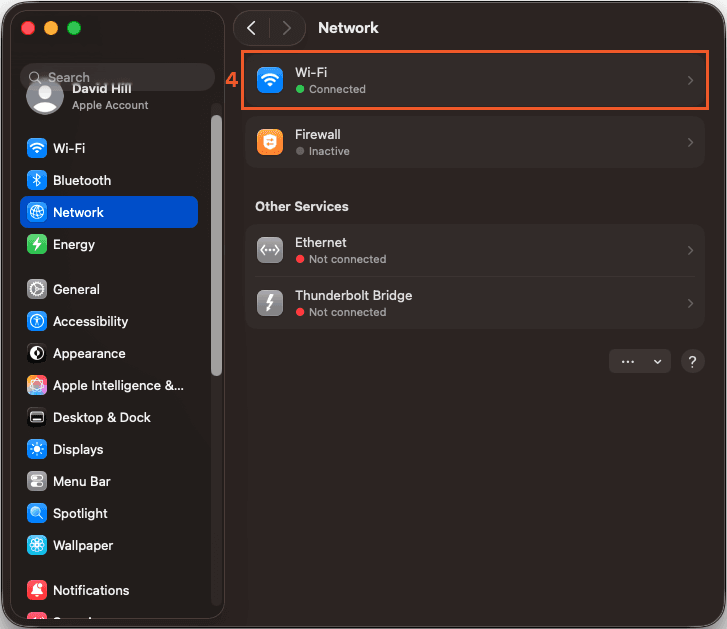
- Step 3: Select your active connection (4) to configure the proxy.
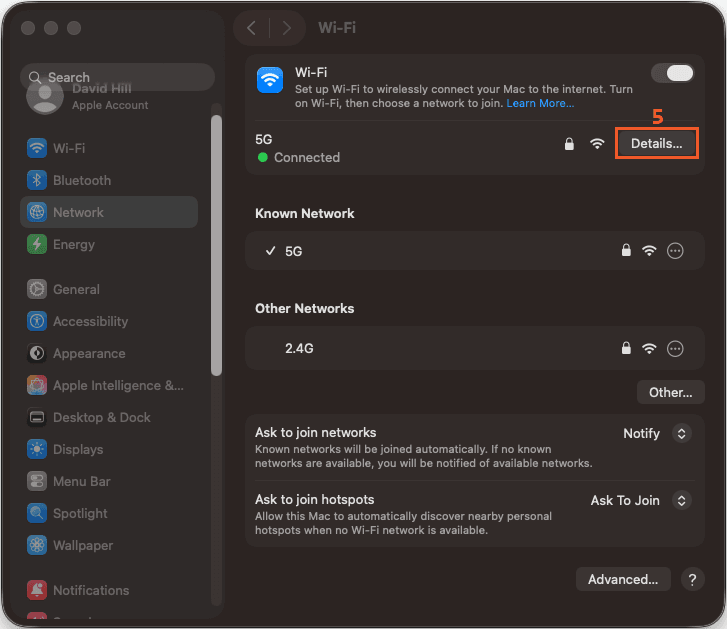
- Step 4: If you are on Wi-Fi, find the connected network and click 'Details' (5) next to it.
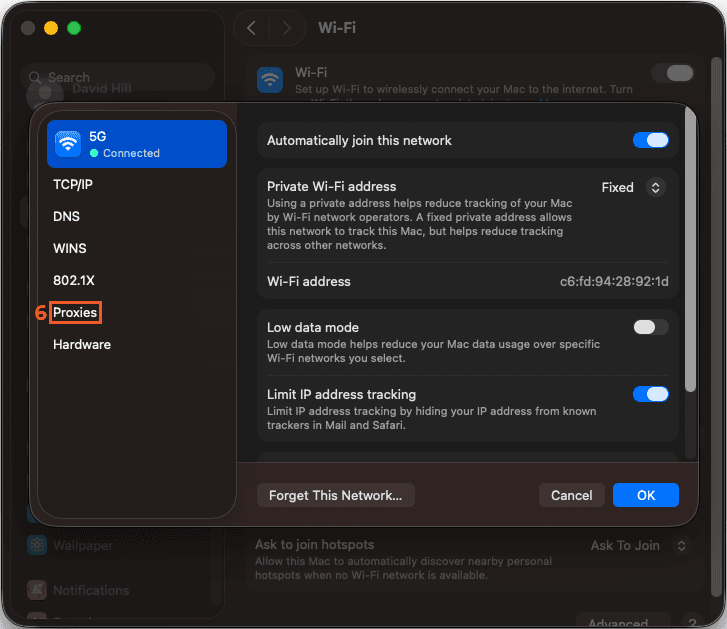
- Step 5: In the new view, click the 'Proxies' (6) in the left-side menu to access the proxy settings.
Access proxy configuration
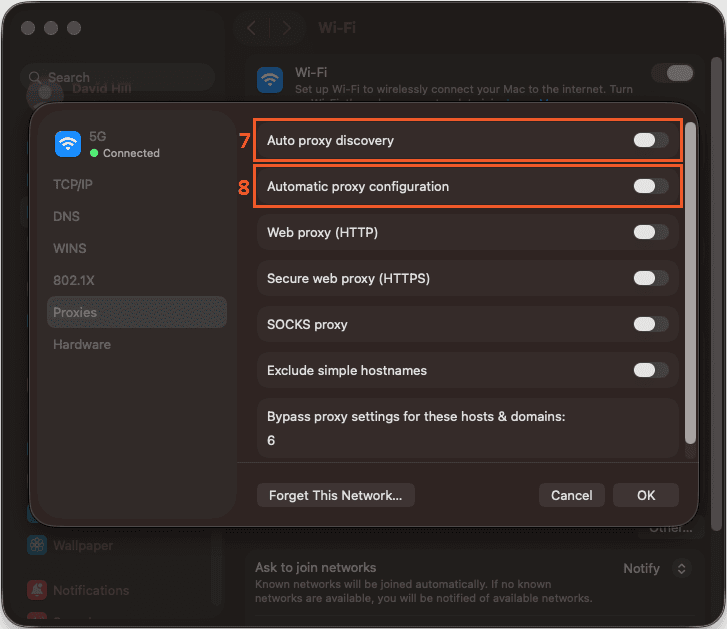
- Step 6: Several proxy configuration options appear. Enable 'Auto Proxy Discovery' (7) if your network automatically provides proxy settings. Use 'Automatic Proxy Configuration' (8) if you have a configuration URL from your network admin.
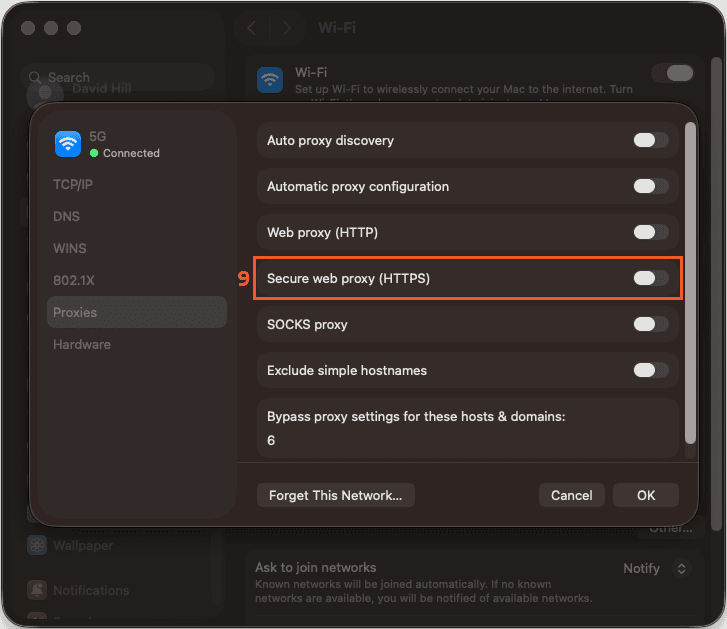
- Step 7: If you are using a third-party proxy, leave those options off. Choose the correct type of proxy. We'll be using 'HTTPS Proxy' (9) for this tutorial.
Enter proxy details
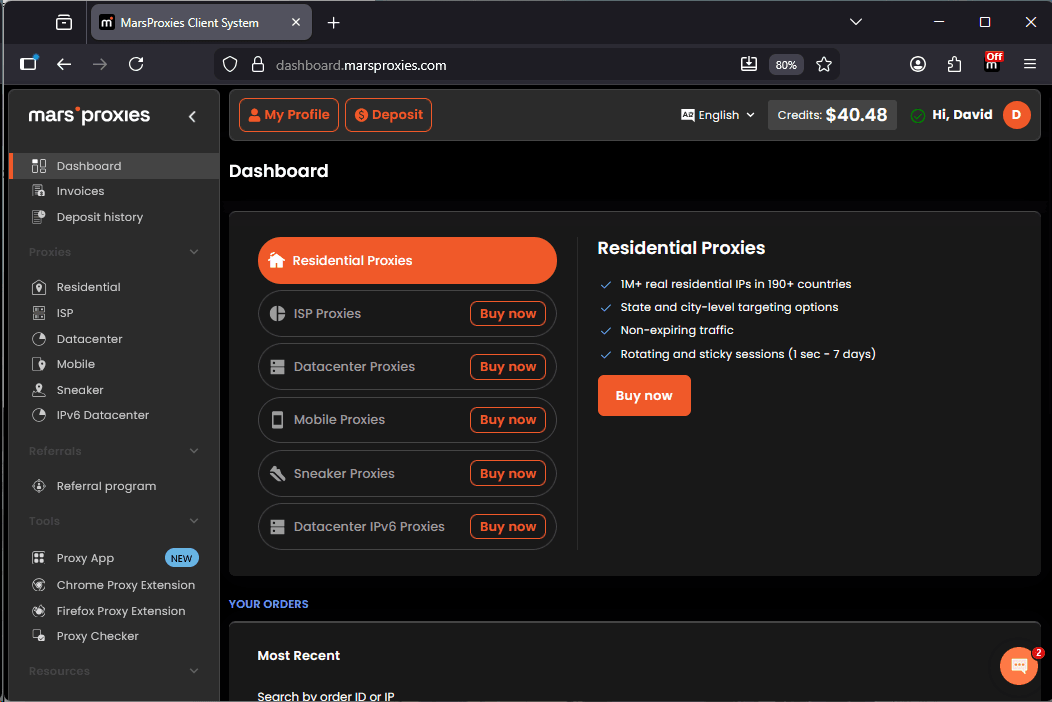
- Step 8: Open your MarsProxies dashboard to configure your proxies.
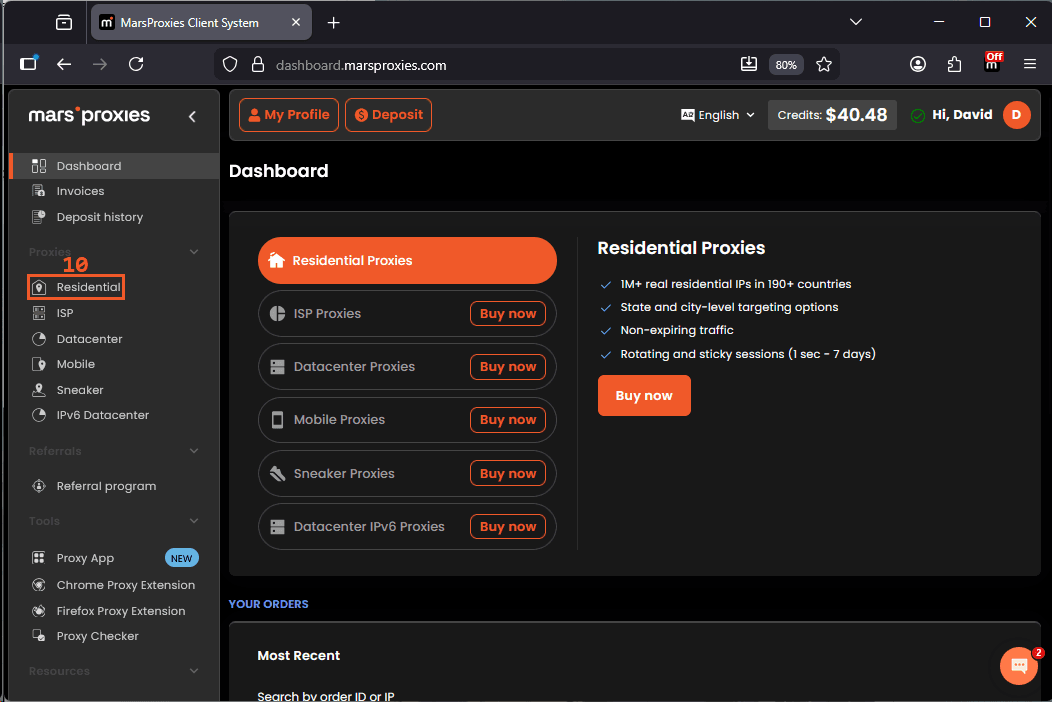
- Step 9: Let's use Residential Proxies for their anonymity advantage. Click 'Residential' (10) in the left-side menu.
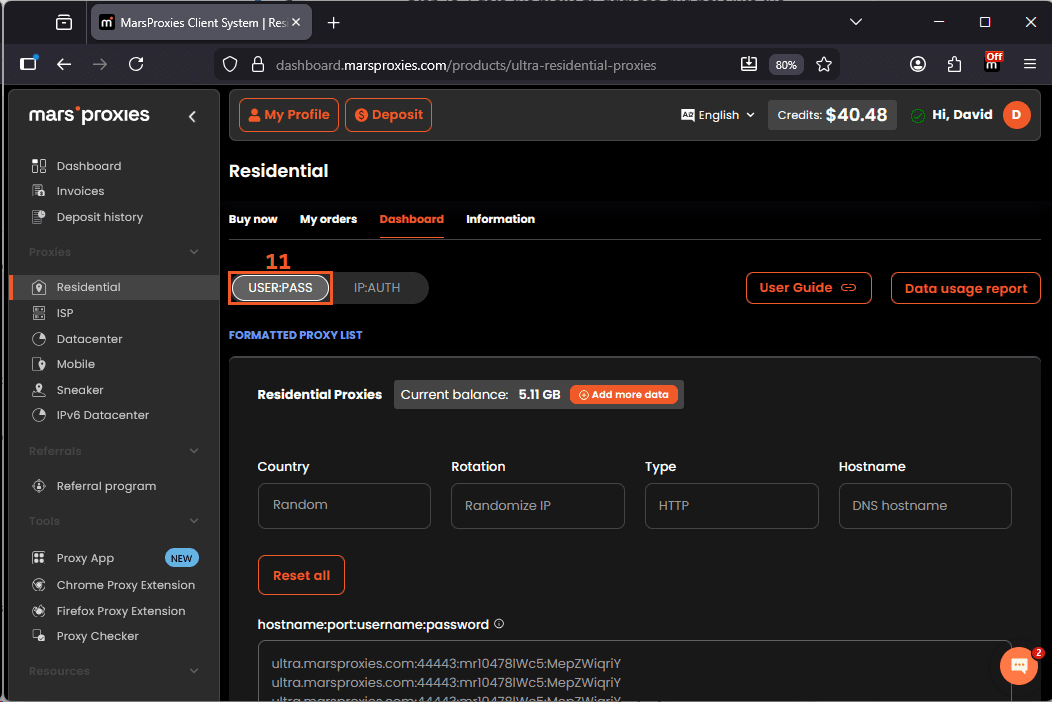
- Step 10: We are going to use Username/Password authentication for this example. Select 'USER:PASS' (11).
- Step 11: Configure your residential proxies by choosing the Country (12), State/Region (13), Rotation (14), Type (15), and Session duration (16).
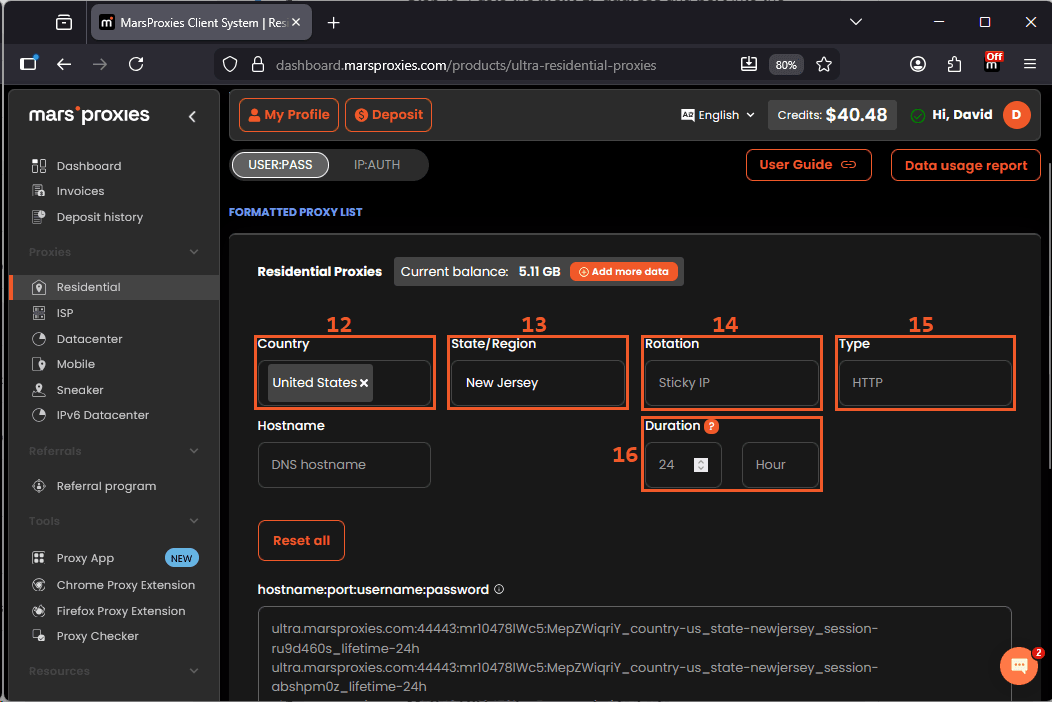
- Step 12: Copy the proxy address, port, username, and password (17) from the box below.
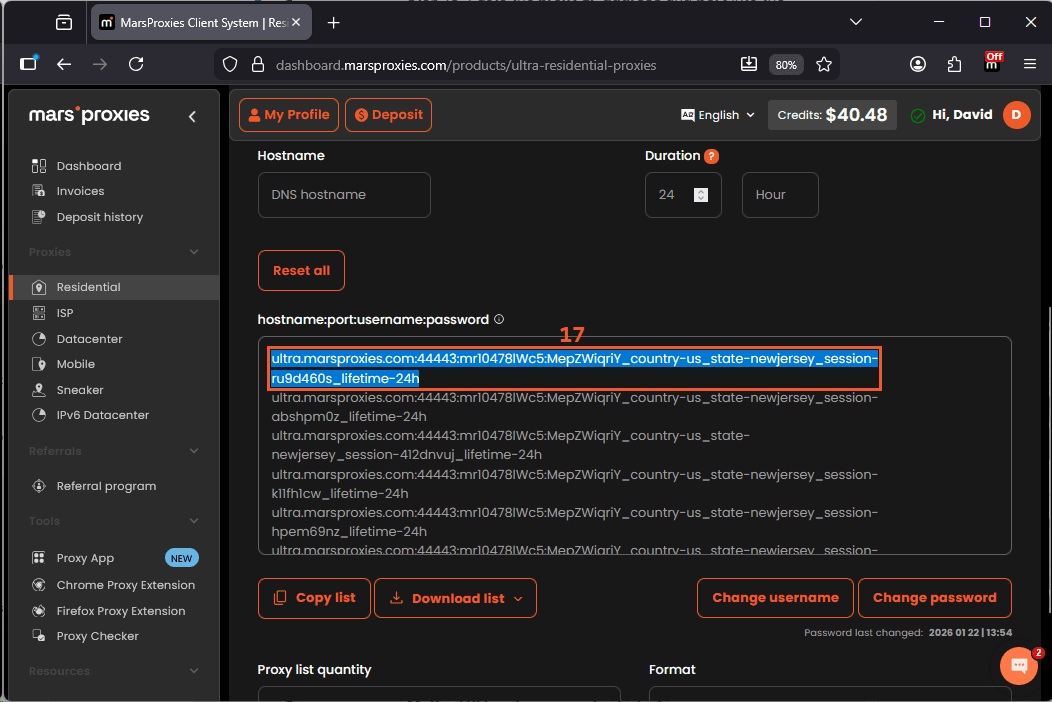
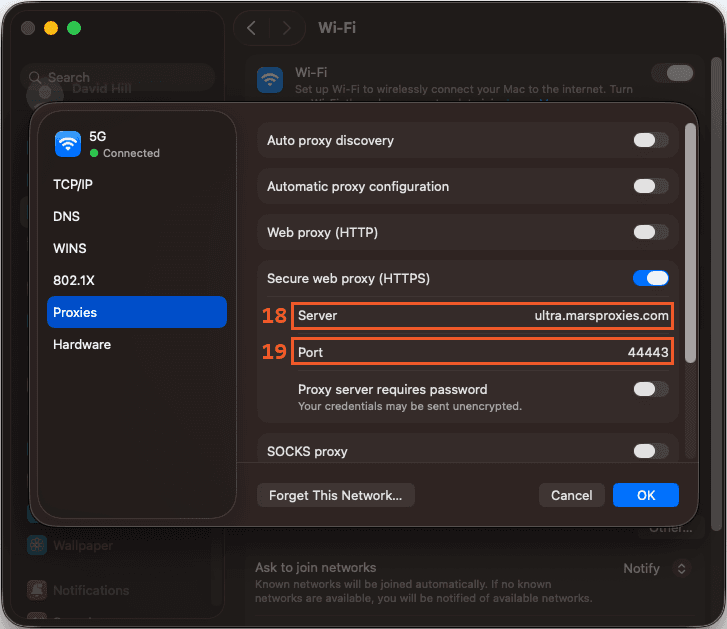
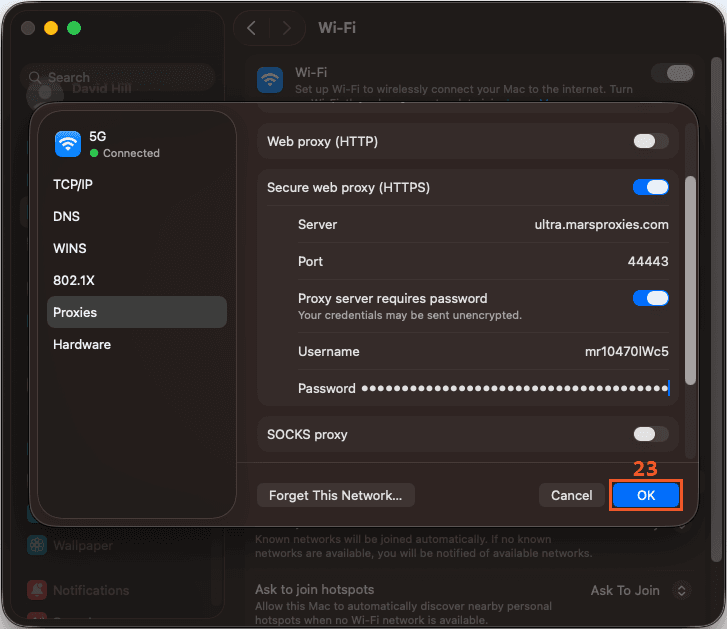
- Step 13: Paste the proxy IP address (18) and port (19) into the corresponding fields.
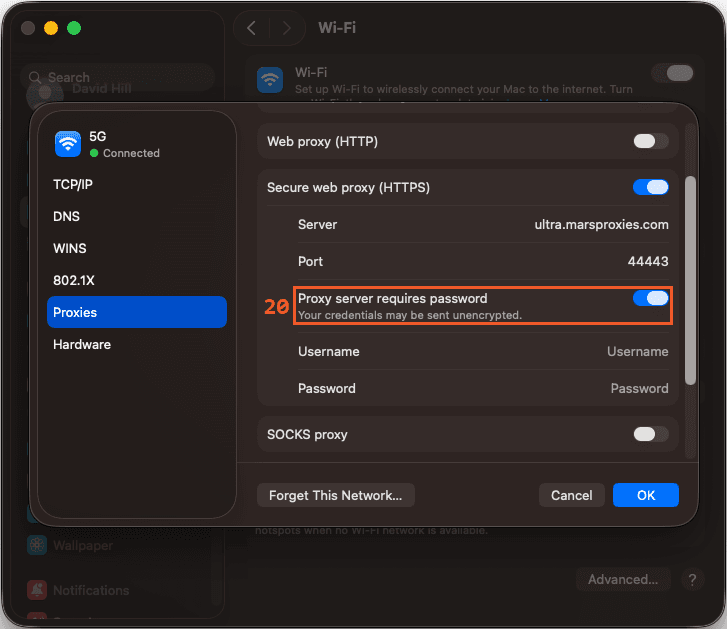
- Step 14: Because we chose username and password authentication, enable 'Proxy server requires a password' (20).
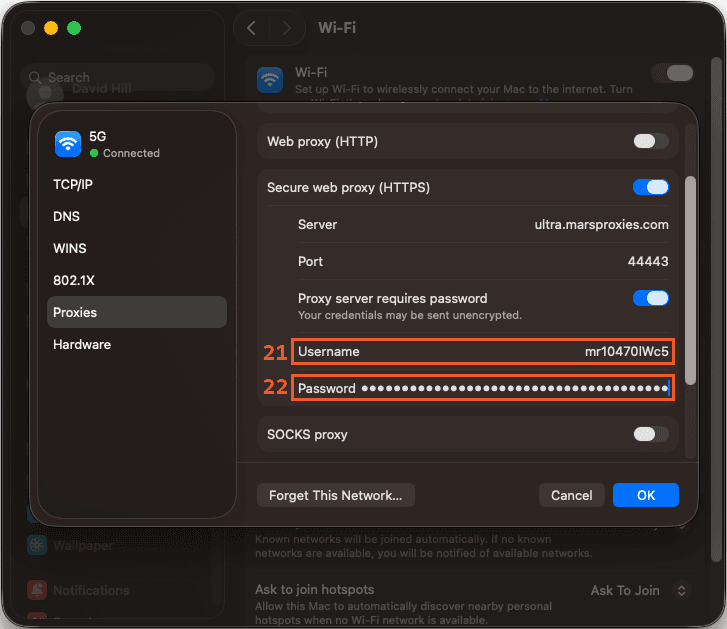
- Step 15: Enter the username (21) and password (22) you copied from the MarsProxies dashboard earlier.
Apply changes
- Click 'OK' (23) to apply the changes and start using your proxy.
Alternatively, read this guide to set up a proxy on your iPhone or iPad.
How to check if your proxy is working
Now that your proxy is enabled, let’s confirm it’s working. Here are three simple checks.
- Method 1: Check your IP before and after
Before enabling the proxy, note down your public IP. After enabling the proxy, visit an IP checker site like WhatIsMyIPAddress and check your new IP. The location should match your proxy’s location. If it doesn’t, check the proxy settings in the 'Proxies' tab.
- Method 2: Load a geo-restricted site
Visit a site that's not available in your location but is available in the proxy server’s location. If it loads, your proxy is working. If it doesn’t, check that you selected the correct proxy protocol (HTTPS in our case) and that no automatic configuration file is interfering.
- Method 3: Check traffic routes
For more thorough testing, use cURL in 'Terminal' to test outbound traffic. The returned IP should be your proxy server’s, not yours.
Common proxy problems and fixes
After adjusting your Mac network settings, you may notice connection issues. Most problems are caused by incorrect proxy settings or network conflicts. Here is how to fix them.
Internet stops working
If your internet stops working after setting up your proxy, the issue is usually an incorrect IP address or port number. macOS cannot connect to the specified proxy address.
Open 'System Settings', return to 'Network', and review the 'Proxies' tab. Confirm the server address, port, and selected type of proxy match your proxy details.
Authentication errors
If websites load but show proxy authentication errors, review your credentials. A small mistake in your username or password can block the proxy.
Check your provider dashboard and confirm your current IP is approved if you’re using IP whitelisting. Then update the proxy details.
Some websites not loading
If certain sites fail to load while others work fine, the proxy may be blocked by that domain. This does not always mean the proxy settings failed.
Go to the 'Proxies' option and add those domains to the bypass list. This allows direct access without routing through the proxy.
Proxy keeps turning off
If the proxy disables itself, another tool may be overriding your proxy settings. VPN software and some security applications can change your proxy settings automatically.
Check whether a VPN is active. Also, review your proxy settings to confirm no automatic proxy configuration or PAC file is being applied.
How to disable or change proxy settings on Mac
To turn off a proxy server, open 'System Settings' and go back to 'Network'. Select your active connection, open the 'Proxies' option, and uncheck (1) any active configurations. Once you’re done, click 'OK' (2) to save your settings.
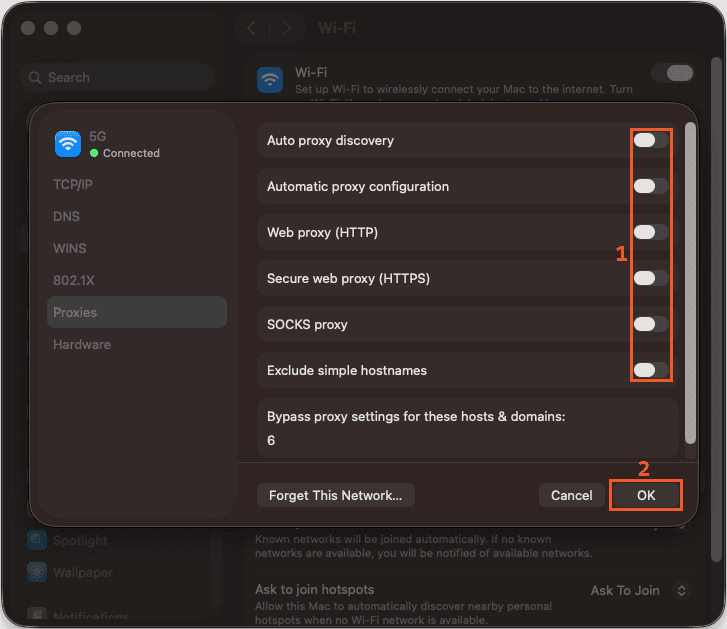
To change the proxy settings, adjust the proxy address or port directly in System Preferences. You can also switch between a Web Proxy (HTTP), Secure Web Proxy (HTTPS), or a SOCKS Proxy if needed.
Your proxy settings stay stored even after disabling the proxy. This allows you to restore the same setup later without retyping the proxy IP or login details.
Proxy types explained
Account management, web scraping, geo-targeted browsing, ad verification
Yes, if you need real-user IPs and a lower detection risk
High-speed scraping, bulk tasks, automation at scale
Yes, if speed matters more than anonymity
Stable sessions, long logins, ecommerce accounts
Yes, if you need both consistency and a residential footprint
Mobile app testing, social media automation, mobile traffic simulation
Yes, if your workflow depends on mobile IP reputation
Standard browser traffic routing
Yes, for simple browsing tasks
Flexible traffic handling, apps beyond the browser
Yes, if you need broader protocol support
Automatic vs manual proxy setup
You can set up a proxy manually or automatically. Each method handles traffic differently.
Manual proxy
Manual setup means you enter the proxy details yourself, including the proxy address, port, and authentication in your proxy settings. This mirrors the setup we completed earlier in this tutorial.
This method is best if:
- You ordered a proxy directly from a provider
- You need a fixed proxy address
- You need to change proxy settings on demand
- You manage scraping or account workflows on one device
- You want direct control
Automatic proxy setup
Automatic proxy configuration uses a PAC file in the 'Proxies' tab. This file defines how the proxy server is applied, and macOS follows the instructions in the file.
The PAC file can:
- Route external traffic through a proxy server
- Allow internal domains to bypass the web proxy
- Apply different proxy server rules to selected requests
- This approach is typical in managed environments.
Why use a proxy on macOS?
Here are some of the top reasons to enable a proxy server on your Mac:
- Privacy
A proxy server hides your IP address and replaces it with the proxy address. This reduces the direct link between your activity and your home connection.
- Geo-blocking bypass
Using a proxy server makes you appear in a different location, because the assigned IPs can unlock region-specific platforms and testing environments.
- Secure browsing
When set up correctly, a web proxy reroutes requests securely through a defined proxy address instead of sending them directly from your device.
- Public Wi-Fi safety
On public Wi-Fi, enabling a proxy server prevents your real IP from being exposed to every destination server.
How do I change proxy settings on a Mac?
Open your Mac’s System Preferences, select your connection, go to Proxies, then update the address, port, or change the type of proxy.
How do I turn off a proxy on Mac?
Open your Mac’s System Preferences, go to Proxies, uncheck any enabled proxy options, then click OK to save.
Why is my internet not working after enabling a proxy?
An incorrect IP address or port number may prevent the connection. Verify your proxy server settings and confirm your authentication details.
How do I know if my proxy is working on Mac?
Visit an IP checker website and confirm your displayed IP matches the configured proxy server location.
Does macOS support SOCKS5 proxies?
Yes. macOS lets you configure a SOCKS5 Proxy in your Mac’s network settings.